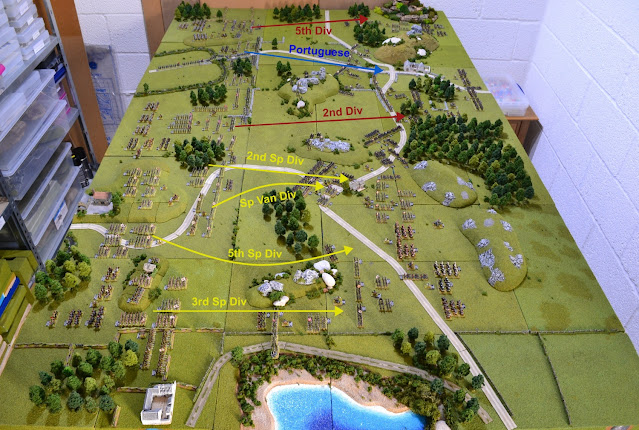
The objectives for each allied Division. |
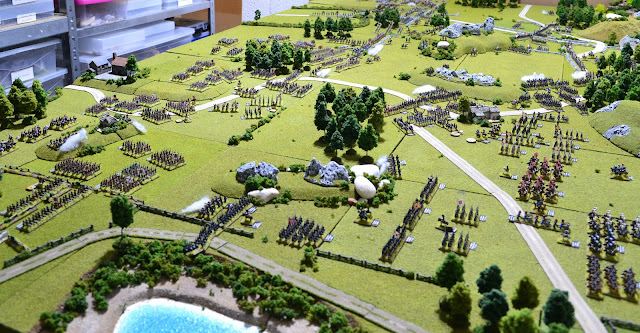
Turns 1 - 4
The objectives for each allied Division. |
Turns 1 - 4
You will be able to find the strategic background to this battle in the last "Map Moves" posting which is located under the "Napoleonic Campaign Map Moves" label on the right.
The compliment of Native Americans has been completed, albeit 120 short of the 600 mounted figures recommended in the rules. Having seen advice that 480, or even 360, should be enough I have decided to leave it at that. There will be tepees and Bison to be painted up in due course.
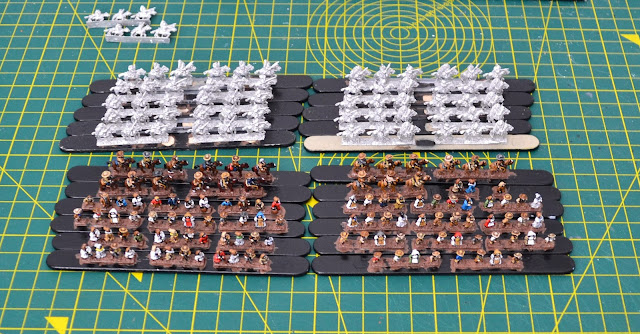
The completed Natives. On the left is a pack of dismounted Braves and a pack of villagers. |
The most recent figures just completed. A pack of 120 mounted Braves. |
Prior to the Natives, a pack of Settlers and Civilians was completed. The wagons had been done previously. |
Table Size: 6' x 3'9"
Figures: 6mm Mostly Baccus and some Rapier
Rules: My own (based on General de Brigade)
ORDERS OF BATTLE
Roman
1 x CinC + 2 sub-commanders
Auxiliaries -
Durotriges
1 x CinC + 2 sub-commanders
Total 642 figures
An overview at the start. The Romans deploy around the fort with all infantry ready to form testudos when necessary. |
I am acutely aware that my blog posts are becoming a little rare of late! A combination of real world commitments and, dare I say it, a lack of wargaming mojo. I have the Roman invasion of Britain battle on the board but it is progressing at a snails pace. I do though try and maintain some sort of momentum in painting and modelling. Even if it is only half an hour during the morning.
To that end, here is an update on what I have been working on. Since January it has all been terrain, ships and planes. This is probably just about the longest spell where I have not painted any figures. A couple of weeks ago I decided it was high time that I made some progress on other projects. First up was Pony Wars.
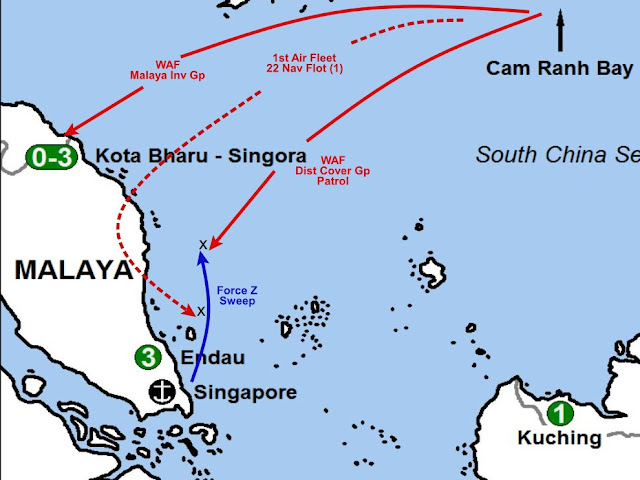
Rear Admiral Arthur Palliser commanding the WESGROUP sweep breathes a sigh of relief having successfully evaded any Japanese patrols. It was now important to locate the Batu Kharu supply convoy to buy the allies time. His flagship, the heavy cruiser Exeter, with the light cruisers Dragon and Durban, the destroyers, Encounter, Jupiter, Scout and Tenedos, heads north straight into a force 8 gale.
Visibility was heavily reduced and WESGROUP searched in vain. Unable to locate the convoy they head for home in Singapore.
Several damaged Japanese ships are drydocked for repair bringing turn 1 to an end.
There will be a delay before I return to this campaign having switched to another era, the Roman invasion of Britain which will be the subject of the next posting.
IJN Western Attack Force (WAF) - Allied WESGROUP (RN)
Rear Admiral Arthur Palliser commands the WESGROUP sweep intending to intercept the Batu Kharu supply convoy. His flagship is the heavy cruiser Exeter, with the light cruisers Dragon and Durban, the destroyers, Encounter, Jupiter, Scout and Tenedos sailing out of Singapore. Intelligence has been received from a sub reporting a sighting of what is believed to be this convoy. It has been confirmed this intelligence has been deemed accurate and therefore increasing the possibility of interception.
The weather is a rough Force 7 and overcast reducing visibility. As the fleet heads north Japanese land-based aircraft sortie to intercept but failed to locate them.
The wind drops to a Force 5 and still cloudy. Palliser curses the weather improvement raising the prospect of his force being located by the Japanese Distant Cover Group patrol. He need not have worried. The veteran Vice Admiral Ozawa was demanding answers from his lookouts as to why they failed to spot the Royal Navy ships. It was now just a question of locating the supply convoy.
IJN Eastern Attack Force (EAF) - Allied EASGROUP (US)
Rear Admiral William Glassford in the aging light cruiser, Marblehead, prepares to lead out his similarly aging flotilla of destroyers. Each has to test to ascertain if any have mechanical problems. As they slip their moorings, the Paul Jones announces it has engine damage. It could continue but its speed would be reduced. Believing it would be more of a hindrance than an asset, it was decided it would remain alongside for repairs.
Heading out of Tarakan in Borneo, Glassford's force is now reduced to 4 Clemson class destroyers, the Stewart, Parrott, Barker and Bulmer. They hope to intercept one of the Philippines invasion convoys. The weather is a relatively calm force 4 and cloudy allowing for carrier born air operations. The IJN light carrier, Ryojo, launches its aircraft but they fail to make contact with the US group.
As the Marblehead and its escorts continue the wind speed drops to a Force 2 and the skies clear. Not exactly what Glassford was hoping for with a Japanese patrol lurking out there somewhere. Sure enough, the EAF Distant Cover Group made contact during daylight 0800 - 1200.
The Prince of Wales and Repulse inflicted severe damage to the IJN before their demise. One IJN battlecruiser sunk and another so badly damaged it had to be removed from theatre for repairs. Additionally, two heavy cruisers are now drydocked for repair, 3 destroyers sunk and 5 damaged also requiring repair, one of which was crippled and needed to retire from theatre.
The 3 British escorting destroyers were also damaged and now undergoing repair in Singapore.
Against this backdrop, the campaign proper begins. I will deal with each turn phase in order as in the scenario book:
1. General Intelligence.
At 0330 hours in Manilla on 8th December 1941, Admiral Hart was awoken with the news of the air raid on Pearl Harbour. His first order to the fleet was simply, "Japan has started hostilities. Govern yourselves accordingly". Japanese troops invaded Hong Kong; Thailand, Malaya (including Kota Bharu); and Batan Island, Aparri, Vigan, and Legaspi in the Philipines. The IJN's 11th Air Fleet land-based aircraft from Taiwan attacked and crippled the USAFFE air forces on Luzon and then the naval base at Cavite. Force Z has effectively been destroyed.
2. Japanese Theatre Events.
Reinforcement: Add CVS Mizuho to IJN Eastern Attack Force (EAF) OB. This ship is available after this turn.
3. Allied Theatre Events.
A convoy requires escorts from WESGROUP. The light cruiser HMS Danae with the destroyers HMS Stronghold and HMS Thanet are detached to provide that escort.
4. Weather Forecast.
Dice rolls were made to determine any adjustments to the weather during the engagements phase. For the Western Attack Force (WAF) the result was a +1 to dice rolls. For the EAF it was -1. More of this later during the engagement phase.
5. Japanese Command Decisions.
EAF:
Medium invasion convoy - target Davao in the Philippines. 10 merchant/transport ships escorted by the Seaplane carrier Chitose and one destroyer.
Medium invasion convoy - target Jolo in the Philippines. 8 merchant/transport ships escorted by the light cruiser Jintsu and 2 destroyers.
Carrier group lead by the light aircraft carrier Ryojo. Escorted by the heavy cruiser Haguro and 2 destroyers.
Distant Cover Group - a patrol tasking covering both convoys. Consisting of the heavy cruisers Nachi and Myoko with 2 destroyers.
WAF:
Large supply convoy supporting the Malayan invasion - destination Kota Bharu. 12 merchant ships escorted by the seaplane tenders Kamikara Maru and San'yo Maru. The heavy cruisers Kumano, Suzuya, light cruiser Sendai and 8 destroyers.
Small invasion convoy - target Miri in Brunei. 4 merchant/transport ships escorted by the seaplane tender Sagara Maru and 3 destroyers.
Distant Cover Group - patrol consisting of the heavy cruisers Chokai, Mikuma and Mogami with 6 destroyers.
6. Allied Intelligence.
Asiatic Fleet Subs report contact! Allies receive a report on a randomly determined IJN Patrol/Convoy mission increasing the possibility of intercepting or evading that mission.
7. Allied Command Decisions.
EASGROUP (US Navy) based in Tarakan, Borneo.
Sweep mission with the target of intercepting one of the Philippines invasion convoys. Consisting of the light cruiser Marblehead and 5 elderly Clemson class destroyers.
WESGROUP (Royal Navy) based in Singapore.
Sweep mission with the intention of intercepting the supply convoy. Consisting of the heavy cruiser Exeter, the light cruisers Dragon and Durban, and 4 destroyers.
8. Japanese Intelligence.
Loose lips.... Reveal any reinforcements received this turn by the Allied Theatre Events and/or Command Decisions. (This will have no value for the Japanese this turn).
9. Engagements.
This will be the subject of the next post.
![]() |
Force Z - in the lead is the Electra with Express on the right and Vampire at top of photo. In the calmer seas, the PoW has managed to increase its speed to 9 knots setting the maximum for the force. |
Having survived an air attack, although with Prince of Wales having sustained damage, Force Z continues with its patrol intending to intercept the Japanese invasion convoy.
During the first watch (2000 - 2400 hours of darkness), a blip was reported on the Prince of Wales' radar heading on a reciprocal course at 12,000 yards (60cm).
Force Z consisting of the battleship, Prince of Wales, battlecruiser, Repulse, and destroyers, Electra, Express and HMAS Vampire alerted their lookouts but they failed to identify the contact. Prince of Wales fired star shells and immediately illuminated two Japanese destroyers. For their part, the Japanese lookouts spotted the Prince of Wales.
![]() |
An overview of both forces as contact is made. The Japanese on the right with markers indicating the ships illuminated by star shells. |
There has been a lull in my gaming allowing me to concentrate on terrain in preparation for forthcoming tabletop action. An additional reason being my holiday abroad for a couple of weeks from this weekend and did not want to leave a half-completed game on the table for this duration.
With regard to terrain. I have completed a batch of buildings for Gettysburg and I am cautiously optimistic that I have enough. All being well that will be good to go this year.
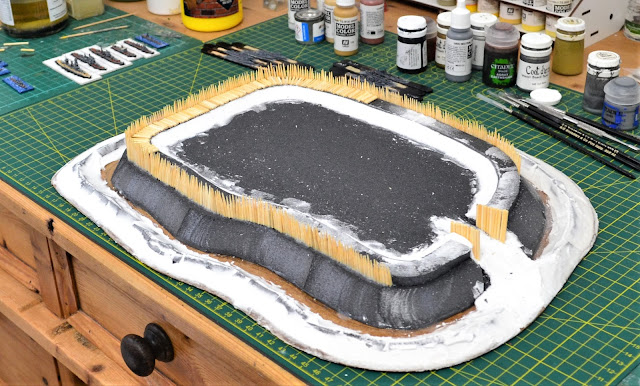
Another long overdue item is the iron-age hillfort for the next action in my Roman invasion of Britannia campaign:
Before I detail the initial action of the campaign, I will cover some of the rules contained within the book (see previous post).
There are 6 bi-weekly turns with an optional turn 0 being the Force Z sortie. I have opted to include turn 0, which as it turns out, is a useful introduction into the campaign mechanism. Anybody aware of the initial moves by Japan will understand that this is a very one-sided affair. The ABDA (America, Britain, Dutch and Australia) navies were hopelessly outgunned at this stage of the war. The allies have no hope of defeating the Japanese outright, but they do have a chance of winning the campaign by amassing victory points.
The central core of this is disrupting Japanese invasion and resupply fleets. This potentially prevents Japan achieving its historical objectives.
Each turn is broken down into a number of phases:
1. General Intelligence
2. Japanese Theatre Events
3. Allied/ABDA Theatre Events
4. Weather Forecast
5. Japanese Command Decisions
6. Allied/ABDA Intelligence
7. Allied/ABDA Command Decisions
8. Japanese Intelligence
9. Engagements
a. Weather determination and time of day
b. Engagements resolution (resolved in order as below)
i Roll for ship availability
ii Resolve Carrier Group vs. Carrier Group attacks
iii Resolve Carrier Group vs. Surface attacks
iv Resolve Land Based Air attacks
v Resolve Japanese Patrol vs. Allied/ABDA Sweeps
vi Resolve Allied/ABDA Sweeps vs. Japanese Convoys
vii Resolve IJN Carrier Group follow-up attacks vs. disabled Allied/ABDA surface groups
viii Resolve Land Based Air follow-up attacks vs. disabled Allied/ABDA surface groups
10. Repair, Bookkeeping and Victory Determination
The book provides details of orders of battle for each turn and the events section follows historical and optional a-historical deployments. I will cover the above in more detail as the campaign progresses.
A note regarding the air element of the campaign. Originally, I intended to play any air actions using the main rules in GQ3. However, on re-reading those rules I came across the campaign air rules which I had not paid any attention to in the past. These are a simplified set of rules and allows for a speedier play-through providing more time for the naval aspect. To avoid getting too bogged down, for most air actions I intend to use this version of the rules, but may occasionally revert to the full set as the mood takes me. I may even use Bag the Hun for air-to-air combat if I get really inspired!
Continued -
After a couple of years painting the odd ship as a sideline to my main projects, I have finally decided to kickstart this campaign as a project. So as not to perpetually add to an ever-lengthening project list, I have cancelled the Kingmaker Wars of the Roses campaign. This was the only non-solo project but unfortunately my opponent found it difficult to find time when we were both available due to his job and child commitments.
The campaign is one of several from the Old Dominion Gameworks site Home (odgw.com). Although based on the General Quarters 3 rules (which I shall be using), any set of WW2 naval rules can be used.
Turn 9
![]() |
The E Yorks 6pdr hurriedly moves off the road seeking cover as it comes under fire from the German 150mm infantry gun scoring a hit on the Lloyd Carrier. |
This game is an adaption of a Rapid Fire scenario in the 'Normandy Battlegames' scenario book. It is relatively straightforward to adapt for Blitzkrieg Commander 4 with slightly more AFV's being the most obvious change.
Background to the battle.
After D-Day the 50th Infantry Division supported by the 8th Armoured Brigade pushed forward south of Bayeux in an attempt to take Tilly-sur-Suelles prior to a move on Villers Bocage with a view to outflanking the German defenders of Caen.
The Germans had been reinforced by the Panzer Lehr Division who launched an attack towards Bayeux on the 9th June advancing to within 3 miles before being pulled back. On 11th June the 69th Brigade of the 50th Division attacked SS units defending the villages of Brouay and Cristot with the particular aim of capturing Hill 102, a slight rise giving commanding views over the area.
This scenario covers that assault by the 69th Brigade.
Continued -
There follows a lull in the fighting as all 3 French thrusts are held. The French had enjoyed a significant amount of success until these simultaneous setbacks. Had any one of them achieved victory freeing up resources for the other two, the allies may well have been facing defeat in the campaign. Victory is not assured for the allies yet though with the French switching to defence.
I will begin with the strategic maps giving an overview before zooming in one each theatre for more detail. I have not included every day's movements to avoid being swamped in maps, but it should be sufficient to indicate what has happened.
![]() |
3rd April |
The hiatus in my wargaming has unfortunately, extended into the new year. Having moved into a newbuild house last year I was fully aware that I would need deal with cracking caused by the house drying out and settling. The new year was my target to complete this work believing 2 or 3 days should sort it. How wrong I was. After a week of recaulking, filling and sanding I have still not lifted a paint brush!
Cristot is gathering dust (and cobwebs) in the garage although I did manage to complete Usher's dragoons, the last unit for Edgehill. Even figure painting is now suspended.
All being well normal service will be resumed in a few days. The Napoleonic campaign map moves have been completed leading to the next battle and will be the next blog post as soon as I have prepped it. I hope to have Edgehill on the board after Cristot but there will be a brief interlude while I insulate the garage door. The cold snap we had in December defeated my heaters and insulating the door is a fairly easy upgrade to improve the temperature. I have received a garage door insulation kit designed for the purpose and hopefully will do the job.
In the meantime, back to the rather less exciting task of sanding and painting.