 |
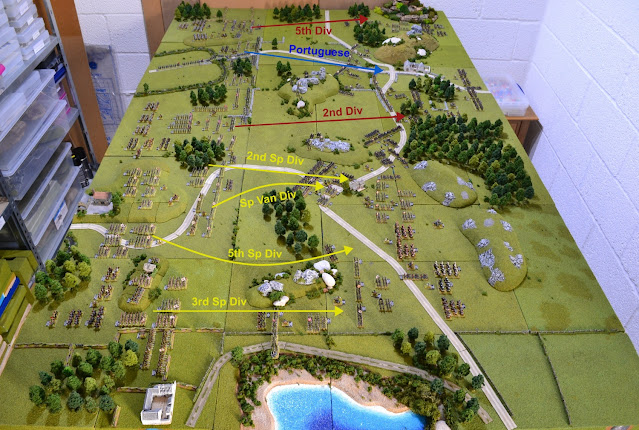
| The objectives for each allied Division. |
Turns 1 - 4
 |
Turn 1 saw the opening exchange of artillery fire and deployment of skirmishers. A With the allies outnumbered by artillery pieces, Wellington took no time to order the advance across the whole line. This is an overview after the opening moves in turn 2.
A reminder of how I play skirmishers. They are played in the abstract with each unit's and brigade skirmish values marked on the roster. This indicates how many dice rolls are made with a '6' to hit. Where possible they are rolled in pairs to allow for double '6' results. The only representation on the tabletop of skirmishers are those light battalions that deploy into skirmish formations when the normal skirmish rules apply. |
Continued -
I shall break down the AAR into each sector which will hopefully provide clarity as the game unfolds. For the most part (if not all) these will be in groups of 4 turns.
British left
 |
| The 5th Division on the left moves out with the 95th Rifles joining the skirmishers ahead. To the right the 1st Portuguese Division begins their advance with the Cacadores ranging out ahead. Whinyates rockets have some success striking a French battery (upper right) causing them to falter as well as inflicting a couple of casualties. Otherwise the initial exchanges inflict light casualties on both sides. |
 |
| The allies continue to advance in turn 3 with the Rifles and Cacadores increasingly engaging French skirmishers. |
 |
| Turn 4 and the rifles are making themselves felt inflicting heave casualties on the French skirmishers and driving them back. |
Portuguese
 |
| The initial Portuguese move has been detailed above. Here we join them on turn 3 advancing towards its target. The Cacadores and Brigade skirmishers are engaging their French opposite numbers. |
 |
| Turn 4 and the Portuguese steadily advance towards the valley. Another success for the rocket battery (top right) hitting the French artillery at bottom right. Another casualty eliminating one of its cannons and causing the battery to falter. |
British right
 |
| The 2/95th and 3/95th Rifles move up the steep rocky slopes during turn 2 engaging the French skirmishers firing from cover. |
 |
The two rifle battalions engage the French in melees among the rocks quickly expelling them from the heights inflicting heavy casualties.
|
 |
By turn 4 the French had been completely evicted from their position. Having rejoined their parent battalions they immediately came under fire from the Rifles. The French 2/6th Light battalion, already having suffered heavy casualties, took heavy punishment which resulted in them retiring from the field. This just left the 1/6th Light in the photo. A French artillery battery promptly limbered up moving away from the threat to its flank.
This setback badly affected the carefully laid plans of the French to create a killing zone as the allies moved through the valley. |
 |
| The British 2nd Division advance towards the valley with the heights secured. |
 |
| On the southern valley side, the 60th Rifles had similar success driving the French clear. |
Spanish left
 |
| In a staggering display of marksmanship, the Spanish skirmishers from their 2nd Division inflict havoc on the French grand battery during turn 2. Out of 7 dice rolled, five are 6's including two doubles. Two batteries, including a 12pdr, suffered 4 casualties each, a loss of a cannon each, and both forced to retire. The 12pdr battery subsequently failed morale tests and left the field. |
 |
| The end result of that action removed a significant threat to the Spanish advance who now seek to take advantage. |
 |
| The bite from the French artillery has not been nullified yet. The last remaining battery delivers an accurate salvo onto the Mallorca Line battalion (middle right) inflicting heavy casualties and forcing it to retreat. |
 |
| Turn 4 and the Spanish Vanguard Division on the left, join the 2nd Division converging on their target. As the gap closes skirmishers are recalled and the French prepare to receive the charge. |
Spanish centre
 |
| The Spanish 5th Division has spent the first 3 turns moving forward into position ready to assault the narrow pass between woods and a rocky hill. It is currently defended by a Baden 4pdr battery. In this turn, turn 4, the Division's skirmishers have engaged the battery inflicting casualties. |
Spanish Right
 |
| The Spanish 3rd Division move off in turn 2 towards the narrow strip of land between a rocky hill and the lake. It is being defended by Potocki's Polish brigade and a Hesse 6pdr battery. |
 |
| It is now turn 3 and the Spanish launch their charge. The Hesse battery pours canister into the leading columns. |
 |
| The devastating impact of the canister fire is too much for the green troops and the Spanish attack is abruptly stopped in its tracks. |
 |
| Meanwhile the two battalions of Badajoz volunteers move to engage the Poles nearest the lake. |
 |
| A fresh Spanish column moves in a position where it can launch a charge (column nearest the battery) shrugging off rather a rather limp salvo from the German battery. To the right, the 1st battalioin of Badajoz Volunteers exchanges fire with several Polish companies with neither side having much impact. |
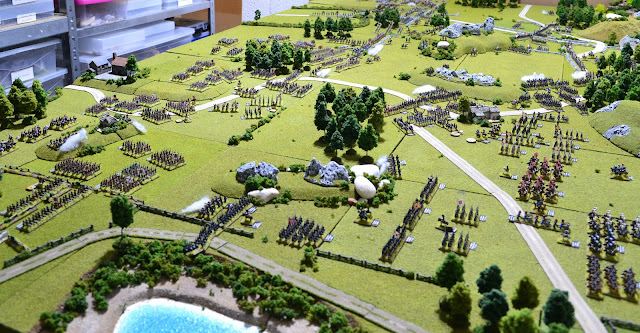
Overview at end of turn 4
TURNS 5 - 8
British Left
 |
| Above right, the British 5th Division continue to close with the 95th Rifles screening to their front. On the left is the Portuguese advance. |
 |
| Turn 8 and the two lead battalions of Kempt's brigade begin to engage the leading French line. They succeed in destroying the artillery battery but not before it delivered a shattering salvo of canister on the 1/28th Line (on the left). When combined with a musket volley from a French battalion it was sufficient to damage morale forcing them to retreat. |
Portuguese
 |
| In support of the Portuguese, Gardiner's RHA battery, that had run low on ammo, has repositioned to pour canister into the French (middle left). |
 |
| A double '6' from the Cacadores in turn 6 inflicts severe damage on the 2/59th Line who fall back leaving a gap in the line. The hapless General Capitaine, already wounded, receives a light wound forcing him back to seek medical attention. |
 |
| The French hurriedly plug the gaps in their line as the Portuguese closes having recalled many of their skirmishers. |
 |
| Turn 8 - The lead Portuguese battalions swap musket volleys with the French infantry with neither side getting the upper hand. On the left a French artillery battery retired from the field having suffered heavy casualties. |
British Right
 |
| The French deploy their skirmishers in an attempt to screen those units repositioning away from the 95th Rifles on the heights but have little success with more casualties caused on the French. |
 |
| On the opposite heights, the 60th Rifles harass the French on the valley floors. A double '6' results in Simmer receiving a light wound and heavy casualties inflicted on Bony's 1/5th Light battalion. |
 |
| Fane and Adams brigades pass through the valley and are met by salvos from French artillery. Most notable is a hit on a limbered KGL horse battery causing it to become unformed. The 95th Rifle battalions on the right have moved off the hill and now engaging French skirmishers. |
 |
| Turn 8 - Adams' brigade on the left and Fane's on the right sweep into the open ground with du Platt's KGL brigade supporting to the rear. |
 |
| The view from the French lines. A 12pdr battery fires a salvo into the lead column of Adam's brigade on the right inflicting two casualties on the 43rd Light. |
Spanish Left
 |
| The action on the Spanish flank intensifies, and not in a good way for the French. On the right, Zayas leads the Barbastro light battalion of his Vanguard Division, in a column charge on the 4th Swiss. One of the better trained Spanish units, the Barbastro overwhelms the Swiss, inflicting heavy casualties and routing them. |
 |
| Fortunately for the French, the routing Swiss only unnerves one battalion who falters. |
 |
The situation goes from bad to worse during turn 6 for the French 20th Division. The last of their artillery batteries succumbs to rifle fire from the high ground although not before putting the frighteners on an advancing Spanish battalion (middle right).
In the middle of the photo the two battalion columns of Cazadores de Antequera pile into the 2/10th Line pushing them back inflicting 6 casualties for the loss of 1. The 4th Swiss failed to rally and fled the field. Jeannin will have his work cut out holding his division together at this rate. |
 |
| Jeannin throws his only available battalion into the fray in an effort to halt the Spanish advance. The understrength 1/107th Line launched itself into the much larger unformed 1st battalion of Cazadores (middle of photo). Despite being outnumbered 2:1, the French succeed in pushing back the Spanish battalion. The remaining Spanish and French battalions are too busy reforming to mount any further advances. |
 |
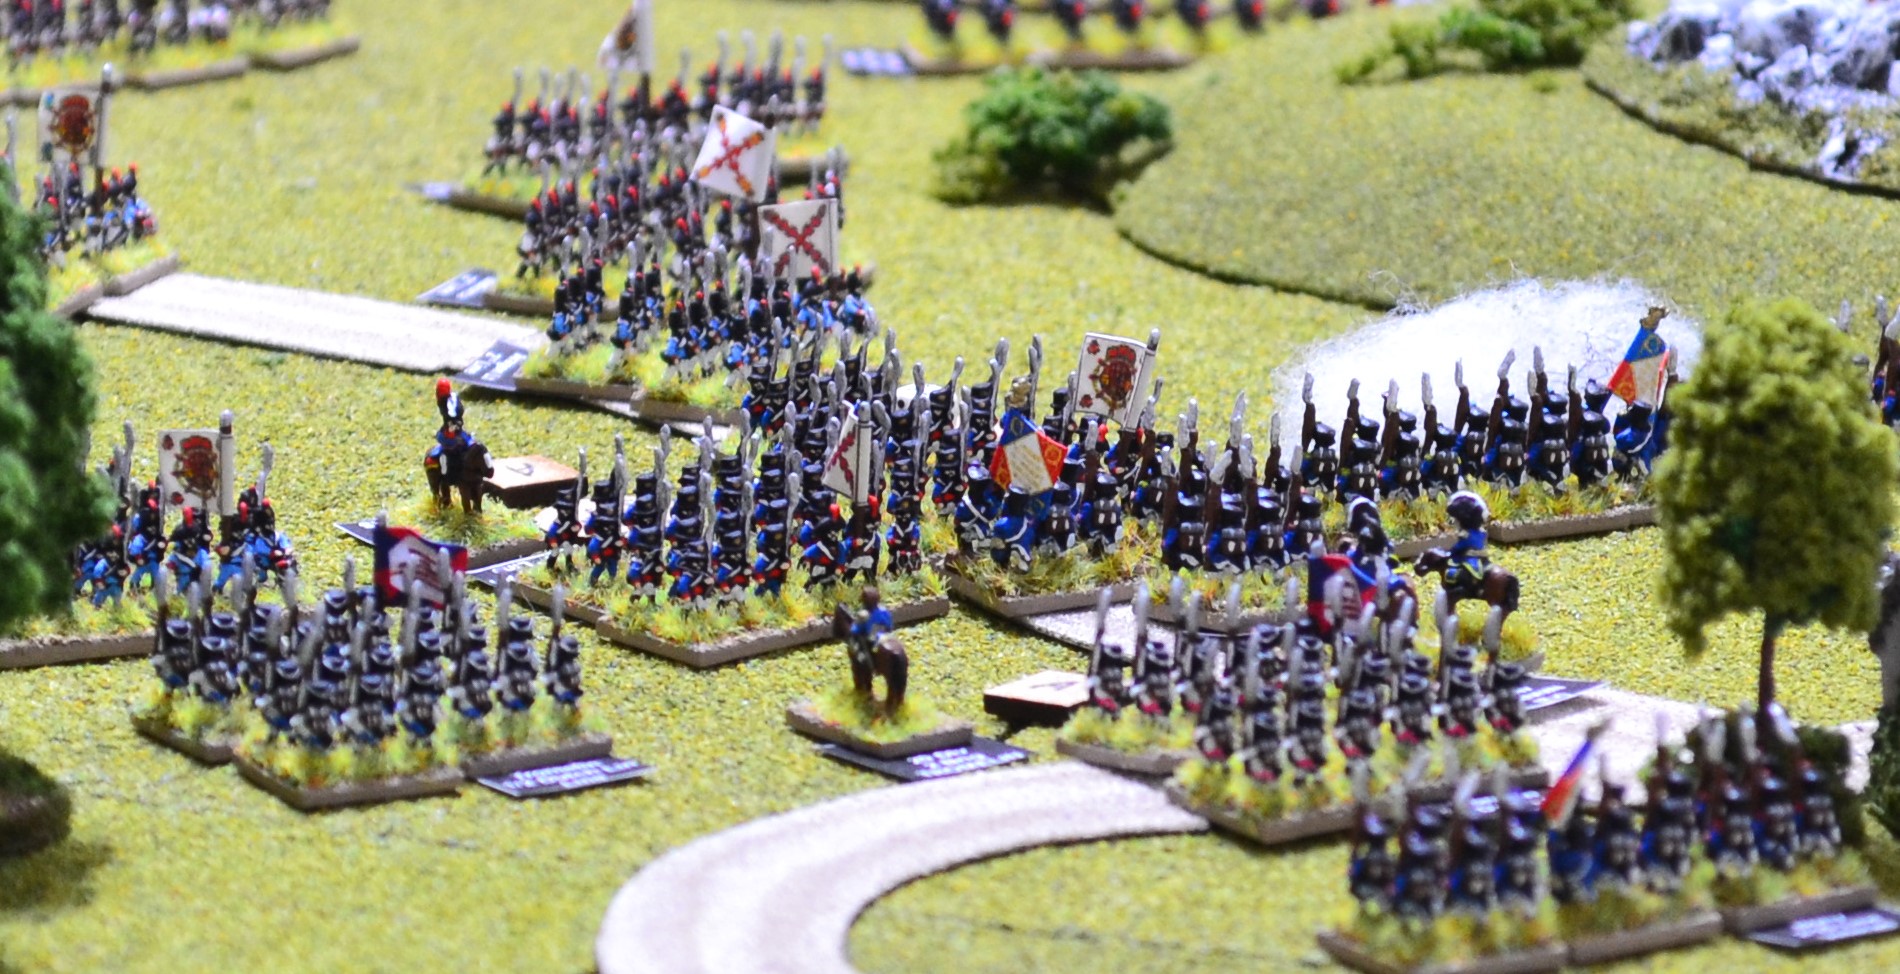
Turn 8 - When the situation was looking desperate for the French, the 2 Dutch battalions (middle right) saved the day. Both charged destroying one Spanish battalion and routing another. The subsequent domino effect proved serious for the Spanish 2nd Division, losing 3 battalions fleeing the field. Another battalion from the Vanguard Division joined them. A subsequent divisional morale check by Iglesias just about held them with a faltering result. This had the effect of reducing his orders from 'attack' to 'engage'.
The end result is shown in the photo with the attack having been successfully repulsed. |
Spanish Centre |
| Turn 6 and the lead Spanish column from their 5th Division attempts to clear the pass defended by a single Baden battery of 4pdrs. The latter gives them a blast of canister which proves sufficient to halt the charge. |
 |
| Turn 8 and the Spanish 5th Division are still being held up in the narrow pass by the German 4pdr battery. The lead Spanish battalion, the 3/6th Africa, decided it was time to give somebody else the opportunity when their morale failed causing them to retreat. |
Spanish Right |
| The Spanish recovered from their earlier setback with the 21st Cantabria Line launching a ferocious charge on the Poles. The German artillery battery evaded to what they thought was safety, when the 1/4th Polish battalion promptly broke in the face of the oncoming Spanish column. The routing Poles caused a collapse in Brigade morale. The 1/4th fled the field leaving the 2nd battalion retiring to the rear. |
 |
| Grandjean brings up his German brigade to plug the gap left by the Poles. Canister fire has halted the advance in the middle of the photo, but Portago frantically urges his 3rd Spanish Division to take advantage of the enemy's disarray. |
 |
An attack by the Granaderos Provinciales struck the only French battalion still holding the line, the 1/4th Baden line (lower middle of photo). The heavily outnumbered Germans were defeated by the Spanish conscripts forcing them to retreat. The morale of Grandjean's German brigade was in danger of falling apart as several began uncontrolled retreats.
The situation on the French left was beginning to look serious. |
 |
| Turn 8 - The mostly conscripts of the Spanish 3rd Division surge forward seeing the disarray in the French ranks. |
 |
Only a succession of very high dice rolls saved the French from catastrophe, although are not out of the woods yet with several battalions still retreating. In the middle left of the photo, the best of 3rd Division's battalions, the 21st Cantabria, charged the 1st Hesse-Darmstadt battalion. The latter retreated in the face of the charge but were still caught and heavily punished by the Spanish.
The French cavalry, held in reserve, are ordered forward but struggle to pass the mass of retreating infantry. |
Overview end turn 8
During the early moves it looked like a quick collapse of the French 6th Corps in the face of determined Spanish attacks was imminent. Fortunately for the French, the 20th Division managed to stabilise their sector although the Confederation of the Rhine 22nd Division is in real trouble. It could require the 5th Cavalry Division to halt the Spanish advances, particularly if the Spanish 5th Division succeed in breaking through threatening the flanks of the 19th and 20th Divisions.
In the northern half of the battlefield, the British also enjoyed early successes with the 95th and 60th Rifles comfortably sweeping the rocky hills clear of French skirmishers. The Anglo-Portuguese divisions are only now beginning to fully engage and apart from the irritating Rifles, the French are reasonably comfortable in their positions.


Great AAR, 6MM tour d'force. Drama all over the table, thanks for sharing your game.
ReplyDeleteMany thanks Pancerni
DeleteGosh what an opening! First off I couldn't believe what I was reading when those British rockets got the better of French artillery (what do they need to score to do that?). The latter are clearly not having a good day and the 12pdr battery commander, who left the field so early in the battle, will probably find he has an appointment with a firing squad. Such rank cowardice, more like a Hanoverian hussar than a Frenchman entrusted with the Emperor's beautiful daughters.
ReplyDeleteThe French seem under a lot of pressure and the Spanish are doing creditably but... with the Dons now battered, after fighting through the French infantry and guns, that mass of cavalry facing them looks pretty ominous.
Super battle, can't wait for episode 1, but I was a little put out when my favourite unit (28th Foot) caught a packet - try and be nice to them... ;o)
Many thanks Rob. Re the rockets. Yes Whinyates was very lucky. I think he rolled an 11 from 2D6 to get the hit. He has almost as much chance of hitting his own side!
DeleteYes, as shame regarding the 28th. They rolled a double '1' on the morale test! I am sure they will recover to do their bit. The British 5th Division have had something of a halting start on that flank.
Fantastic!
ReplyDeleteMany thanks Kym
DeleteGood afternoon Jon. Well we went away for a short holiday in Yorkshire and on our return I opened up your blog to find what can only be described as a brilliant set of posts that has taken me at least a few days to read,re read and then take in. Regards Peter.
ReplyDeleteHi Peter. Very chuffed to see that. Spookily enough, tomorrow I am off to Yorkshire for a few days although it will be seeing relatives rather than hols.
DeleteJon, blogging at its absolute best. You may fancy a trip over to the Perry website. There are a set of rules there (Valour & Fortitude) available for free download. These are the new V2 set and designed in 4-5 pages of rules to run big games and may just catch your eye.
ReplyDeleteMany thanks for that Norm and also the tip. Will definitely have a look at those rules which may prove useful for when I do Austerlitz.
DeleteAnother cracking game and entertaining AAR there Jon:)! I thought the French were going to collapse as the British and their Allies seemed to be having good luck across the baord, but the French just managed to stem the tide in time it seems. As always really looking forward to the next AAR!
ReplyDeleteMany thanks Steve. Even solo wargaming you never know how a game will progress. This is a very unpredictable wargame and still all to play for.
Delete