Wednesday 18 September 2024

Gettysburg Day 2 - Introduction

This is the Day 2 scenario deployment taken from the original Fire & Fury rulebook. All the orders of battle are a direct transfer to Guns at Gettysburg rules. I had originally based my 6mm ACW for F&F but with 6 infantry figures to a base rather than 3 x 15mm and the base frontage reduced to 15mm. A simple matter therefore of retaining the number of bases exactly but using figure numbers rather than bases for casualties etc.

With figure bases being 60% of the 15mm size I reduced the table size by a similar amount allowing for my 9" square terrain bases. This provided for an 8'3" x 3'9" size widening to 4'6" east of Culps Hill. Some slight adjustments have been made to cater for my terrain but otherwise a direct copy of that provided in the rulebook.


I agonised for some time whether to play from day 1 but decided to fall back on my long term ambition of playing the large action as depicted in the rules. Given the speed in which I play through a large game, to play day 1 as well would take me eons to complete the entire thing! 

Day 2 fired my imagination on acquiring F&F in the 90's but at the time my collection was almost universally 15mm. A 14' long table was never going to be an option in that scale. 6mm though opened up this up as a real possibility, and hence the long awaited game will now be played.

I will not be playing day 2 as a standalone game as in the book, but will continue into day 3 if not concluded. Start and finish times will remain, these being 1300 - 2000 on day 2, and 1100 - 1700 on day 3. Orbats for day 3 will be whatever survives from day 2.

In F&F each move is 30 minutes. GaG use slightly slower movement speeds and given the differences in the way they play, I have fallen back on the same timescale I use in General de Brigade. i.e. 15 minutes per turn. This equates to 28 turns for day 2 and 24 turns for day 3. This also improves the possibility of a conclusive outcome.

Continued -

Sunday 8 September 2024

Britannia Campaign: Turn 8 - 2nd Legion v The Dobunni


Focussing on the south west, the 2nd Legion deals with a rebellion by the Dobunni tribe and is the setting for the next game.
I will be using the L'Art De La Guerre rules again but on this occasion I have balanced the points at around 270 to give a more even game.

The initial setup with the Britons on the left having rolled as the attackers once again. Terrain was determined using the Age of Hannibal rule system modified to reflect the type of terrain to be found in this part of the country. The table size has been reduced to 4'6" x 3' reflecting the smaller size of armies deployed.

Continued -

Saturday 24 August 2024

Britannia Campaign: Turn 7 - 9th Legion v The Cornovii


This action focuses on the 9th Legion's advance on Mona. The Cornovii tribe had previously indicated a willingness to be allies to Rome. As the 9th Legion marched through their territory they had a change of heart and rebelled. 

For this game I shall be using L'Art De La Guerre (ADLG) rules for the first time. The orders of battle will remain largely unchanged - more of this later.

Initial dispositions. The Cornovii are the attackers on the left. They have a normal camp and the Romans on the right have a fortified camp.

I retained the 'Age of Hannibal' method of terrain placement which, I felt, was more suited to solo play. All terrain cards were placed face down by each side with just minor adjustments when revealed. 

The river is impassable apart from the ford. At the top of the photo, the stream is classed as difficult terrain. Both woods are also difficult. 

Continued -

Tuesday 6 August 2024

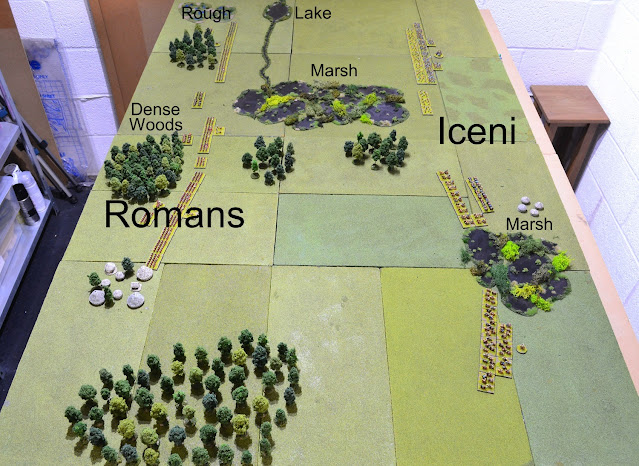
Britannia Campaign: Turn 6 - 16th Legion v The Iceni


The 16th Legion have retraced their steps to deal with the Iceni rebellion which is the setting of the next battle, again using the Age of Hannibal rules.

The Iceni have the initiative and will be the attackers. Only skirmishers can pass through marshes and the lake is impassable. 

The Iceni have a particularly high proportion of light units (skirmishers and light horse) along with chariots. Their lieutenant is placed in command of the light horse, chariots and medium horse on the left. They are tasked with pinning the Roman legionary cohorts while the warbands under the direct command of the chieftain seek to punch through the Roman left, a mix of legionaries and auxiliaries.

Good news for the Romans, their lieutenant has arrived sober!

Continued -

Sunday 21 July 2024

Britannia Campaign: Turn 5 - 16th Legion v The Catuvellauni

 I will start with an overview of the campaign situation:


Turn 5: 20th Legion returns to Londinium having pacified the Cantii. In the west. the 2nd Legion moves on the Dobunni tribe who immediately declare themselves as allies of Rome.

In the midlands, the 16th Legion seeks to clear the way for the 9th Legion who are tasked with capturing Mona. The Catuvellauni tribe are expected to be allies and it therefore comes as some surprise to the 16th when they find the warbands arrayed for battle.

The Romans on the left anchor their flanks on a small pond (top of photo) which is impassable to all, and a marsh which is only passable by skirmishers.

The Catuvellauni tribe on the right have their warbands and chariots positioned in the centre with cavalry and some skirmishers on their flanks.

Most terrain is clear and all woods are passable.

Continued -

Friday 14 June 2024

Britannia Campaign: Turn 4 - 20th Legion v The Cantii


The situation in turn 4. The Cantii have rebelled necessitating the 20th Legion, held in reserve around Londinium, to be despatched for lessons to be administered.

This is the setting for the next game of the campaign:


Continued -

Monday 10 June 2024

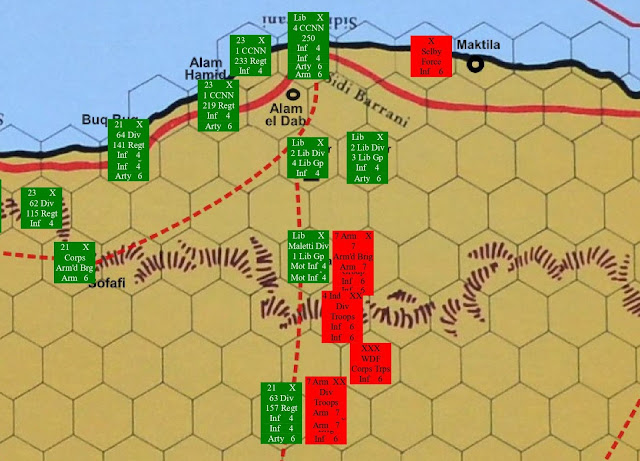
WW2 Operation Compass: South of Nibeiwa

My N.Africa campaign continues. 

A reminder of the situation:

It is now 11th December 1940 and the Italian advance has halted with most of their units settling down into fortified camps.
The British counter-attack has begun and the setting for this action is in the south of the map. The 7th Armoured Division has begin its 'left hook' and comes into contact with the Italian 63rd Cirene Division south of Nibeiwa. 


Continued -

Thursday 30 May 2024

On The Workbench: WW2 Late War German Infantry + Wargaming Update

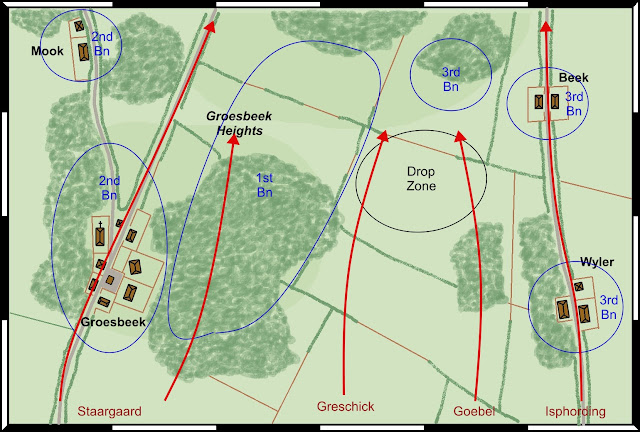
Firstly the latest painting progress. A long overdue attention to the Market Garden project - Groesbeek Heights.

Almost complete prior to basing.

The finished figures. Laid out in their battalion formations suitable for BKCIV and Rapid Fire Reloaded. The only complete battalion is in the centre. That on the left is awaiting its HQ base, on the right the HQ and support company. The top right is the beginnings of a 4th battalion and on the left a Divisional CO and FAO. All battalions will be brought up to strength on completion of the next batch.

Figures are a mix of Heroics & Ros and 2D6.

Continued -

Friday 24 May 2024

On The Workbench: Pony Wars Terrain

More terrain pieces have been completed for Pony Wars. My first use of cork bark was used to make rocky terrain pieces which will also form rocky passes.

My terrain modelling skills are basic to put it mildly and much of this was trial and error together with guidance from various Youtube videos.

One side is sheer rock face with the rear sloped to allow access for the ambushers!
Continued -

Tuesday 14 May 2024

On The Workbench: Pony Wars

A few weeks ago, prior to my splurge on painting ships, I completed all the figures for Pony Wars with the exception of 4 cannon and crew awaiting a new Baccus order. In the meantime I will use artillery from my ACW collection to plug the gap. There are a total of 1,150 figures in the collection.

What follows covers the entire figure collection:

Mounted Braves. 480 have been completed, 120 short of the number recommended in the rules. 

Mounted Braves
Continued -

Saturday 11 May 2024

On the Workbench: WW2 Aircraft Carriers Part 3

 The final batch of ships before returning to figure painting is now complete.

Two Essex class carriers and the lead ship of the Bogue class escort carrier. All Davco.
Back left to right: Intrepid, Bogue
Front: Essex


Continued -

Friday 3 May 2024

On the Workbench: WW2 Aircraft Carriers Part 2

 The latest on the carrier progress - a quick update:

I have for the most part worked in batches of 3 ships and here is from top to bottom, Shokaku, Zuikaku and Junyo. All Navwar.


Continued -
Tuesday 23 April 2024

On the Workbench: WW2 Aircraft Carriers

With the blog having switched to a nautical theme over recent weeks, I post here an update on naval painting, in particular aircraft carriers. I have purchased some flight deck decals from "Flight Deck Decals" (link on the right) which really are superb. They do require some trimming to fit as closely as possible the Navwar models and many are also suitable for Davco. The current naval painting bug has inspired me to crack on with aircraft carriers in particular to utilise these decals.

Royal Navy carriers (all Navwar) from left to right:
Top row; Hermes, Ark Royal, Glorious
Middle row; Ameer, Victorious, Furious
Bottom row: Biter; Indomitable, Eagle

Continued -

Friday 19 April 2024

Defending the Malay Barrier: Turn 2, 1st - 15th January 1942, Japanese EAF Patrol v EasGroup (USN) Sweep

The second Japanese patrol was also successful intercepting the USN EasGroup which is the subject of the next game.

The heavy cruiser Nachi with 4 Shiratsuyu class destroyers are on a reciprocal course with the US sweep which it sights at a distance of 23,000 yards (115cm). The US force consists of the cruisers Houston and Boise escorted by 9 Clemson class 4-stacker destroyers.

An overview at the start.
Continued -

Wednesday 17 April 2024

Defending the Malay Barrier: Turn 2, 1st - 15th January 1942, Japanese WAF Patrol v WesGroup Sweep

In this phase the Japanese have sent out two patrols with the intention of intervening any allied sweeps before they interfere with any invasion or supply convoys.

The first action sees WesGroup out of Singapore intercepted by the WAF patrol:

HMS Exeter continues its northerly route having lost HMS Dragon crippled by an air attack and now returning to Singapore. The remaining two 'D' class light cruisers and 7 destroyers plough through the force 7 sea state with reduced visibility.

Continued -

Wednesday 3 April 2024

Defending the Malay Barrier: Turn 2, 1st - 15th January 1942, LBA Attacks

Two Japanese Land Based Air attacks were launched. One each from the Western Attack Force and the Eastern Attack Force.

Turning first to the WAF:

A force of Betty and Nell bombers, equipped with medium bombs and escorted by Zero fighters, successfully located the Royal Navy WestGroup who had been heading north to target the Malayan bound supply convoys.

The 4 British cruisers were in line astern lead by the Danae, followed by the flagship Exeter, Durban and Dragon. The cruisers were escorted by 7 destroyers.

9 flights of Nell bombers are in the first wave. One was damaged by AA fire with the remaining 8 dropping their payloads. 

Continued - 
Saturday 16 March 2024

Defending the Malay Barrier: Turn 2, 1st - 15th January 1942


The Japanese Eastern Attack Force are now operating out of Davao allowing them to ramp up operations. The allies have yet to form ABDACOM and are operating individually.

In an attempt to disrupt the Japanese, the Royal Navy operate out of Singapore, the Dutch out of Batavia, the USN out of Surabaya, and the Australians from Darwin. The map shows the planned movements including Japanese supply convoys, invasion fleets and naval patrols.

The weather is good with clear skies and clear visibility. A carrier air strike from the Ryojo takes advantage of the good conditions successfully locating the Dutch to the west of Borneo. 

Cengroup under Admiral Doorman in his flagship, the De Ruyter, leads a sweep towards the north of Borneo sights aircraft approaching from the north east. The first action of turn 2 begins.

Continued - 

Monday 4 March 2024

Defending the Malay Barrier: An update

Currently reading a book covering the naval aspects of the invasion of Norway in 1940 had inspired me to continue with my naval campaign. 

On reviewing my posts so far I noticed a glaring omission. They could really have benefitted from maps. 

Maps have now been added with the map supplied in the scenario book used as the base. Ship movements are my additions reflecting events within the campaign.

A couple of the maps are included here providing a brief summary of movements and actions so far.

Force Z sortie during turn 0.

Turn 1. The only contact occurred when a sweep conducted by the USN lead by the aging cruiser 'Marblehead' was intercepted by an IJN patrol. The end result was not pretty for the USN.
For more detail click on the appropriate label on the right.

I will shortly be posting details of turn 2 including maps!

In the meantime orders have been placed with Navwar and Davco. The painting table is now adorned with ships in the process of being painted.


Saturday 3 February 2024

Edgehill 1642 The Action

I will break the battlefield down into 3 for ease of following the flow of the game:
From the Royalist perspective; Left Flank, Centre, Right Flank.

LEFT FLANK

The initial exchange between the deployed dragoons on both sides saw the Roundheads get the upper hand with both Royalist regiments suffering the heavier casualties and subsequently falling back.

Wilmot's cavalry took the lead but something close to a disaster struck the Royalists. The first casualty on this flank was Wilmot himself. Leading his own regiment he was struck by a musket ball suffering a severe wound. He will be out of action for the next 3 turns. This unnerved his raw troopers who failed to launch their charge.

Continued - 

Saturday 6 January 2024

Edgehill 1642

This is a battle I have intended to play ever since my days with ECW re-enactment societies in the 1970's. In those days it was 25mm Hinchliffe and Minifigs but I never seemed to be able to collect anywhere near enough to do it justice. Not to mention the pathetically small number of painted figures!

6mm has finally provided that opportunity without breaking the bank and in a small enough space that will fit in the garage. 

A very brief background to the battle:

King Charles I marched his army on London held by Parliament. The Earl of Essex commanding the main Parliamentary field army of similar size marched to intercept the Royalists with both armies meeting at Edgehill becoming the first major battle of the war. The outcome was indecisive but nevertheless prevented the triumphant entry into London that the Royalists were hoping for.

If King Charles succeeds in defeating Essex in my replay then the course of history will be changed!

The Battle of Edgehill
23rd October 1642
Table Size 6' x 3'9"
Rules - Forlorn Hope
Figure Ratio 1:10
Artillery Ratio 1:2


Continued -

Tuesday 2 January 2024

Plans for 2024

As any wargamer knows, planning a year ahead with any degree of accuracy can prove a challenge! A sudden urge to start a new period, campaign, or particular battle, tends to intrude. That said, I will once again lay out what I hope to be the direction of my wargaming in the coming year.

As in previous years I will break down my plans into Battles, Campaigns, Painting/Modelling.

BATTLES

ANCIENTS:

Early Imperial Roman 20th Legion v Ancient British Cantii tribe who have rebelled.


ECW:

Edgehill - This is a definite and I know this as it is currently occupying my tabletop. Hope to have a blog posting very soon.


NAPOLEONIC:

Peninsular War project - Battle of Busaco 27th September 1810. Approximetely 2/3 of the figures I needed to paint were completed this past year. All being well this should be on the tabletop before the end of the year.

Napoleonic Campaign - The next map moves have yet to be completed but confident at least one action will be played out.


ACW:

Gettysburg Day 2 - I have lost count as to how many times I have stated this will be played. Part of the delay was down to me dithering about scratchbuilding terrain such as the Little Round Top. I have decided to just run with what I have got and thus cautiously optimistc that this will be played out. 


PONY WARS:

The end is in sight for figure painting although terrain needs to be constructed. I am hopeful I will be able to play this before the year is out.


WW2:

Battle south of Nibeiwa - Operation Compass campaign. I have some rule tweaks to complete around the propensity of the Italians to surrender en-masse at this stage of the war. Some of my desert terrain boards are in need of attention which will also be used in the Pony Wars project. 

Groesbeek Heights - Op Market Garden. This is a repeated target from last year but now, as then, will depend on how quickly I am able to paint up the required figures.


Continued -