I will break the battlefield down into 3 for ease of following the flow of the game:
From the Royalist perspective; Left Flank, Centre, Right Flank.
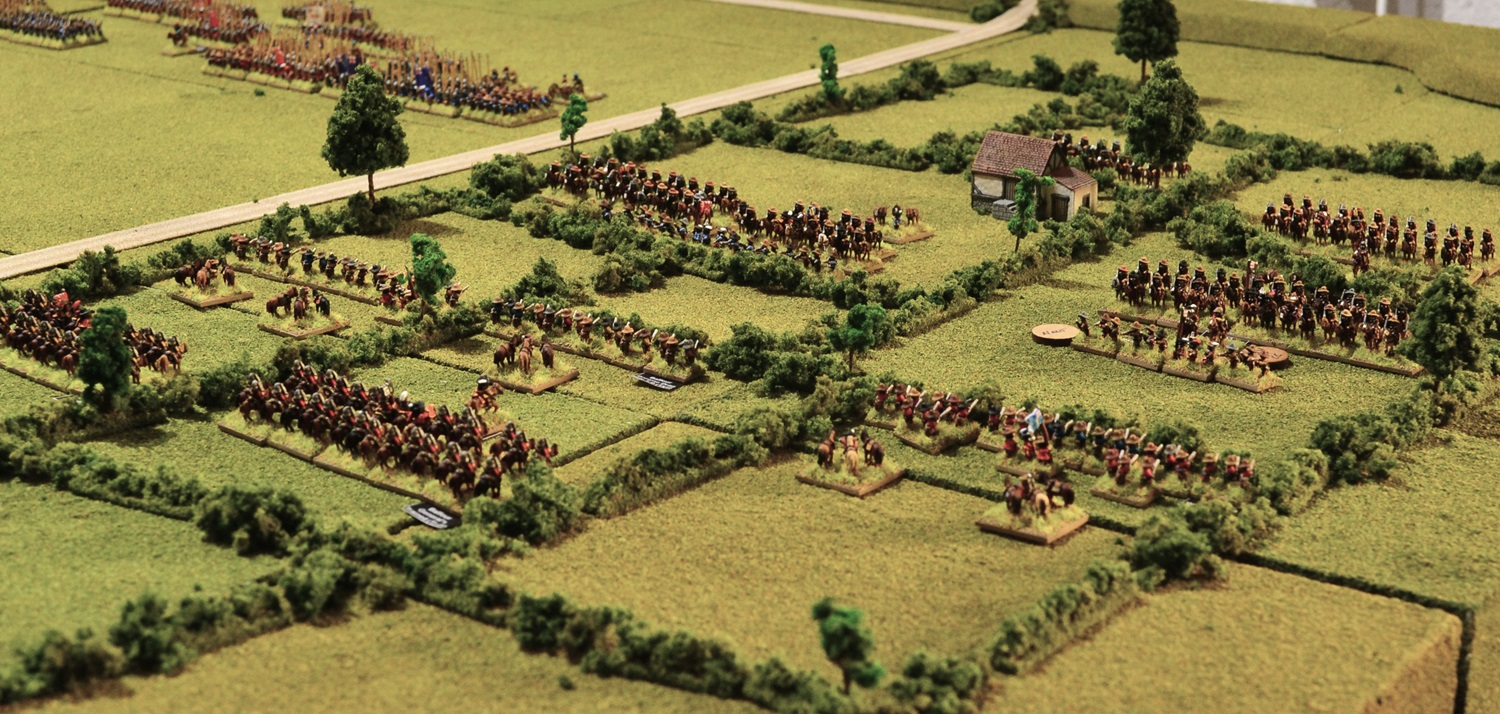
LEFT FLANK
 |
| The initial exchange between the deployed dragoons on both sides saw the Roundheads get the upper hand with both Royalist regiments suffering the heavier casualties and subsequently falling back. |
 |
| Wilmot's cavalry took the lead but something close to a disaster struck the Royalists. The first casualty on this flank was Wilmot himself. Leading his own regiment he was struck by a musket ball suffering a severe wound. He will be out of action for the next 3 turns. This unnerved his raw troopers who failed to launch their charge. |
Continued -
 |
| The veterans of Carnarvon's horse had no such problem launching their charge at Browne's dismounted dragoons. The latter immediately routed and only just put themselves beyond the reach of the Royalist charge (middle left of photo). |
 |
| It is now turn 6 and in the right of the photo Wardlawe's dragoons rout in the face of a charge by Wilmot's cavalry regiment. |
 |
Balfour's regiment succeeds in rallying providing some hope that the Parliamentarian right will hold but is immediately met by the routing Browne's dragoons who are being mercilessly butchered by Carnarvon's Horse.
In the background Fielding's Horse holds the Ashton's Royalist charge for another round of melee. |
 |
Turn 7 - bottom left Wilmot's regiment pursues the Wardlawe's routing dragoons catching them as they cross a hedgerow butchering many of their number.
Top right Browne's routing dragoons pass through Balfour's horse who maintain good order as the pursuing Royalist cavalry of Carnarvon's regiment plough into them. The Roundheads are pushed back but manage to contain the initial impact. |
 |
Turn 8 - On the left, Wilmot's Horse continue to ride down Wardlawe's dragoons inflicting heavy casualties.
In the centre, Grandison's Horse charge Balfour's General's Regiment and in a rare victory for the Parliamentarians, the Royalists are defeated heavily fleeing the field.
Middle top, Balfour's own regiment are struck by Carnarvon's Horse who have been pursuing Browne's dragoons. Flush with success the Royalists rout Balfour's regiment. |
CENTRE
 |
| After firing off an initial artillery salvo which had no effect, the Royalist foot advanced towards Essex's line. The Roundheads were content to let the enemy approach using their artillery to inflict as much damage as possible. That, so far, has proved to be very little with just a couple of casualties inflicted. This is the situation at the end of turn 4. |
 |
| Turn 6 - as the Royalist foot regiments close on the Parliamentarians, the latter withdraw their artillery and engage with musketry inflicting several casualties. |
 |
| Battle is joined in the centre. The Parliamentarian regiments, having the advantage in musketry, elect to stand relying on firepower to disrupt the Royalist charge. Although they inflicted casualties among most attacking regiments they all strike home. |
 |
| Many Roundhead regiments are pushed back but disaster struck when Chomley's large regiment (bluecoats in middle of photo) are comprehensively routed from the field with heavy casualties. |
 |
| Turn 8 - Disaster looms for the Parliamentarians with 4 regiments routing following defeat in melees comprising most of the vanguard. Another regiment to the rear also routs and this comprises the whole of Meldrum's brigade and Mandeville's regiment of Essex's brigade which routs from the field. Fortunately Ballard steadies his rearguard brigade so all is not lost. |
 |
It is not all bad news for the Parliamentarian foot with the far left of their central line enjoying some success. Nearest the camera, Holles' regiment receives Dyves' Foote routing them from the field.
Top of the photo, Essex's regiment holds Gerrard's to a second round of melee in a closely fought contest. |
RIGHT FLANK
 |
Holles' musketeers hurry into the enclosures to support the outnumbered musketeers of Ballard who have been sustaining heavy casualties from Usher's dragoons (far left).
In the foreground the Roundhead cavalry prepare for the approaching Rupert's cavalry (top right). |
 |
The clash arrives during turn 4 as Rupert unleashes his cavalry brigade. Waller's and Goodwin's regiments immediately rout leaving Ramsay's own regiment and Willoughby's to face Rupert.
Ramsay's regiment fires a volley into Rupert's own regiment as the latter leads the charge (upper middle). Ramsay fails to stop the charge and in a closely fought melee the Roundhead cavalry are pushed back but still fighting.
In the foreground Maurice's regiment piles into Willoughby's roundheads. The Royalists were overwhelmingly victorious causing their opponents to flee the field. |
 |
| Ramsay's left wing are in danger of collapsing completely as more of his regiments rout. Only his own regiment remains in the fight successfully holding Rupert's regiment. In a final defiant act leading his troops from the front, Ramsay is killed and Rupert's troopers comprehensively roll over the Parliamentarians in turn 6. |
 |
Turn 8 - Ballard's musketeers have fallen back in an attempt to counter the threat posed by Byron's horse who are preparing to charge from the hedgerow. Their morale begins to fail and are rooted to the spot!
In the background Holles' musketeers continue to trade shots with Usher's dragoons.
Byron launches his charge in turn 9 routing Ballard's musketeers. Holles' musketeers decided it was time to leave and they followed suit. This signalled the demise of the Parliamentarian left flank; |
 |
| In a departure from history, Rupert curbs his exuberance and succeeds in rallying his brigade from pursuit. |
With the game rapidly drawing to a close and nearly all action now concentrated on the foot regiments in the centre, I have combined all into the final 2 turns:
Turns 10 - 11
 |
The two General's regiments of orangecoats are among the best of the Parliamentarian foot regiments.
Both are trained and represent the last real hope of halting the Royalist advance.
Both gave good accounts of themselves in the initial contact but the sheer number of regiments dissolving around them took their toll then they too routed from the field. |
 |
| Towards the Parliamentarian left where they were enjoying more success, the failures elsewhere were taking their toll. Top left of the photo, Wharton's regiment were continuing to push back Fitton's foot but this success was their ultimate doom. Isolated and most of the potential support regiments now routing, they were struck in the flank by Dutton's whitecoats. Simultaneously, Belasyse reinforced Fitton and the combined Royalist forces proved too much for Wharton's foot causing them to rout. |
 |
| Essex's regiment that had also enjoyed success, succumbed too to the inevitable lack of support and decided to call it a day routing from the field. |
 |
Rupert's brigade swung in towards the Parliamentarian centre with only 2 troops of Cuirassiers available to hold them.
Top of photo, Balfour's Cuirassiers were easily defeated by the charging Rupert's lifeguards and were sent fleeing the field with heavy losses.
Bedford's Cuirassiers were more successful halting the charge of the Prince of Wales' regiment (bottom of photo) with the melee continuing into another turn. |
 |
| The Parliamentarians registered just one success on their right flank with the charge of Balfour leading the General's regiment into Digby with his own regiment. Balfour's inflicted heavy casualties routing the Royalists. |
 |
| Turn 11 and the final turn of the game. An overview of the centre with all Parliamentarian regiments in rout and many already having left the field. There was no possible way back for them now with their only regiment in good order being the General's regiment of horse lead by Balfour. |
So a very decisive outcome for the Royalists who easily defeated Essex altering history. Whether this would have enabled King Charles I to enter London is probably doubtful given the significant presence of the London Trained Bands sent out to intercept him. If their morale in the wake of this defeat suffered badly though, history may have taken a different course.
The Parliamentarian foot regiments had the advantage of firepower and it was imperative that they inflict sufficient casualties on the advancing Royalist pike-heavy regiments prior to contact. Once contact is made, the Royalist pikemen had the advantage in melee but provided those casualties suffered to musketry were sufficient, that advantage could be cancelled out. Unfortunately for the Parliamentarians, their musketry proved largely inaccurate (poor dice rolls) and once regiments began to rout, it quickly had a domino effect.
This one-sided outcome did not provide for the most entertaining game but interesting nontheless.


What a visual feast there Jon and one that really does look like a large ECW battle:)! Just a shame it was rather one-sided, which does not make for the most satisfying solo game, but these things happen. Might a re-fight be in the offing?
ReplyDeleteMany thanks Steve. Sadly, probably no refight but will be looking at the next significant battle that appeals for the tabletop soon.
DeleteImpressive looking battle - good to see that the correct side won this time round!
ReplyDeleteMany thanks Kym
DeleteThe Royalists really got on a roll and just didn't stop! As you say it didn't make for a nerve-biting game but interesting nonetheless. Just finished a big (25mm) ECW game today and after Parliament got off to a stellar start it all just went wrong and kept heading in that direction to a rather one-sided result. You can start to see why generals were often reluctant to take the chance of putting all to eth hazard in the field - there are no certainties on the battlefield!
ReplyDeleteI was rather hoping that the Parliamentarians would at least hold the line for a while and maybe show signs of turning the tide. Quite possibly one of the most one-sided games I have played of this size. Partly compounded by the number of raw units and as soon as several decided to quit the field it was hard to stop the rest from doing likewise.
DeleteBeautiful work on the table and troops, you have a very good eye for where everybody needs to be.
ReplyDeleteMany thanks pancerni
DeleteHi Jon, I was expecting a reversal of fortunes with the dice half way through but it never materialised and the Parlimentarians did not get much in the way of luck throughout.
ReplyDeleteGreat report. Regards Peter.
Many thanks Peter.
DeleteGreat looking battle Jon.
ReplyDeleteMany thanks Stuart.
DeleteWow, excellent work again.
ReplyDeleteMany thanks Paul
Delete