-Vespasian moves west into the land of the Durotriges leading the 2nd Legion. The rolling countryside is topped by numerous hillforts. It becomes clear that this tribe is more content to sit in their fortifications from which they will need to be ejected.
Table Size: 6' x 3'9"
Figures: 6mm Mostly Baccus and some Rapier
Rules: My own (based on General de Brigade)
ORDERS OF BATTLE
Roman
1 x CinC + 2 sub-commanders
2nd Legion: 1st Cohort 52 figures. 6 x cohorts of 36 figures each, 1 of 34 and 2 of 32.
4 x Scorpios
Auxiliaries -
1 x Medium Cavalry cohort 30 figures
1 x Light Cavalry cohort 28 figures
1 x Equitata cohort - 1 x 12 light cavalry + 1 x 24 Aux infantry
2 x Batavian cohorts each 1 x 12 medium cavalry + 1 x 24 Aux infantry
2 x Auxiliary infantry cohorts each 36 figures
Total 617 figures
Durotriges
1 x CinC + 2 sub-commanders
1 unit of 30 medium cavalry
1 unit of 16 light cavalry
2 units of 12 light cavalry
2 units of 6 light cavalry
1 x warband 72 figs
2 x warbands of 60 figs
1 x warband of 50 figs
4 x warbands of 40 figs
2 x warbands of 36 figs
2 units of 20 Slingers
2 units of 20 Javelinmen
Total 642 figures
 |
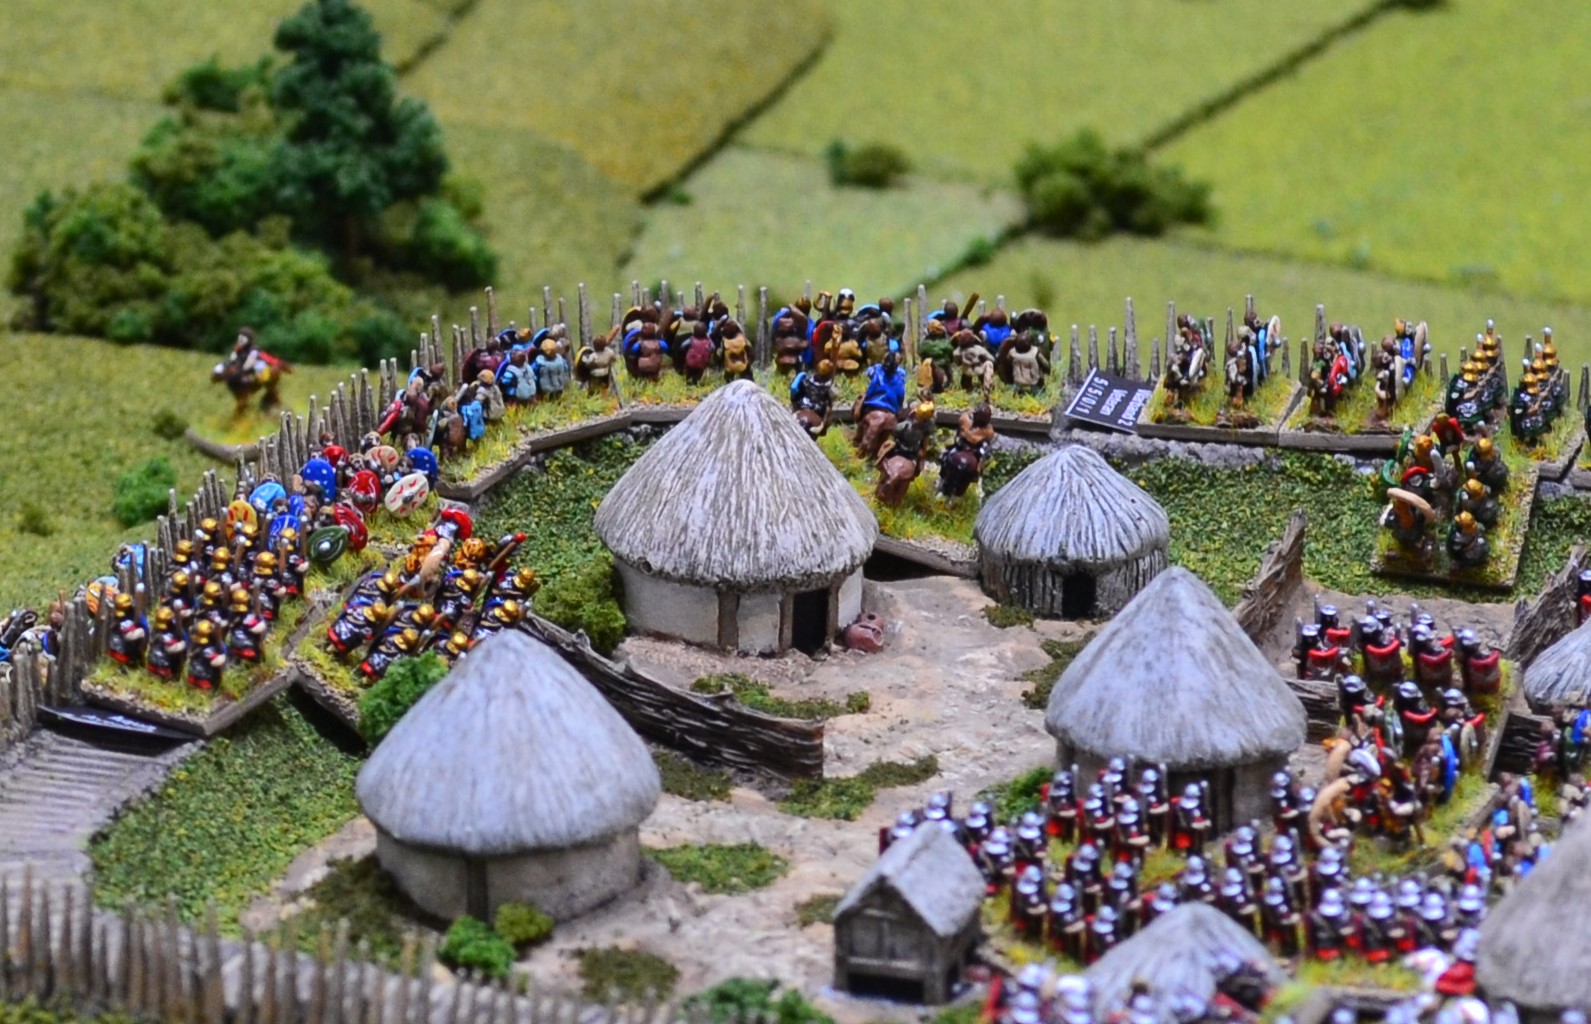
| An overview at the start. The Romans deploy around the fort with all infantry ready to form testudos when necessary. |
Continued -
 |
| The flimsy palisade is constructed as a defence against other tribes rather than the disciplined and well equipped Romans. Therefore, aside from the gate and gate tower, the Britons only benefit from uphill and behind cover/defending obstacle. |
 |
| The Durotriges CinC commands the hillfort. |
 |
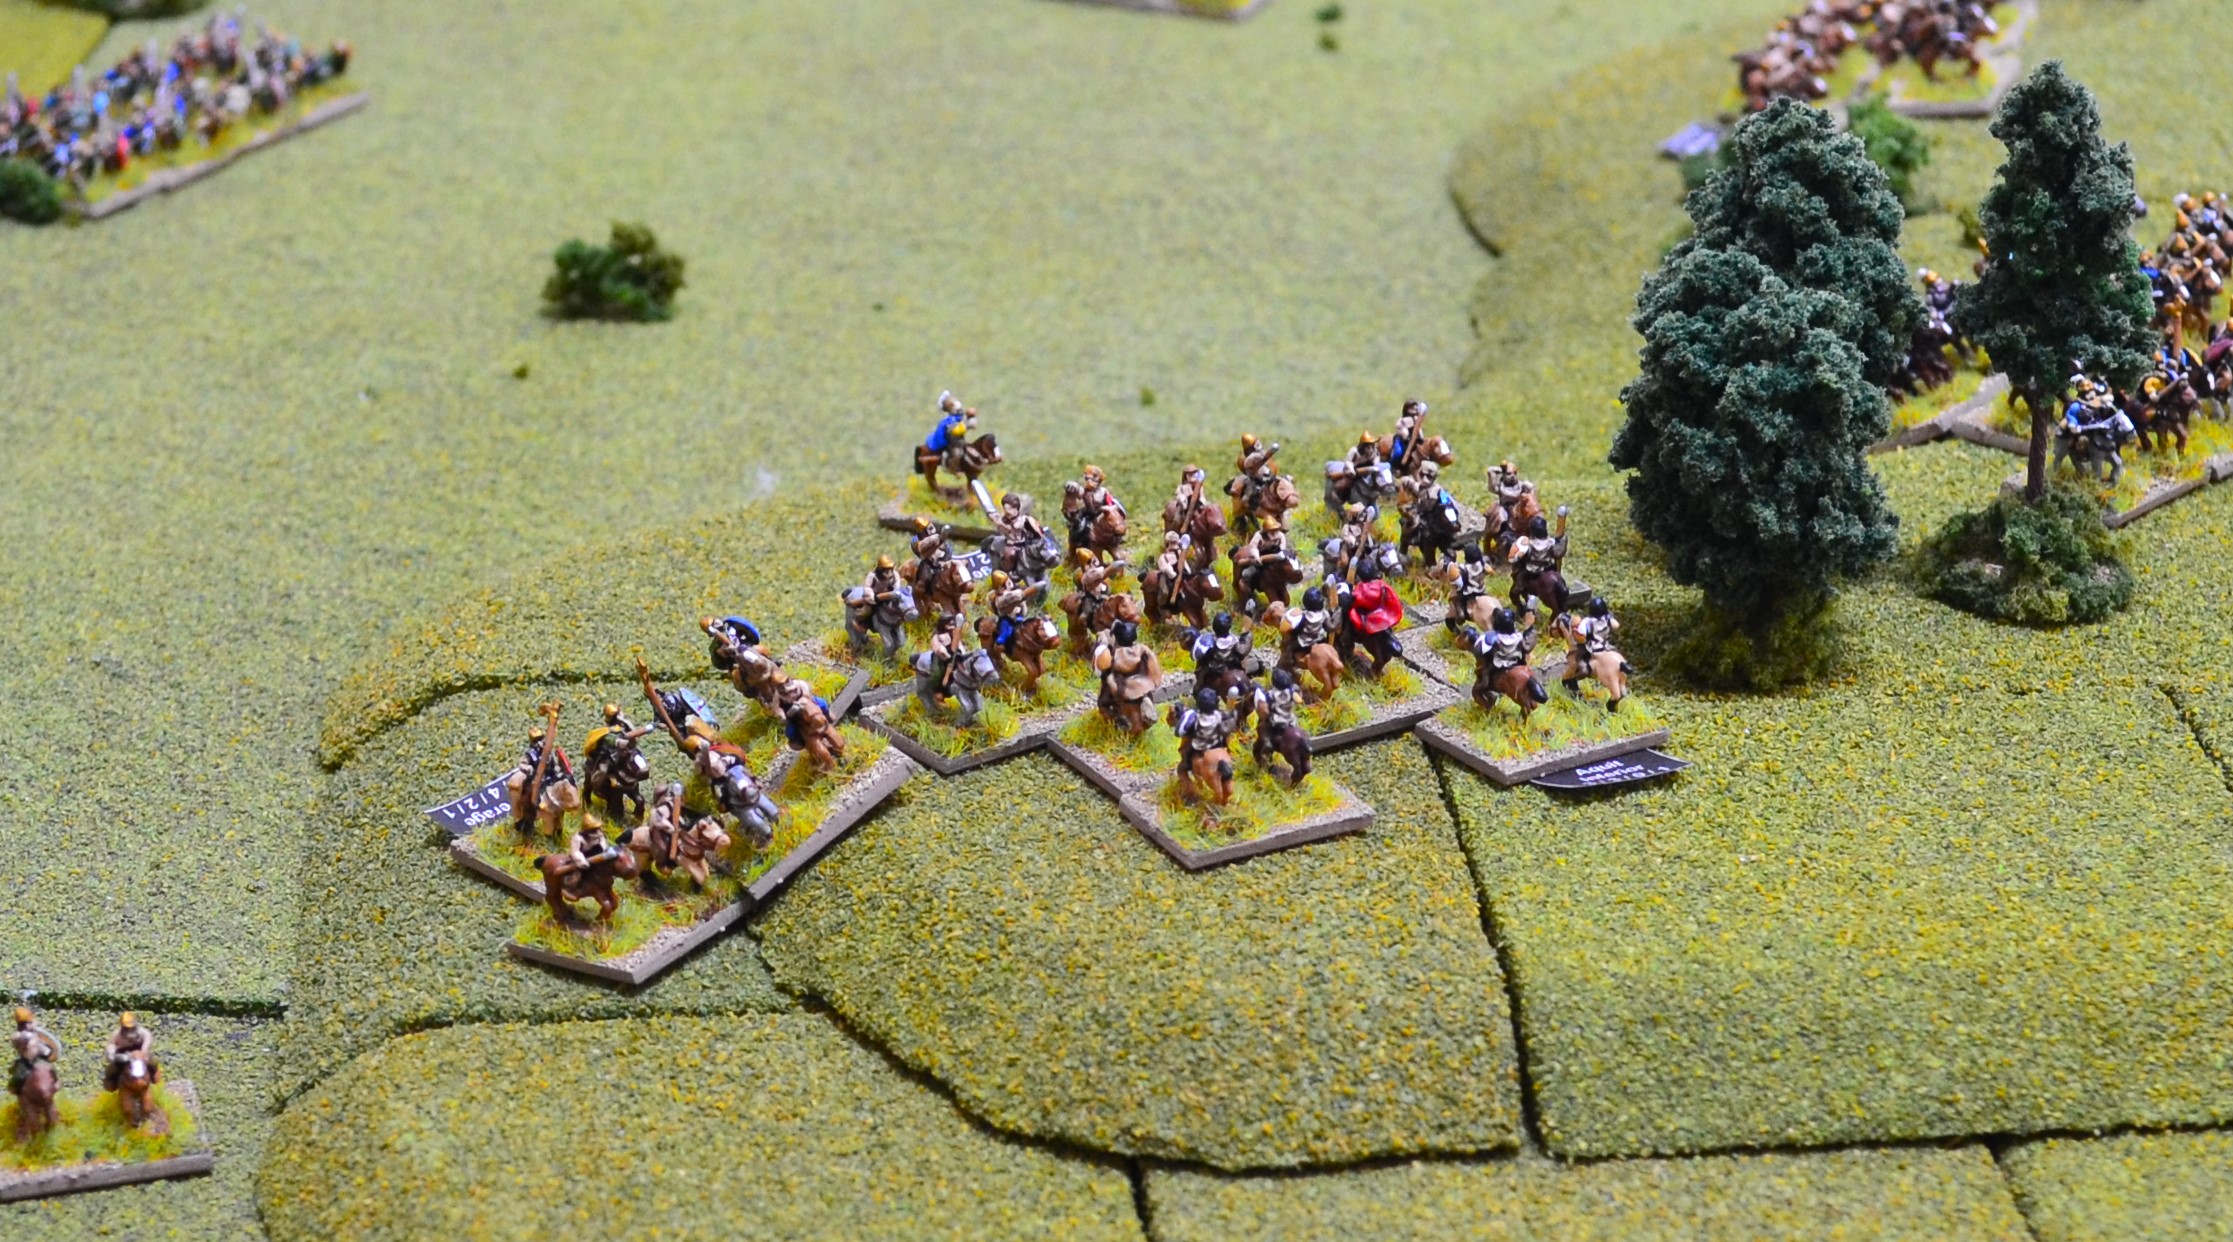
| The thunder of hooves announces the arrival of the rest of the tribe. Off to the right foot warriors pour through the woods. |
Turn 1
 |
| The order was given for the main assault to begin. The Roman scorpios succeeded in sweeping some of the slingers from the pallisade. |
 |
| The Briton reinforcements emerge into the open. The Romans had the initiative and having the initial move has left them unable to react to the new threat this turn. |
Turn 2
 |
| The Romans lose several casualties to slingers as the approach the ditch but this fails to stop them. |
 |
| The focus of the main Roman attack are the ramparts around the gate with the remaining units seeking to pin down the rest of the garrison. |
 |
| More warbands stream across the open ground leading to the northern boundary of the fort. |
 |
| Roman units now begin to respond with several units diverted from their attack on the fort. Mounted units that had been held in reserve are instructed to quickly intervene. |
Turn 3
 |
| As the Roman cohorts advance up the steep rampart, several are felled by various missiles launched down at them. They all press their attack and are met with fierce opposition. None successfully break through but neither are they repelled. The celts lost more casualties but will fight on. |
 |
| Inside the hillfort. |
 |
| More warbands arrive with light and medium horse leading the advance. |
 |
| Two units of light horse are counter-charged by a cohort of Auxiliary cavalry. The Romans hold their own but only just and the melee will continue. |
 |
| Legionaries brace ready to receive the Celt medium cavalry. |
Turn 4 - 5
 |
| Initially the Roman cohorts fail to make much impression on the defenders who steadfastly hold their positons behind the pallisade. |
 |
| Several cohorts were thrown back from the fort but progress was finally made around the gatehouse. |
 |
| Legionaries pour over the palisade as the defenders are beaten back. In the left foreground more Romans clamber over the palisade inflicting heavy casualties on the Britons. |
 |
| At the top of the photo, a charge by Briton light horse falters in the face of an Auxiliary cohort. In the foreground, two Batavian cavalry units pounce on slingers routing them. |
 |
| The Batavian's excellent discipline allows them to launch a controlled charge on a nearby warband. The latter are defeated heavily and routed. |
 |
| A medium cavalry warband charges into an infantry cohort but failed to make a breakthrough. They are held before being defeated in the 2nd round of melee causing them to retreat with heavy loss. |
 |
| Heavily outnumbered Roman light horse desperately hold on as Britons swirl around them. |
 |
| They are eventually overcome by the numbers with the survivors abandoning their position. In the foreground the reverse is the case as a large Roman light horse cohort ploughs into two small Briton light horse units. |
Turn 6 - 7
 |
| An overview of the action outside the fort. The Durotriges reinforcments are struggling to break through. |
 |
| A closer look at the action. Having destroyed one warband, the Batavian cavalry are charged by another towards their flank. One Batavian unit succeeds in turning to meet the charge and a fierce fight ensues. |
 |
| The heavily outnumbered Batavian unit holds on despite several losses buying the second unit time to reform. |
 |
| Durotriges light horse charge into a cohort of auxiliaries. |
 |
| The auxiliaries stand their ground fighting off the charge inflicting heavy casualties on the horsemen. |
 |
| At the top left the Roman light horse routs from the field two small units of Durotriges light horse. To the right the opposite is the case with the Roman light horse being destroyed but not before a reinforcing cohort of medium cavalry ploughs into the melee. |
 |
| The outclassed Britons stubbornly fight on for another round of melee. |
 |
| Over in the hillfort the Romans finally break through. They sweep all before them in and around the gatehouse. |
 |
| The Legionaries move through the settlement joined by the large 1st cohort advancing through the now open gates. The Durotriges tribal leader pulls unengaged warbands from the wall and attempts to form a defensive line across the hillfort interior. |
Turn 8
 |
| Romans surge through the hillfort only checked when a warband pulled from the rear palisade charged into the mass of Legionaries (middle of photo). It is unlikely to hold them for long as more Romans capture sections of the palisade routing the defenders. Only the large warband to the right and the smaller one in melee are still in the fight. |
 |
| A closer look at the melees outside the hillfort. With a mounted section of a Batavian cohort in danger of being overrun by a warband, a second Batavian section charged into the flank of the Britons forcing them to retreat with heavy loss. |
 |
| A warband charges into a Legionary cohort rocking them on their heels. The ferocity of the charge very nearly breaks the Romans but their discipline holds. Although they absorb the charge in good order the Legionaries suffer 6 casualties to the warband's 4. |
 |
| The Roman medium cavalry cohort was surprisingly held by two smaller light horse units. The end came for them though when the Roman light cavalry cohort, having reformed from the earlier melees, plough into the Britons' rear. With nowhere to retreat the Briton light horse was put to the sword. |
 |
| An overview at the end of turn 8. All the British horse have now been destroyed or routed from the field leaving just two warbands from the reinforcements to break through to the hillfort. |
Turn 9
 |
| The lone warband holding out in the centre of the hillfort stood no chance as marauding Romans converged on their flanks and rear. |
 |
| With nowhere to retreat they were wiped out. |
|
 |
| The last of the warbands defending the palisade followed a similar fate. Their morale collapsed and were put to the sword including the Durotriges tribal chief. |
 |
| Outside the hillfort one of the reinforcing Briton commanders lead another warband in a desperate charge to break a lone Roman cohort already engaged in melee. The additional warband gave them the advantage pushing the Romans back. Unfortunately for them, the increasingly triumphant warbands are about to be flanked by Roman cavalry and auxiliaries. |
 |
| The warband broken by the Batavian cavalry were quickly ridden down. |
 |
| An overview at the end of turn 9. With the hillfort lost there was no prospect of the Durotriges retrieving the situation so the end was called. A victory for Vespasian and his 2nd Legion. |
Another victory for the Romans and the Durotriges are now pacified. However, the Romans sustained considerable losses. 103 in total with half, rounded up, returning.
I will cover the strategic situation in the next post.


What a fantastic game. A feast for the eyes too!
ReplyDeleteMany thanks Jolly Broom Man.
DeleteI couldn't help feeling for the Brits, that Roman juggernaut just seemed unstoppable. Looking forward to seeing the strategic update to see if they really have any chance to avoid what seems an inevitable, an dismal, fate.
ReplyDeleteIt is a tough one for the Britons. Their main hope is to wear down the Roman Legions as they progress across the province.
DeleteYou get the feeling the Brits will be fighting on many fronts at the retreat facing that Roman gathering, wonderful table as usual Jon. Regards Peter
ReplyDeleteMany thanks Peter.
DeleteTremendous and spectacular action!
ReplyDeleteMany thanks AP.
DeleteFantastic looking game!!
ReplyDeleteMany thanks John.
DeleteWhat a cracking game and such a joy to behold too:)! A tough ask for the Britons but it seems all that they can do is attrit the Roman war machine as it advances across the land. I'm certainly looking forward to seeing the overall situation as it stands after this battle.
ReplyDeleteMany thanks for that Steve.
DeleteGreat to see you back in action on the tabletop Jon! Brilliant models & fantastic terrain as always, and a gripping narrative of the battle. It felt like the end of Spartacus when the plucky Britons were getting sandwiched between cohorts of remorseless Romans. Thank you!
ReplyDeleteMany thanks for that Dave.
DeleteWonderful stuff as always Jon! That hillfort is fantastic!
ReplyDeleteMany thanks for that. The hillfort was something of a challenge!
DeleteReally good conflict Jon and I suppose an ending that was expected. Visually superb.
ReplyDeleteMany thanks Peter.
DeleteFantastic John - Your whole site is inspirational - I have finally taken the plunge and started a solo campaign.
ReplyDeleteMany thanks Neil. Great to hear you have commenced your own solo campaign game.
Delete