Having survived an air attack, although with Prince of Wales having sustained damage, Force Z continues with its patrol intending to intercept the Japanese invasion convoy.
During the first watch (2000 - 2400 hours of darkness), a blip was reported on the Prince of Wales' radar heading on a reciprocal course at 12,000 yards (60cm).
Force Z consisting of the battleship, Prince of Wales, battlecruiser, Repulse, and destroyers, Electra, Express and HMAS Vampire alerted their lookouts but they failed to identify the contact. Prince of Wales fired star shells and immediately illuminated two Japanese destroyers. For their part, the Japanese lookouts spotted the Prince of Wales.
 |
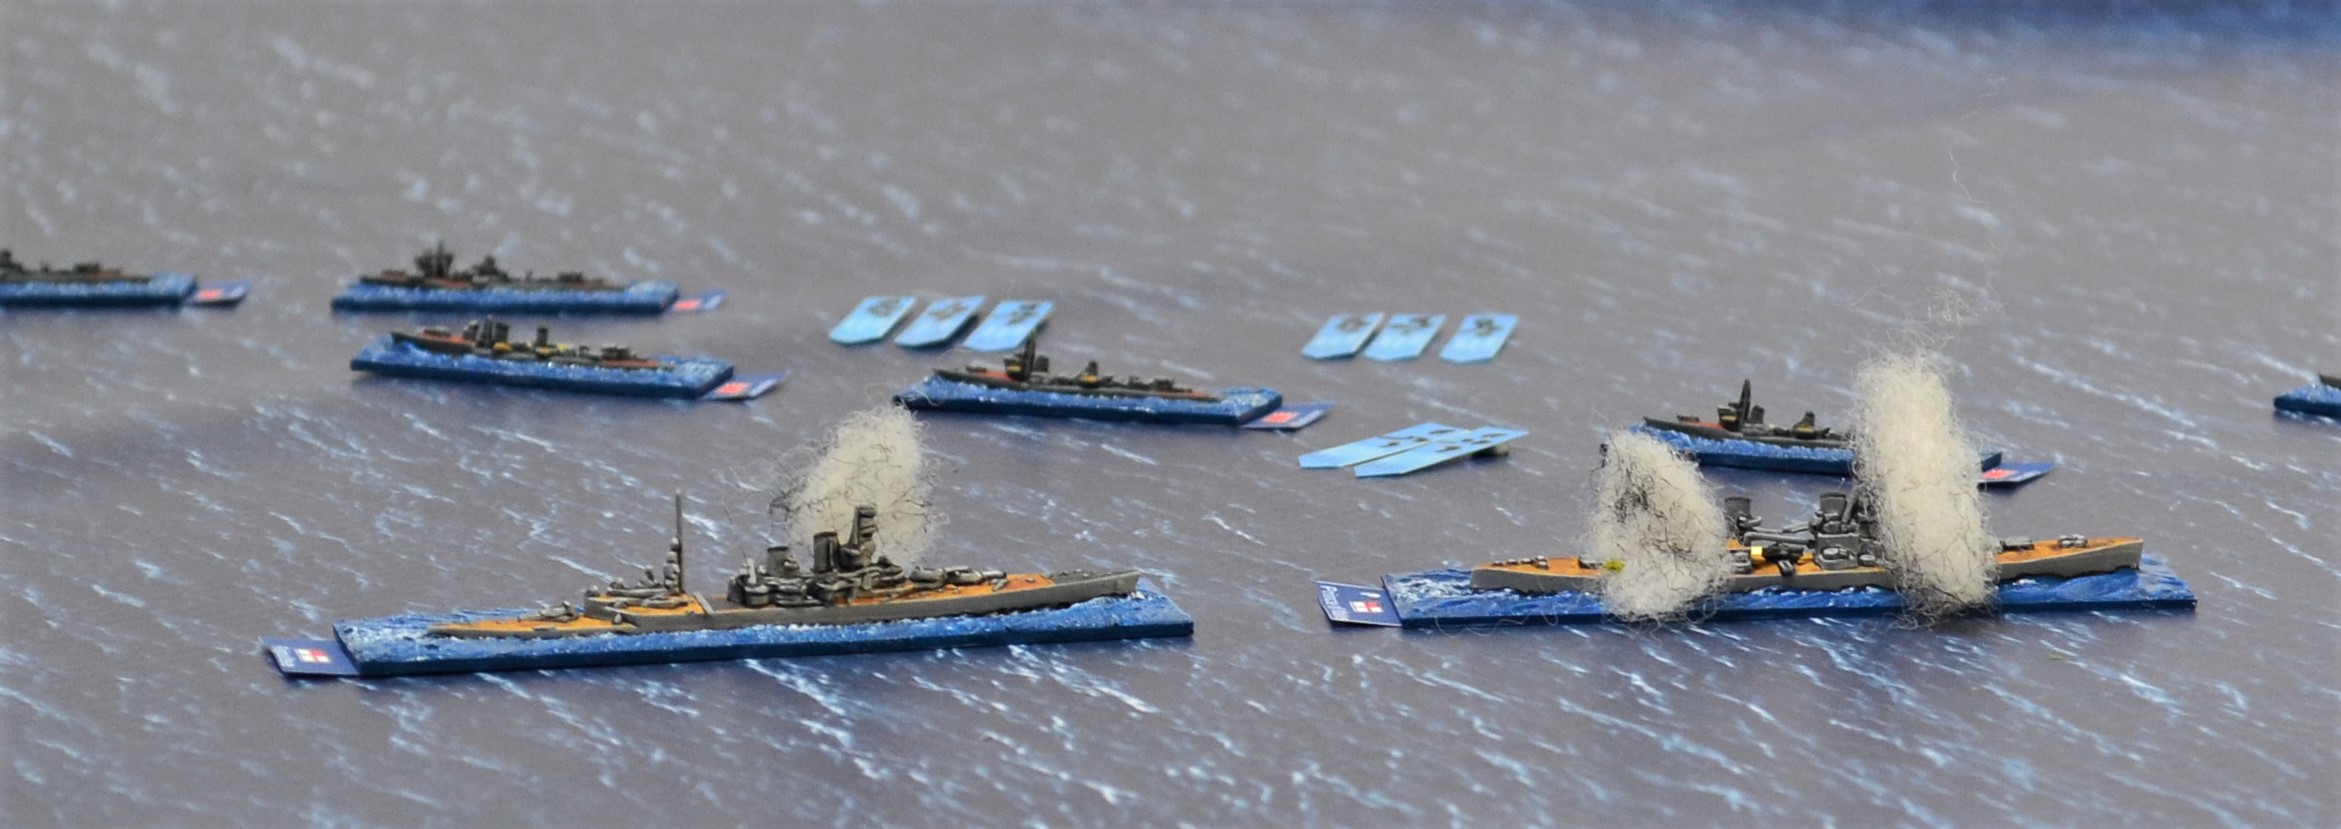
| An overview of both forces as contact is made. The Japanese on the right with markers indicating the ships illuminated by star shells. |
Continued -
 |
| The British lead by their flagship Prince of Wales. |
 |
| Gun flashes rippled along the British column with one 14" shell from the PoW hitting the Kagero class destroyer, Hagikaze (2nd ship in column nearest camera). It was lucky to survive but nevertheless suffered extensive damage with both torpedo mounts, depth charge rack and 'Y' turret destroyed with the superstructure set on fire. |
 |
| The Japanese fleet with on the left, the 8th Division, 2nd Destroyer flotilla (Asashio class) Oshio (flag), Arashio, Asashio, Michishio. The centre column is led by the battlecruisers Kongo and the Haruna, the heavy cruisers Takao and Otago, and at the rear the two Akatsuki class destroyers of the 6th Destroyer division, Ikazuchi, Inazuma. On the right are the Kagero class destroyers of the 4th Destroyer division, Arashi (flag), Hagikaze, Maikaze, Nowake. |
Turn 2
 |
| A whole series of blips now showed up on the radar and it was clear a significant Japanese force had been detected. |
 |
| Several Japanese ships were illuminated by star shells. Both sides acquired each other visually but no hits were registered. Japanese destroyers peel away to obtain torpedo firing solutions. |
Turn 3
 |
| PoW and Repulse concentrated their main battery fire on the Kongo scoring several devastating hits knocking out 3 hull boxes reducing its speed to 9 knots. Return fire from the Japanese capital ships proved poor missing their targets. |
Turn 4
 |
| The Haruna, both cruisers and a slowing Kongo concentrated their main battery fire on the British capital ships destroying 'A' turret on the Repulse. Both battlecruisers fired their secondaries on the British destroyers again having no success. Good news for the Japanese came with the extinguishing of the fire on Hagikaze which had now pulled out of the line (middle right). |
Turn 5
 |
| An overview of turn 5. The yellow markers indicate ships that have been illuminated, here by searchlights. |
 |
| All ships have been acquired with gunfire exchanged. More importantly for both sides are the number of torpedoes launched. |
 |
| The PoW and Repulse find themselves swarmed by Japanese destroyers. |
Turn 6
 |
A good many ships are illuminated by searchlights and the British destroyer flotilla on the left waste no time in firing their entire salvoes of torpedoes. A total of 18 torpedoes are now in the water with Kongo on the right providing a particularly enticing target. It had now slowed to 4 knots in the force 7 seas.
Haruna at top of photo used fired its main armament on the Repulse destroying a 15" turret. Its 6" and 5" secondaries poured their fire into HMAS Vampire at the rear of the destroyer column. Several hits were scored knocking out both torpedo tube mounts! More importantly an Engineering hit was sustained resulting in their speed reduced to 13 knots (destroyers lose 10 knots of speed in this sea state). |
 |
| Vampire's torpedo salvo, fired a turn before the other 2 destroyers, missed the Haruna and Kongo, but travelled on towards the Japanese cruisers. A plume of water was thrown into the air as a hit was scored on the Atago. 2 hull boxes and 'B' turret was knocked out. |
 |
| The Japanese fired an eyewatering total of 41 torpedoes at the British capital ships. Most of those were the powerful long lance. Of the 16 fired by both cruisers two struck the PoW. With more hull boxes lost its speed was now reduced to 8 knots. 'B' turret was also destroyed as was the bridge killing the Captain and Admiral Thomas Phillips! |
 |
Of the multitude of torpedoes launched by the Japanese destroyers, just one hit was scored on the Repulse. A second main gun turret was lost but critically, the rudder was jammed. It will perform an uncontrolled turn to port next turn. The secondaries of both British ships fired on the destroyers will several damaged.
Although the Japanese ships have torpedo reloads, they are unable to undertake this task in this sea state much to the relief of the Royal Navy. The seas state is also a significant factor reducing torpedo accuracy. |
 |
| The Oshio leads the 8th destroyer division as they seek to acquire a firing resolution for their torpedoes, all 32 of them! |
 |
| An overview of turn 6. |
Turn 7
 |
The PoW and Repulse continue to fire their main batteries on the battlecruiser Haruna with the latter returning fire but all missing their targets. The Repulse has failed to repair its rudder and makes an uncontrolled turn to port.
Both British capital ships fire their secondary armament at the Hagikaze (bottom left) with the 5.25" guns of the PoW in particular causing heavy damage. It was pretty much a floating wreck and can only manage 6 knots. The starboard 5.25" guns had some success firing at the flagship of the 8th Destroyer division, the Oshio, (off camera to the left) crucially knocking out one of its torpedo launchers.
Both British ships had successfully evaded the multitude of torpedoes but the Japanese destroyers did not hold back in firing their 5" guns in return. Although they could not penetrate the armour they could inflict other damage. And this they did to the PoW destroying its searchlight and more importantly, jamming its rudder to starboard! |
 |
The Haruna (top of photo) broke away from the crippled Kongo to engage the British capital ships. Both Japanese cruisers see an opportunity of wiping out the British destroyers and move to intercept them. In doing so they failed to take into account torpedoes in the water. The lead ship Takao was hit by a torpedo from the Electra. Its speed was reduced to 17 knots.
The Kongo and cruiser Atago were not so lucky. A total of 8 torpedoes had been launched by the Express (2nd ship in the column). One struck the already heavily damaged Kongo which proved to be its death knell. Losing all power and developing a list the ship began to sink. The Atago also sustained a hit causing a fire.
In return the cruisers fired on the British destroyers with both main and secondary armament. All 3 ships took damage but survived relatively intact. |
Turn 8
 |
| More torpedoes were fired at the Repulse and PoW but the Japanese had not anticipated the uncontrolled turns with all missing. The 4" secondaries from the Repulse used rapid fire to pour shells into the nearby Arashi (middle top with red marker) causing significant damage including a fire. |
 |
| The British lost acquisition of the Haruna in the darkness and therefore fired their available main armament on the illuminated Japanese cruisers. A 15" shell from the Repulse struck the Atago causing a fire. Gunfire was exchanged with the British destroyers with minimal impact. |
Turn 9
 |
| Atago successfully extinguished the fire and with the British destroyers peeling away into the darkness the two cruisers began to disengage to target the capital ships. |
 |
The Asashio (second in the destroyer column) fired a spread of 8 torpedoes at the PoW which had now repaired its rudder bringing the ship back under control. A torpedo struck the PoW disabling the last operational main battery turret and reducing its speed to just 4 knots.
The PoW was not finished though and fired its starboard 5.25" guns at the Michishio causing significant damage. A torpedo mount and both rear turrets were destroyed. The rudder had been jammed and a bulkhead hit sustained causing flooding. |
 |
| A combination of 4" shells from the Repulse and 5.25" from the PoW utterly destroyed the Hagikazi scoring a total of 8 hits between them. |
 |
| Repulse has re-acquired the Haruna illuminating it with star shells. It's 2 remaining main turrets aided by Radar Fire Control knock out Haruna's 'X' turret and damage its hull reducing its speed to 15 knots. Haruna fails to hit in reply and is now down to just 'Y' turret operational. |
Turn 10
 |
The Japanese 8th destroyer division on the left, fired the last of their torpedoes at the PoW and Repulse. A total of 12 torpedoes sped towards their targets but none finding their mark. The Repulse fired 4 torpedoes from their still loaded starboard launchers at the Haruna but also missed.
In the gunfire exchange, the Michishio, bringing up the rear of the 8th destroyer division, was hammered by the secondaries of both British ships. Leaving it almost dead in the water it was now battling to stop the flooding from 3 bulkhead hits. |
Turn 11
 |
| The Haruna on the left exchanged fire with the Repulse in the centre with neither side inflicting any damage. The PoW (top right) continued to limp away with the Repulse seeking to join her. |
 |
The Michishio (top right) could do little to stem the significant flooding and the order was given to abandon ship.
Having fired all their torpedoes, the remaining 3 destroyers sought to put some distance between them and the enemy heading towards the approaching cruisers. The last ship in the column, the Asashio, was hit by a 15" shell from the Repulse. Needless to say, the heavy shell caused significant damage. Two bulkhead floods and two fires have left the crew some serious work to undertake to keep the ship afloat. |
Turn 12
 |
| Asashio fails to stop any flooding or fires bringing it close to its demise. |
 |
| PoW slowly limps aways at a paltry 4 knots and to have any chance of escape the Repulse will have ot sacrifice itself. As it turns to deal with the Haruna in the foreground it receives a hit from the latter's 14" guns having been caught in that ship's searchlights. Another rear main battery turret is knocked out just leaving 'B' turret operational. |
 |
| The heavy cruisers Takao and Atago turn to assist the Haruna with both ship's port torpedo tubes still loaded. So far they have failed to acquire the PoW. |
Turn 13
 |
| Minimal action this turn with the Haruna and Repulse continuing to trade shots but all missing. The Asashio (bottom left) again attempted to stop the flooding and dowse the fires but such was the damage the ship was beyond saving. Another Japanese destroyer lost. |
Turn 14
 |
In the distance a rain squall rolls in from the north. The Repulse (middle right) turns north attempting to draw the Japanese away from the crippled PoW. It continues to be illuminated by a searchlight from the Haruna. The Japanese cruisers (off camera to the right) have failed to acquire the PoW so move towards the ship that can be seen, the Repulse.
The white counters at bottom right represents flotsam from the now sunken Kongo. When I can drum up the enthusiasm, I intend to make some suitable flotsam markers. |
Turn 15
 |
| The PoW continues to limp away (bottom left) while the Repulse (middle) trades shots with the Haruna (top right). Both ships score this from their main battery with each losing a hull box slowing both down to 8 knots and 9 knots respectively. The white counters are the flotsam from a now sunken Japanese destroyer. |
Turn 16
 |
| The Repulse, having turned to line up its last 15" turret, fires on the Haruna without success. Not so the Haruna who successfully hits the Repulse from its own last 14" turret. The result was serious for the Repulse with its last 15" turret knocked out. Its secondary 4" guns would be next to useless. |
Turn 17
 |
| The Repulse loses one of its secondaries to fire from the Haruna as it now heads for the relative safety of the squall. The two Japanese cruisers have still not acquired the PoW and continue towards the illuminated Repulse. |
Turn 18
 |
| The now silent Repulse heads for the squall escaping fire from the Haruna. |
 |
| The PoW luck finally runs out. Spotted by lookouts from the Japanese cruisers it is immediately illuminated by searchlights. |
 |
| The Takao and Atago prepare to make their turn hoping to finally destroy the PoW with their remaining torpedoes. |
Turn 21
 |
| I have skipped a few turns as nothing to report other than manoeuvring. The Repulse continues towards the rain squall and the Haruna has all but given up the pursuit. In the foreground the cruisers prepare to launch their torpedoes and exchange ineffective shots with the PoW. |
Turn 23
 |
| The Takao launches its 8 torpedoes at close range and there is nothing the PoW can do to evade them. Incredibly the Takao overestimated the speed of the PoW and missed by a fraction! |
Turn 24
 |
| The Haruna begins the process of rescuing survivors with the Repulse now lost in the squall (visibility 4cm or 800 yards). |
 |
The final action occurs when the Atago launches its 8 torpedoes not making the same mistake as the Takao. The rough seas hamper their accuracy but nevertheless a hit is scored. Another hull box is lost leaving the PoW almost dead in the water. A fire is started which must be extinguished for the PoW to stay afloat.
The first attempt fails leaving just half a hull box keeping them afloat. If they fail again it is game over for the PoW. The crew has success!
The frustrated Japanese disengage with no torpedoes left and none of their guns able to penetrate the tough armour of the PoW. They console themselves that it is not over yet for the crippled British capital ships. Their land based aircraft have a chance to intercept them before they reach safety. |
The Japanese succeeded in that they prevented Force Z from intercepting their Malaya invasion group but at a heavy cost. One battlecruiser and 3 destroyers were sunk with no losses for the Royal Navy. This translated to 33.5 victory points for the British and 18 for the Japanese. Their battlecruiser,
Haruna, and the destroyer,
Arashi, were too badly damaged to continue in the campaign and will be withdrawn for repair. Of the British ships, both
Prince of Wales and
Repulse would also be withdrawn due to their extensive damage.
Force Z reforms and all five ships limp back towards Singapore. Unfortunately for them, they are spotted by Japanese land based aircraft who launch an attack. This will be played out in the next post (aircraft have now been painted!).


Wow, what a cracking game there Jon! I'm not normally into naval actions but I really enjoyed this. I thought the British would be in trouble but was happy to see that they held on to the end, but at some cost. Sadly I fear for their survival when attacked by the Japanese air force...
ReplyDeleteMany thanks for that Steve. I have always had a soft spot for WW2 naval going back to my youth.
DeleteThat one was worth waiting for - a rather close fought action but Force Z is about to meet its demise at the hand of your newly painted Japanese air power. That must've been one hell of a sea state for PoW to take a torpedo hit in the bridge... ;o)
ReplyDeleteMany thanks Rob. Those Japanese torps are certainly impressive!
DeleteGreat AAR! I just started playing GQ myself. What rule adjustments* do you make (if any) for playing solo? Also are you using the standard or advanced torpedo rules?
ReplyDeleteMany thanks mkee. I make no rule adjustments for playing solo. As with my land based games, I place myself in the shoes of each side at the relevant time. I have used standard rules for torps so far but considering aspects of the advanced rules such as partial spreads and optional launch time. Although I have owned the rules for some time I am still a novice so getting my head around the basics for now.
DeleteJon that is a brilliant AAR - loved the detail of the description and the link to the campaign.
ReplyDeleteShips look good also.
Richard
Many thanks for that Richard
DeleteGreat battle report, thank you for it. A better end for POW and Repulse (assuming they are finished off by LBA) than they actually had.
ReplyDeleteMany thanks Mad Padre.
DeleteA most interesting engagement, well described combined and with excellent models. I admit to being very surprised by the result. I look forward to reading of the next encounter.
ReplyDeleteMany thanks TWR.
DeleteExciting stuff. Always fancied doing something like that...thanks for the inspiration
ReplyDeleteMany thanks Jim.
Delete