Scale = 1/600 Aircraft; 1/3000 ships
Manufacturers = A/c Tumbling Dice; Ships Navwar & Davco
Rules = Bag The Hun 2 for Air to Air; General Quarters 3 for Air to Ship
Table Size = 6' x 3'9"
Terrain = Sea boards by Purbeck Terrain (no longer trading)
Having been spotted by an Arado Floatplane, the main allied invasion fleet is the target for an Axis air attack.
Axis air units were scrambled with 8 x ME110 fighters and 9 x HE111 torpedo bombers out of Samos rendezvousing with 8 x Italian Folgore fighters and 6 x SM79 torpedo bombers out of Kos before heading out in the direction of the allied ships.
The Axis air formations were picked up on ship's radars at 15,000 yards (150cm) leaving little time to get aircraft airborne from the carrier HMS Avenger. 4 Seafires from blue section were already in the air forming a CAP. 8 Seafires on the deck of the Avenger scrambled to get airborne.
Before I detail the AAR a few words about the rules. Bag the Hun is used for purely the air to air phase with GQ3 for the air to ship. You will have seen from the previous action involving the Cyprus fleet that this neatly split into two different parts with the air to air phase concluded before the bombing attack. This action will not be so convenient due to the close proximity of the fleet.
I had considered just using BTH as it caters for ship action. However, I felt it was all a little too generic for the purposes of my campaign. The ship's AA capability is based on the type of ship rather than what it was actually equipped with historically.
I have therefore created a basic hybrid of the two to allow the ships to respond as per GQ3 but BTH continues with the air to air section. A very brief overview:
2 x BTH moves = 1 x GQ3 air phase (3 air phases = 1 GQ3 move)
A chart was created showing the GQ3 altitude levels in comparison with those of BTH (14 levels in GQ3 v 6 in BTH). Fortunately level 3 in GQ3 is the same as level 3 in BTH which happens to be the maximum height for close range AA fire. Long range being level 4+.
The tricky part commences when the bombers begin their torpedo attack runs. Any Seafires attempting to shoot them down would have broken off by now to prevent them from flying into the barrage of AA fire. So GQ3 now kicks in for the bombers covering the torpedo attack.
Continued -
 Blue Section of Seafires, who had been performing the CAP, are vectored towards the radar detection.
 The Axis air formations approach the allied fleet. HE111 and SM79 torpedo bombers are escorted by ME110's and Folgores at a higher altitude.
 There is not enough time to form up flights of Seafires departing Avenger's flight deck. The best they can do is form up into pairs and gain altitude as quickly as possible. Here red and green sections rapidly climb through the altitude levels.
 Blue Section moves out to the east seeking to gain advantage by having the sun behind them. They are unable to reach the high altitude level of the ME110's who circle ready to intercept them.

 By maintaining a large bomber formation they can act as one until fire upon or are split for any other reason.
 The 1st Schwarm of ME110's descends to fire head on into Blue Section of Seafires. It is a poor start for the Germans with 2 aircraft with Sprog pilots managed to jam their guns and no damage is inflicted on the British!
 An overview of the scene of the action at this point. Top right is the action between Blue Section and ME110's. Red Section with one pair as yet unspotted, move out to the right to support Blue Section. With the Axis forces now all spotted it is clear to the British that they must concentrate on the torpedo bombers even if it places them at risk of being picked off by the escorting fighters.
 With that in mind, Blue Section fly past the 1st Schwarm aiming to have a clear run at the HE111's. The 2nd Schwarm is at a higher altitude and therefore cannot fire on them as yet.


 The position of the fleet in reveals how close the action is. More of the fleet has yet to enter the board.
 The leader of the Folgore's 2nd Section conducts a hard turn and in doing so the Sprog wingman fails utterly to follow suit. He strays into the path of two Seafires that up until now had not been spotted. He pays the ultimately price as a burst of 20mm and MG fire causes his Fulgore to explode. The only consolation being that the firing Seafire suffered from a jammed gun.
 As the Folgore disintegrates a Seafire suffers a similar fate. An ME110 dives out of the sun from a higher altitude towards a Seafire performing an 'overhead attack'. As the ME110 passes the Seafire it fires off a devastating burst of gunfire causing the Seafire to explode. The ME110 was unaffected by the explosion and ended its move at a lower altitude and ahead of the hapless Seafire. The Sprog piloting the Seafire adjacent to the doomed plane lost control of his plane as a result of the explosion and pealed away from his formation.
 The Seafires get amongst the bombers breaking the large formation. Blue Section Leader gets on the tail of an HE111 and shoots it down.
 As the Italian and German bomber formations angle to the west to gain a good attacking torpedo angle on the fleet. The Ace Seafire Squadron Leader gets behind the Top Ace HE111 Schwarmfuhrer but fails to get on its tail.


 The Veteran Green Section Leader was determined to make the 2nd Kette Leader pay for the demise of his colleague. He makes a perfect turn getting right on the tail of the HE111. He unleashes a devastating long burst of 20mm and machine gun fire utterly shredding the HE111. The 2nd Kette Rottenfuhrer would play no further role in this action other than to try and bail out!
 Two Seafires, both piloted by Sprogs, continue to descend out of control. Both are panic-stricken as they fight to regain control of their aircraft. One manages to regain control moments before plunging into the sea. The other was not so lucky and failed to recover. The surviving plane was now too far out of the action to play any remaining role and would make his way back to the Avenger before running out of fuel.
 The Fleet Air Arm Squadron Leader Ace pilot nurses his badly damaged Seafire towards the flight deck of the Avenger. He succeeds in making a safe landing before the torpedo bombers strike.
 The view from the fleet. AA crews await at 'Action Stations' looking on at the swirl of planes in the distance finding it difficult to tell friend from foe. Momentarily planes briefly fly within long range but the AA guns hold their fire for fear of hitting their own side.

Axis air units were scrambled with 8 x ME110 fighters and 9 x HE111 torpedo bombers out of Samos rendezvousing with 8 x Italian Folgore fighters and 6 x SM79 torpedo bombers out of Kos before heading out in the direction of the allied ships.
The Axis air formations were picked up on ship's radars at 15,000 yards (150cm) leaving little time to get aircraft airborne from the carrier HMS Avenger. 4 Seafires from blue section were already in the air forming a CAP. 8 Seafires on the deck of the Avenger scrambled to get airborne.
Before I detail the AAR a few words about the rules. Bag the Hun is used for purely the air to air phase with GQ3 for the air to ship. You will have seen from the previous action involving the Cyprus fleet that this neatly split into two different parts with the air to air phase concluded before the bombing attack. This action will not be so convenient due to the close proximity of the fleet.
I had considered just using BTH as it caters for ship action. However, I felt it was all a little too generic for the purposes of my campaign. The ship's AA capability is based on the type of ship rather than what it was actually equipped with historically.
I have therefore created a basic hybrid of the two to allow the ships to respond as per GQ3 but BTH continues with the air to air section. A very brief overview:
2 x BTH moves = 1 x GQ3 air phase (3 air phases = 1 GQ3 move)
A chart was created showing the GQ3 altitude levels in comparison with those of BTH (14 levels in GQ3 v 6 in BTH). Fortunately level 3 in GQ3 is the same as level 3 in BTH which happens to be the maximum height for close range AA fire. Long range being level 4+.
The tricky part commences when the bombers begin their torpedo attack runs. Any Seafires attempting to shoot them down would have broken off by now to prevent them from flying into the barrage of AA fire. So GQ3 now kicks in for the bombers covering the torpedo attack.
Continued -


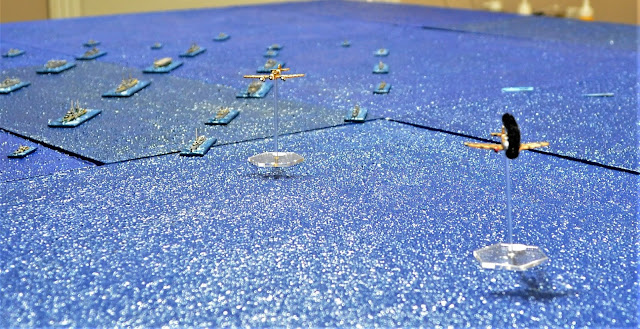
To the east, the Italians make good progress relatively clear of interference.


The Allied fleet hoves into view.

The flagship HMS Norfolk, and 8" cruiser, forms the centre of the fleet behind the cruiser Dido and ahead of the carrier Avenger.


A flight of Folgores attempts to head off Seafires making for the SM79's.

Another view of Axis bomber formations.

A pair of Seafires hurtle towards the SM79's with a Folgore trying and failing to get on the tail.

A pair of Folgores attempts to head off another pair of Seafires from the Italian bombers.


Blue Section Leader is very confident of a 2nd kill as he gets on the tail of the 2nd Kette Rottenfuhrer (leader). He lets fly with a long burst but frustratingly his guns jam without causing any damage.

The Rear gunner of the HE111 fires a perfectly aimed hail of machine gun fire into the Blue Section Leader's Seafire. The Seafire peals away on fire as it begins its fatal plunge.


An overview at the end of Move 2.

The veteran Green Section Leader (centre of photo) gives a masterful display of pilot skills as he first shoots down an HE111 he then dives on an SM79 giving it a burst as he plunges past. The SM79 bursts into flames but is still airborne with the crew now attempting to extinguish the fire. This action also breaks the Italian SM79 bomber formation.

Lead bombers begin their approach prior to making their torpedo attacks.

The crew of the burning Italian SM79 struggle to extinguish the flames and it now becomes a 'serious fire'.

The German ME110 Ace pilot gets on the tail of a lone Seafire piloted by a Sprog and promptly shoots it down.

Two HE111's lead by their Top Ace Schwarmfuhrer followed by several Italian SM79's now almost reach deck level prior to making their turn to start their torpedo run.


The whole of the British fleet are now on the tabletop. For ship types refer to the naval orders of battle on an earlier posting under this label.
 The Italian and German torpedo bombers start their run. At this point I have switched to GQ3 rules for AA fire and the torpedo attack. One aircraft in GQ3 represents a flight of 3. I therefore roll 3 AA dice rather than one with results allocated to individual aircraft rather than flights. Due to the disparity in scales each section of aircraft will drop their torpedoes in a single group with the torpedo marker placed in the centre of the section (in GQ3 a single aircraft 'flight' drops a group of 3 torpedoes).
All aircraft are now 'on the deck' and approach the fleet at a reduced speed to launch their torpedoes.
 My apologies for this rather fuzzy photo but you will get the gist of what has happened. AA fire from all ships in range open up on the attacking aircraft shooting down a HE111 and a SM79. Additionally the Top Ace Schwarmfuhrer's plane is also hit and damaged (black smoke in photo). This just leaves one complete section of 3 SM79's and a single SM79 to complete the attack. Tests are made and the SM79 section drops their group of three torpedoes at 1,800 yards (18cm) from the fleet. The single aircraft drops his single torpedo at 1,000 yards (10cm) from the fleet.
Italian air launched torpedoes have a range of 3,300 yards travelling at 40 knots (40cms). In GQ3 there are 3 air phases per move so the torpedoes tracking will be broken down to 2 phases at 13cms and a final phase at 7cms.
 The surviving SM79's swoop low over the fleet with the Top Ace HE111 nursing his damaged aircraft away to the right of the photo.
The rest of the aircraft must now complete 2 BTH turns to catch up with these bombers.
 Elsewhere the action continues with the remaining HE111's attempting to form a second attacking wave. Here the veteran Green Section Leader continues his lone inspirational action shooting down a Folgore.
 An overview as the scattered HE111's face and uphill task in building a cohesive formation prior to making their torpedo attack. ME110's and Folgores swirl around the skies attempting to take out the handful of remaining Seafires that still pose a threat to the bombers.

 Green Section Leader again causes the Axis forces a headache as he gets on the tail of a HE111 (in the foreground in photo).


All aircraft are now 'on the deck' and approach the fleet at a reduced speed to launch their torpedoes.

Italian air launched torpedoes have a range of 3,300 yards travelling at 40 knots (40cms). In GQ3 there are 3 air phases per move so the torpedoes tracking will be broken down to 2 phases at 13cms and a final phase at 7cms.
The rest of the aircraft must now complete 2 BTH turns to catch up with these bombers.


A Folgore tastes success shooting up a Seafire Sprog pilot whose aircraft explodes.


The SM79 on the left of the photo has spent the last two turns fighting a fire on board. It went from a fire to a serious fire and now has progressed to a very serious fire! They will be very lucky indeed to survive a worsening situation.
 As the torpedo bombers open their throttles to clear the range of AA fire, the SM79 squadron leader looks perilously close to the fleet. On the right the German Top Ace HE111 pilot is still within long range.
 The SM79 2nd Section has now cleared the AA range and slowly gaining height. In the background the burning SM79 is still airborne and the fires are still being fought!
 As the German bombers attempt to regroup, a Seafire explodes in the upper right of photo. The Ace ME110 fired the last of his ammo at the British plane with spectacular results.
 It is time now to check the torpedo tracks. The group of 3 on the left have yet to reach the fleet. The single torpedo on the right tests for a hit on the Black Swan class sloop Flamingo and narrowly misses.
 The SM79 squadron leader has left it too late and is met by a deluge of AA fire from several ships. He is shot down and immediately crashes into the sea.

 The heroic Seafire veteran pilot of Red Section who had caused so many problems for the Axis aircraft and had been instrumental in breaking up the bomber formations, finally succumbed to an overhead attack by a Folgore. The burst of fire from the diving Italian fighter ripped into the Seafire causing it catastrophic damage. The pilot failed to bail out as it crashed into the sea.
 The SM79 whose crew had been fighting a losing battle against a raging fire for the last 3 turns performed a miracle and successfully extinguishing it. With torpedoes still on board the pilot immediately swung his plane around to perform his torpedo run.
 A sprog ME110 pilot fires his remaining ammo at the last of the Seafires still on the board. The Seafire had been out of control but the Veteran pilot finally pulled out of his uncontrolled descent although it was not quick enough to avoid the long burst of fire. His already damaged plane suffered critical instrument damage but it was still in the air. With no further pursuit he exited the battle area.

 Disaster strikes! Not a single bomber succeeded in launching their torpedoes as they succumbed to a withering AA fire. The only silver lining for them being that only one was shot down. The remainder including the lone SM79 sustained damage and were unable to complete their attack.

 As the Axis aircraft flew off into the distance there were still torpedoes in the water. The lone torpedo failed to hit any ships and sank having reached its range limit. The sloop HMS Flamingo was not so lucky. Having escaped one torpedo attack the lookouts spotted 3 tracks heading towards them. One struck and blew the sloop out of the water.
The two remaining torpedoes headed towards the troopship Glenearn. The crew breathed a sigh of relief as two tracks narrowly missed. No further ships were in range so both torpedoes sank bringing to an end the attack on the main fleet.
Of the 12 Seafires, only 4 made it back to the Avenger, 3 of which were damaged and would have to be repaired. Therefore only 1 Seafire would be available the next day to defend the fleet.
The action of the Seafires though had arguably saved the fleet. Had all 15 bombers managed to launch a coordinated torpedo attack the consequences for the fleet could have been very severe.
Axis losses:
ME110's - none lost, 2 damaged, 6 operational.
Folgores - 2 lost, none damaged, 6 operational.
SM79's - 2 lost, 1 damaged, 3 operational.
HE111's - 4 lost, 5 damaged, none operational.
Although the Seafires paid a heavy price, with just one sloop accounted for, this was very definitely a loss for the Axis forces.


Bombers continue to weave their way through the swirl of dogfighing aircraft.


At last, free of interfering Seafires, the surviving HE111's form up to begin their torpedo attack.


Axis fighters regroup awaiting to escort surviving bombers back to base.

The two remaining torpedoes headed towards the troopship Glenearn. The crew breathed a sigh of relief as two tracks narrowly missed. No further ships were in range so both torpedoes sank bringing to an end the attack on the main fleet.
Of the 12 Seafires, only 4 made it back to the Avenger, 3 of which were damaged and would have to be repaired. Therefore only 1 Seafire would be available the next day to defend the fleet.
The action of the Seafires though had arguably saved the fleet. Had all 15 bombers managed to launch a coordinated torpedo attack the consequences for the fleet could have been very severe.
Axis losses:
ME110's - none lost, 2 damaged, 6 operational.
Folgores - 2 lost, none damaged, 6 operational.
SM79's - 2 lost, 1 damaged, 3 operational.
HE111's - 4 lost, 5 damaged, none operational.
Although the Seafires paid a heavy price, with just one sloop accounted for, this was very definitely a loss for the Axis forces.
NEXT: Map Moves
That is an impressive game...amazed you can handle everything solo. Well done!
ReplyDeleteMany thanks Jim. I tend to play games such as this in bite size chunks to avoid frying my brain!
DeleteThese sea-going air battles look spectacular. Impressive and eye-catching.
ReplyDeleteMany thanks for you supportive comments AP.
DeleteReally excellent AAR, and those aircraft formations do look amazing. Must resist the temptation to do some myself...
ReplyDeleteCheers
Richard
That's my problem Richard. Almost on every occasion I see somebody playing something interesting on the internet I have to take a deep breath and resist the urge to start yet another project!
DeleteI know that feeling! Though it’s always tempered by the knowledge that an impulse project never seems to work out as well as a planned one
DeleteYou are definitely right there Richard.
DeleteVery impressive action, Jon!
ReplyDeleteMany thanks again for your support Peter.
DeleteGood morning Jon
ReplyDeleteBeing a newcomer or returnee should I say I am very interested in your gaming table and the blue and green boards you use to cover it for your campaigns. I realise I am being a bit lazy here but could you point me to the articles that describe their construction.
Many thanks in advance
Peter
Hi Peter. The boards were made by a now defunct company 'Purbeck Terrain'. They were bought over 20 years ago. However, I have been upgrading some of them to look a little less basic. I have also made from scratch smaller hill sections (almost all of those in my Waterloo game) which blend in with my existing collection. Unfortunately most of these were made before I started the blog but more will be added in due course.
DeleteMost of my terrain work can be found under the label 'terrain' and some odds and sods in 'On the workbench' label. I intend soon to make from scratch a couple of coastal terrain boards to interconnect with my existing boards which will be posted under the 'terrain' label. These will be used in the Battle of Oporto.
Thanks Jon.
DeleteHi Jon OK I know I am a pain here but your 18" x 18" boards look nice and tough what are they made of?
ReplyDeleteRegards and thanks for your time
Peter
Hi Jon
ReplyDeleteFound the info via the net and a very old blog.
Thank you for your time and patience.
Regards
Peter
No problem Peter. Pleased you found the Answers ok.
Delete