As it has been a while since I played my Nap campaign, a reminder of the events that lead up to this battle can be found in the preceding post - Map Moves 21st to 22nd March.

The Prussian Brigade commander, Ryssel, orders his men roused at first light ready to march to the Prussian capital. As dawn breaks French troops appear en-masse to the east and south east intent on intercepting them. Ryssel realises that Blucher risks being surrounded in the capital and sends a messenger to alert him on events unfolding on his north eastern flank. He intends to hold the French for as long as possible to allow Blucher to fall back (if that is what he decides to do!).
Vandamme at the head of the French 3rd Corps observes the Prussian troops deploying across his line of advance. To ensure Blucher remains trapped inside his capital he is determined to deal with this lesser Prussian force and quick order.
Continued -
THE BATTLE OF ERFURT
French v Prussians
Total French 802
CinC Vandamme
Total Prussians 307
CinC Von Ryssel
Scale = 6mm (Baccus)
Rules = General de Brigade (modified)
23rd March 1808
0900 hrs (max 32 moves)
ORDER OF BATTLE


TERRAIN
4'6" x 3'9" Table
17A4 (top left) – Open
heathland, Pine woods. Village of Erfurt
(capacity 120)
Good Terrain
17A5 - Rough
rocky terrain, cottage (cap 12). Difficult
Terrain
17A9 (bottom left) – Rough
broken terrain, cottage (cap 12). Difficult
Terrain
17A10 – Firm
grazing land, fences, river deep, stone bridge. Good
Terrain
All Woods – Difficult
Terrain visibility 6cm

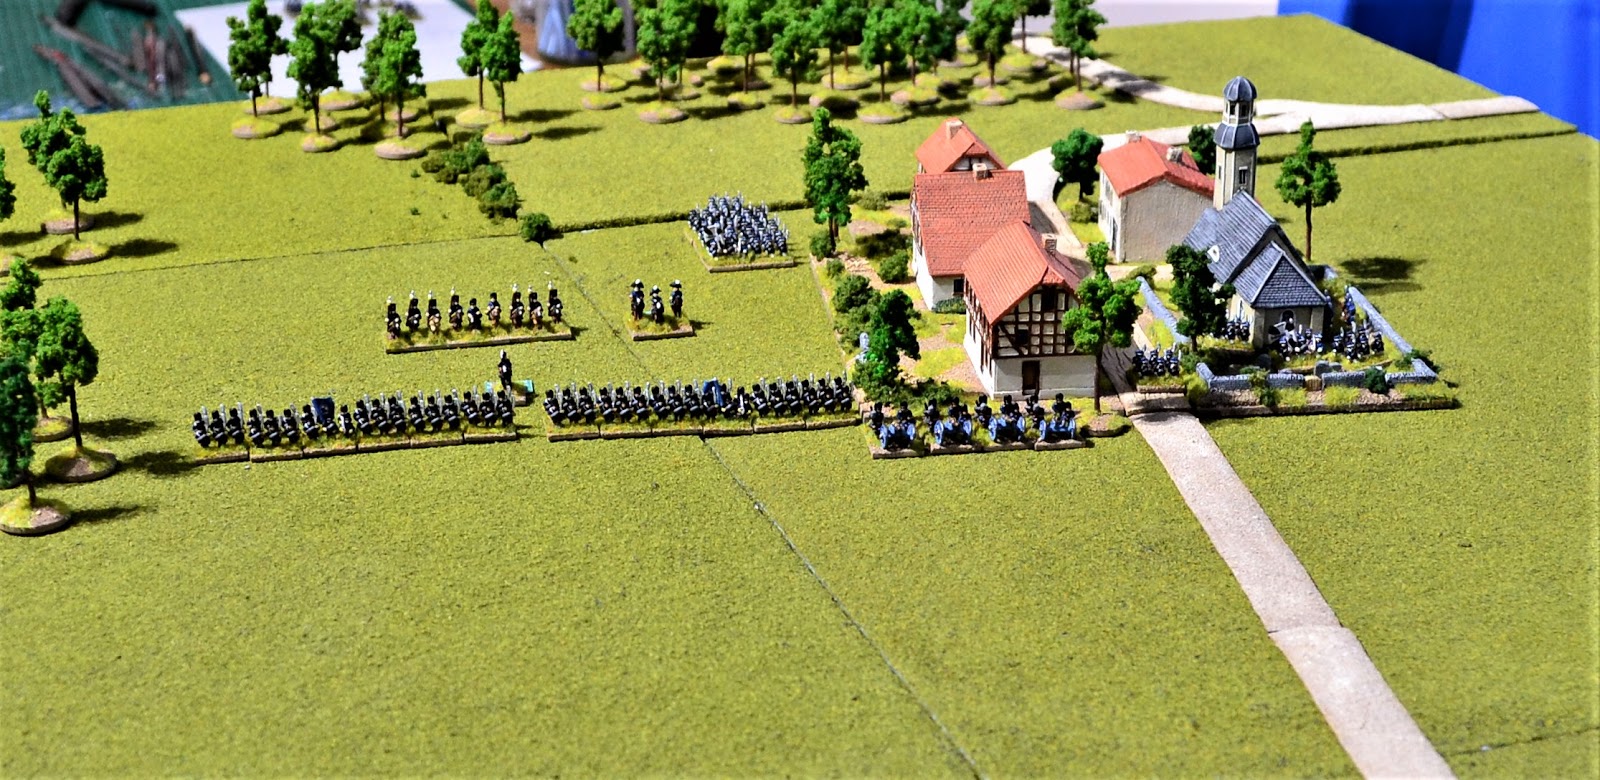
Initial dispositions:


The calm before the storm.

Von Ryssel forms a defensive line with Erfurt protecting his left flank and a wood his right. Brandenstein with the 1st Pomerania Landwehr line the edge of the wood with Pewels and the 2nd Pomerania Landwehr in Erfurt. With the 11th Infantry linking the two the only reserves are a single squadron of 2nd Silesia Landwehr cavalry and a single battalion from the 2nd Pomerania Landwehr. With the French having to traverse difficult terrain to his front their artillery would be confined to the road. Ryssel therefore positions his single artillery battery at the east end of Erfurt to concentrate its fire on the road.
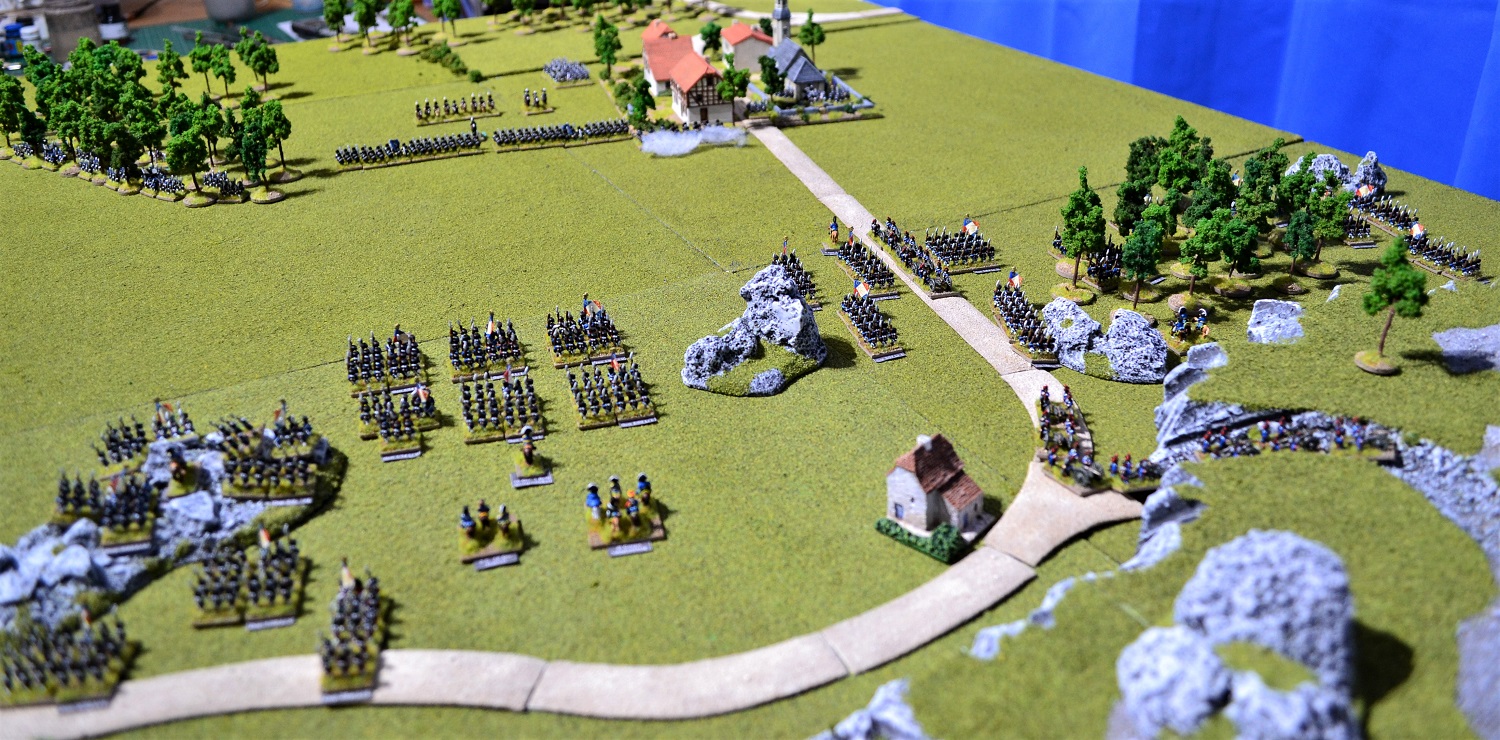
Vandamme knows the speed is of the essence if he is to ensure Blucher is trapped. He therefore orders an all out assault counting on weight of numbers to overwhelm the Prussians. Orders to each division are as per the photo. The cavalry brigade are to support the infantry taking any opportunity that presents itself to launch an attack.


Two views of Lagard's Brigade of the 11th Division.
 |
| French 11th Division and cavalry brigade. |
 |
| French 11th Division |
 |
| French 10th Division |
 |
| French Right |
 |
| French 8th Division |
 |
| Prussian 11th Infantry in line and 2nd Pomerania Landwehr occupying Erfurt. |
 |
| From behind Prussian 11th Infantry. |
 |
| 1st Pomerania Landwehr protecting Prussian right flank. |
TURN 1:

The French centre and right also had a stuttering start. The Prussian artillery opens up on the limbered French battery on the road with questionable accuracy only scoring one hit. This generated a formation test by the French battery which it easily passed. Elsewhere skirmish screens exchanged shots with minimal results.
TURN 2:


The French advance in the centre and right now made steady progress out of the rocky terrain which slowed them down (half move distances). The 8th Division 6pdr battery deployed astride the road and escaped with no casualties from the continuing inaccurate fire of the Prussian artillery. Two French batteries were stuck on the road leading out of the hill cutting.
TURN 3:


French and Prussian batteries exchanged fire with minimal results.
TURN 4:

With battalions now clearing rocky and broken terrain they marched confidently towards the Prussian position.


The 2nd battalion of the 2nd Pomerania Landwehr occupying the church and its cemetary, look on as the French 8th Division approaches.
TURN 5:

Turn 5 saw the first charges of the battle as the French 8th Division began it's task of capturing Erfurt. The two smaller columns in the middle of the photo charged the Prussian artillery who evaded into the village abandoning their cannon.
To the right, 4 battalions charged the 2/2nd Pomerania Landwehr defending the church and its cemetery. The Landwehr opened fire inflicting casualties on all 4 columns. 2 battalions faltered but the other two, the 1/15th and 3/15th Light battalions were not unformed by the two faltering battalions and charged home. The Landwehr stood their ground to receive them.

An overview at the end of the movement phase.


Meanwhile the 1st and 3rd battalions of the 15th Light infantry attack the cemetery walls defended by companies of the 2/2nd Pomerania Landwehr. They succeed in pushing the conscripts back into the church itself with heavy casualties.

Further to the French rear the lead battery finally gets moving only for the following battery to get stuck in the cutting!

A final shot of turn 5
TURN 6:

5 French battalion columns launch a charge at the 11th Infantry. The latter fire off murderous volleys with both battalions scoring high dice rolls. 13 casualties are inflicted across the 5 battalions.

The attack failed utterly. The 2nd and 3rd battalions of the 34th Line infantry retreated (middle of photo). On the left the 1/22nd Line halted and the 2/22nd Line faltered. The only successful battalion was the one that suffered the most, the 1/88th Line on the right. It passed its charge home test only to be unformed by the neighbouring battalion retreating.

The 1/15th and 3/15th Light battalions followed up their previous melee engaging the Landwehr holed up in the church. They succeeded in forcing their way in leaving the 2/2nd Pomeranians retreating from the village. The French success was tempered a little by the fact that Lafol had failed a command test leaving the rest of the division static.

Some photos now at the end of Turn 6. In the foreground is the continuing progress of the 11th Division.

Clear of the rough ground, Vathiez forms up his Lancers.

The left flank of the 10th Division angling towards the woods.

The steadfast 11th Infantry holding off the French.

Another shot towards the mangled French columns.
TURN 7:
With the French centre (10th Division) decisively repulsed and the left (11th Division) failing to make much headway, Vandamme becomes increasingly concerned given the urgency of defeating this Prussian brigade to ensure Blucher is surrounded. The French right (8th Division) is having more success and it is here that Vandamme hopes to turn the Prussian flank.

Turn 7 opens with a charge of French troops in Erfurt from the church towards an adjacent building but lose their nerve half way and halt.

The 1st and 2nd battalions of the 37th Line infantry have more success and storm the building in the middle of the photo comprehensively routing the Landwehr occupants.

With the French capturing the eastern end of Erfurt, the Prussian occupiers are now appearing out of the western end. The unit in the middle are the artillery crew who have given up any idea of retrieving their cannon (I used infantry bases to represent them. At some point I may paint up some crew figures for this situation).

In the centre, Habert pushes his 10th Division forward with several battalions now forming line. The Prussian 11th Infantry are pulled back to prevent being outflanked. However, the 1/11th Infantry nearest to Erfurt falter at the sight of the routing Landwehr from the adjacent building.

The 2/1st Pomerania Landwehr lining the wood fire on skirmishers screening the cavalry without success. To the right the 11th Division is still struggling against command failures to make a great deal of headway.
Turn 8:

A significant event develops in Erfurt when Pewels inexplicably orders his 2nd Pomerania Landwehr to retire from the village (rolled 2 x '1's and 1 x '2' , a significant command failure which forces him to retire if within charge reach of the enemy). This has exposed the left flank of the 11th Infantry.

The French 8th Division wastes no time in exploiting Pewel's cowardice and move through the village.

The French 2/88th Line of Gengoult's Brigade are the only troops withing charge reach of the faltering 1/11th Infantry. Seeking to take advantage of the shaky Prussians the 2/88th charge in column formation towards them (middle of photo). Against the odds, the 1/11th once again deliver a devastating volley despite the handicap of faltering. The 2/88th lose 5 casualties and are forced to retreat.

The 2/11th Infantry to the right are not so fortunate. They receive a volley from the French lines losing 4 casualties which forces them to retreat.

The 11th Division are nearly there!
TURN 9:
A drama unfolds!

An overview during turn 9.

Having abandoned Erfurt, Pewels is ordered to make a new defensive line in the woods to the west of the village.


2 shots of the French 8th Division steadily moving through Erfurt.

This time the French aim to make no mistakes. The 1/11th Infantry has not had time to rally from falter as the 1st and 3rd battalions of the 88th Line infantry charge into them. The two French battalions defeat the Prussian battalion inflicting 6 casualties and forcing them to retreat.

The Prussian centre now looks precarious although the 2/11th were rallied and a new defensive line begins to form.

On the French left, Vathiez leads his lancers on an outflanking move around the western end of the wood occupied by the 1st Pomerania Landwehr.

At last contact is made on the Pomerania Landwehr defending the wood, but not by the 11th Division! 2 battalions launch a charge, the 1/56th Line of the 11th Division, and the 2/70th Line from the 10th Division. The defending 1/1st Pomerania deliver an effective volley causing the 1/56th to falter. The 2/70th was made of sterner stuff and charged home (middle of photo).
Col Brandenstein joined the 1/1st Pomerania to stiffen their resolve. These were slightly better troops than their comrades in the 2nd Pomerania, being rated 2nd Line. The French battalion carved into them with easy and with such devastation they routed despite the presence of Brandenstein who desperately tried to rally them, but to no avail.

In response to this rout, the 2/1st Pomerania lost their nerve and began to retreat. A brigade test followed which proved disastrous for the Prussians. The Brigade (Prussian Regt) broke. As both battalions were either routing or retreating both dispersed. This collapse of the Prussian right now left Von Ryssel in a perilous condition.
TURN 10:

As the 8th Division advance beyond Erfurt, Billiard sees an opportunity to catch a Landwehr battalion who had lagged the rest of the Regiment. He launched 2 battalion columns at the rear of the 3/2nd Pomerania Landwehr. They about faced and received the charge. The French overwhelmed the conscripts causing heavy casualties and routing them.

In the centre the 2/11th Infantry was reforming as 3 French battalions poured fire into them. They absorbed the casualties and held their ground in the subsequent morale test.


A view of the 11th Division who are now advancing in the wake of the routing Landwehr.
TURN 11:

With the area now clear of Prussians, the 8th Division advance towards the centre to intercept what is left of the enemy.


Reichenbach joined the 2/11th Infantry in the centre to steady them as they faced a charge by 3 French battalions. Once again the Prussian musketry proved themselves firing off a deadly volley inflicting casualties on all 3 battalions. All failed to charge home with one retreating, another faltering and the third halting.

Behind and to the left of the 11th Infantry, the 3 conscript battalions of the 2nd Pomerania Landwehr are dissolving into a mess. A brigade morale check is initiated resulting in a 'broken' brigade. The close proximity of the board edge means that they disperse from the battlefield. This is a heavy blow for the Prussians and it is now a case of attempting to pull all units off the battlefield safely rather than continue to try and delay the French.


Seeing the predicament of the 1st Pomerania, the squadron of Silesian Landwehr cavalry move over to support them.

Dufour's Brigade of the 11th Division move through the now vacated woods.


Two photos of the centre showing the ever decreasing Prussian forces. The Prussians now had to take and Army morale test which they passed.
TURN12:

The French 8th Division are now free to move on the Prussian centre.


The 8th Division moving towards the centre with the routing 1/11th Infantry in the foreground.

An overview of the centre at the end of turn 12.

The failure of Vathiez to activate allows the 1st Pomerania Landwehr to exit the battlefield unmolested. The Silesian Landwehr cavalry move to ensure they are screened.
At the end of turn 12 another army test for the Prussians which they again pass.
TURN 13:

Turn 13 sees what the French hope to be the final destruction of the 11th Infantry. 2 battalions charge the front of the 2/11th with the 2/56th Line from the 11th Division, having moved through the wood, charges the flank of the Prussian battalion. Another effective volley causes one battalion to falter but the other 2 charge home. The 2/11th does not wait for contact failing the morale test and retreating.

The Silesian Landwehr launch a charge at the 5th Lancers who counter-charge with Vathiez at their head. There really could only be one outcome with the Silesians being carved up by the more experienced lancers. They lost 5 of the 9 involved resulting in immediate dispersal. The 5th Lancers suffered from blown horses so once again would not be able to cut off any Prussian line of retreat.


An overview at the end of the battle.
Although this was a decisive French victory they failed to deliver the destruction they were hoping for. They were dogged with command test failures particularly for the first half of the battle. At the crucial moment, Vathiez failed his test twice which would have seen the Lancers reining death and destruction among the breaking Prussians. The 11th Infantry were also lucky to escape without being wiped out which looked like a distinct possibility at one stage. Morale failures actually helped them to extract themselves from a rapidly deteriorating situation.
The casualty tally demonstrated the missed opportunity for the French. Both sides lost equal numbers with the Prussian 11th Infantry battalions proving to be particularly effective with their musketry. It is only a combination of better quality troops and a decisive victory that enabled larger numbers of French to be recovered.
TROOP LOSSES:


So the battle ends with the Prussians routing westwards pursued by the French 3rd Corps.
A note about the new-look labels. I trialled a green background on the Prussian labels to see if it blended in better with the green terrain boards. The answer was 'no' with the black being less conspicuous so I will stick with the latter. I was concerned that the unit details being reduced to abbreviations would make them difficult to decipher being so small. It is true to say that they are not as clear as the larger labels but I managed fine. I may try and make the letter denoting the troop quality a little more conspicuous by using a bold font. I did briefly mix up which units were under which commander.
The smaller labels definitely improved the look on the tabletop but I will aim for a compromise between the old and the new. Under the old labels I had 3 lines of type (commander, unit name, unit quality). Increasing it from one to two lines allows me to include the full commander name with the unit name and quality on the 2nd Line. Will try this out next time.
NEXT: Map Moves
Fantastic as always. Great to see the Campaign up and running again.
ReplyDeleteCheers, Richard P
Thanks Richard
DeleteIt just looks so nice./
ReplyDeleteThanks Norm.
DeleteGreat stuff
ReplyDeleteThanks Jacko
DeleteGreat stuff Jon, followed you here from FB, really good seeing the battles laid out this way. It tweaked my interest as it resembles the 15mm battle my group has just completed, battle of Sankt Michael, French Corps vs Austrian Division.
ReplyDeletehttps://toysoldiersforoldgits.blogspot.com/2018/12/battle-of-sank-michael-1809-austrians.html
stu
Thanks Stuart. I took a look at your blog and it looks like you had a fun game there. Austrians have been on my 'to do' list for some time now. Got to get my Peninsular War stuff out of the way first. If I get around to raising an Austrian army any time soon they will arrive in the campaign as reinforcements for the allies.
DeleteJon, you set a stunning game table and was quite pleased to see a thumbnail sketch of the War Plan maps show up on my blog. Seeing those maps, I knew the campaign had returned. I enjoyed your battle report and photos very much. I like your Bavarian looking church. Is that a Timecast model?
ReplyDeleteMany thanks Jonathan. Yes it is Timecast as are the rest of the buildings in Erfurt.
DeleteJust seen the thumbnail on your blog Jonathan. Yes it is pretty clear isn't it Lol.
DeleteMan, you sure make 6mm look good! Excellent and attractive set up. I've been missing this campaign...
ReplyDeleteMany thanks AP. Funnily enough I have been missing it too! Simply not enough time in the day to do all I want to do. :(
DeleteExcellent as always, been a long time admirer of your 6mm Napoleonic, it's a great inspiration. Great to see the campaign back too
ReplyDeleteMany thanks Iain
DeleteJon
ReplyDeletePrussians on something of a sticky wicket there. I'm surprised they lasted as long as they did! Excellent AAR again. Particularly appreciate the initial overview, labels and command intentions - does an excellent job of 'fixing' the situation in my mind for subsequent descriptions. Yours are the only Batreps/AARs I can (and do) follow through the action with any understanding.
A couple of questions occurred to me, if you don't mind my asking
1) Do you routinely play out such one side encounters in your campaign? Never tempted to 'kriegspiel' (or somesuch) some encounters in order to focus time and attention on the bigger/more critical battles?
2) How long did this one take to play - if you took out the photography and note taking necessary for the blog entry?
3) What's your formula for converting battle casualties into permanent and temporary for the campaign?
Thanks for posting.
Andrew
Many thanks for your comments Andrew and pleased you enjoyed the read. In answer to your Q's:
Delete1) I tend to play all actions as each will add to the story in some way. They are still fun to play as was this one. Although one-sided the French failed to exploit their advantage in numbers in destroying the Prussians entirely. They escaped largely intact. I am also looking at introducing skirmishes into the campaign such as British shore party raids and so on.
2) This was played out over 4 or 5 days with approx 8 - 9 hours playing time in total. This included stopping for photos. One of the benefits of playing solo!
3) This is a chart I imported from Grande Armee rules and tweaked a little. Basically roll one D6, add a factor that reflects quality of troops, and finally add or subtract for victory or defeat. I will post the chart with a more detailed explanation on the blog as I am sure others would also be interested.
All the best
Jon
A most enjoyable AAR mate. The best part was when the mass of French columns went in and the only one that charged home was the one who took the most hits....and became unformed, now that's what I call bloody typical lol.
ReplyDeleteThanks Ricky. Yes it was rather ironic that the most mauled battalion passed its charge home test. The battalion commander cursing as the neighbouring battalion stumbled over his in their rush to retreat!
DeleteA great looking action, with nail baiting narration, Jon!
ReplyDeleteA rather hollow victory for the French, I must say. Looking at the forces and the set up, I felt that if the Lancers got around those woods, the Prussians were likely to be annihilated, as they couldn't spare any men from the front. I suspect the French may have done better had they opened their attacks in line with volleys, and then charged ihn column on their next attack with their second wave - they could afford to trade casualties evenly much more than the Prussians could. As for Vathiez, well, he's no Lassale, Montbrun, Grouchy, or even Latour-Mauborg, is he?
Yes Vathiez has got a lot to answer for! Had he done what he was tasked to do it is difficult to see how the Prussians would have escaped so easily. The French went with the high risk tactics of pushing as many columns into the attack as possible with the hope that 2 or 3 would strike home. There is always the danger that effective volleys would put an end to that which is precisely what happened. They did then form lines to counter Prussian musketry backed up by columns. You are right Peter that they should have done that from the start.
DeleteExcellent AAR and a really compelling read. Thanks for posting!
ReplyDeleteMany thanks for your comment Mike.
Delete