 |
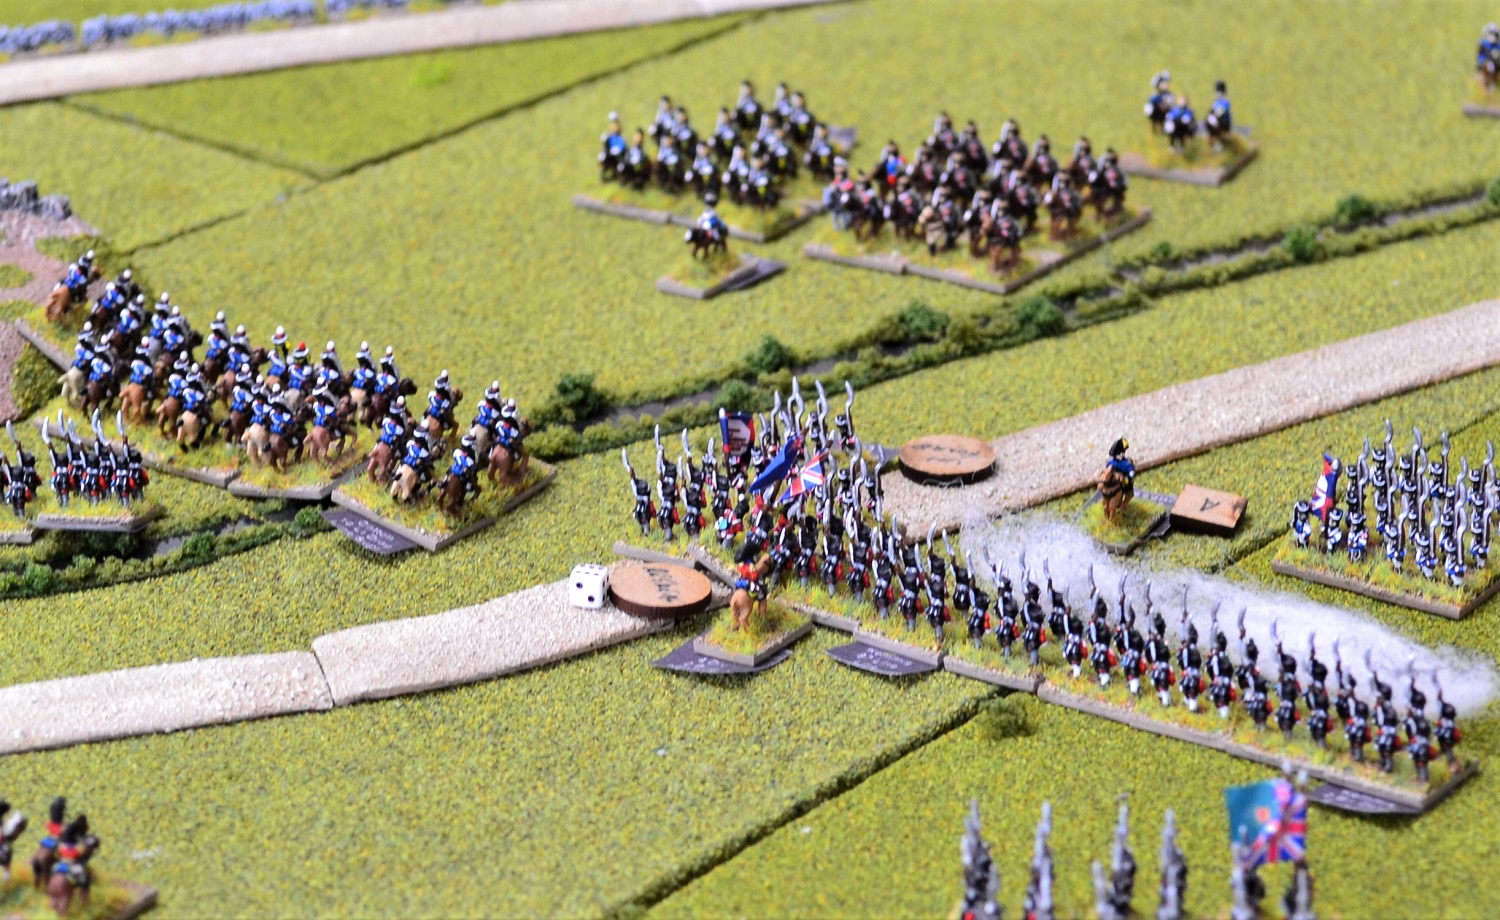
| On the French right, Maubourg's dragoon division, lead by Cavrois' brigade, receive their orders to attack. |
 |
| As the French dragoons advance, the 4th Dragoons on the middle left of the photo becomes unformed crossing the defile. Fane (bottom left) sees his chance and orders the 3rd Dragoon Guards to charge. |
 |
| Absolute disaster for the British! The Dragoon Guards charge into the static unformed French dragoons but fail to overturn it and are defeated. They will retreat in the next turn. Even worse for the British was the charge of the French 9th Dragoons towards the 1st KGL Light Dragoons. The latter counter-charged but was comprehensively beaten. Losses took it beyond the 50% dispersal threshold and would flee the field. |
 |
| Mackenzie's brigade, having about-faced from its march to the Medellin, rapidly closed in on the threatened British right flank. In the top right, Cotton's cavalry brigade also provided reserve support. |
 |
| In the centre the French infantry re-organised themselves having pulled back from the punishing exchange of fire with the British line. |
 |
| Leval's division continued its broad sweep to take attack the British right flank. To their right is Liger-Belair's division. |
 |
| Originally having been ordered to ignore the Pajar redoubt, an opportunity presented itself to take the position and two battalions were tasked with the job. Volley fire from the defending British 7th Line caused one battalion to falter, but the second charged into contact. The French won the melee expelling the British battalion from the redoubt and also maintained good order. |
 |
| The 40th Line are too preoccupied with the approaching French columns to worry about developments on the redoubt. They open fire with a murderous volley inflicting heavy casualties on two of those columns. |
 |
| The 40th are now attacked from the front and on its flank from the victorious French battalion in the redoubt. The battalion holds steady delivering another deadly volley into the battalion charging its front. The French 2/75th Line is utterly shredded causing it to disperse. The French 3/32nd Line pile into the flank of the 40th winning the melee easily. The British veterans rout. |
 |
| The loss of the 2/75th Line generated a morale test of Liger-Belair's own brigade now under the command of an ADC. It failed and as this was the second break for the brigade it's last two battalions fled the field leaving a gap in middle left of photo. |
 |
| The loss of the brigade generated numerous morale tests which affected Leval's battered division badly. Two already depleted battalions retreated with several others faltering breaking up the planned attack. Only the two Polish battalions on the right of the photo were unaffected and continued their march towards the British line. |
 |
| The routing 40th Line passed through the attack column of the 2/31st Line (middle of photo) unforming them. This removed an opportunity for that battalion to charge the now unformed French battalion responsible for the 40th's plight. At the bottom of the photo, Kemmis attempts to rally the 40th and succeeds - just! Had he not intervened they would have dispersed. |


 |
| Three overview photos at the end of turn 19. The loss of Liger-Belair's brigade could prove costly with the opportunity to exploit the capture of the redoubt and the hole in the British line caused by the routing 40th evaporating. Leval's division appears to be too exhausted to make much of an impression although the Poles should never be written off. Milhaud's dragoons are moving up to support them but the British right flank appears rather more secure than it did a fem turns ago. British losses to French guns are mounting in the centre but at this stage will not overly concern them. Over on the Medellin the British will be rather concerned about the poor performance of their cavalry with a collapse imminent. They brace for what will follow! |
 |
| Staying with the French left flank, what follows proved disastrous for the French. Porbeck failed to rally his Nassau battalions and a brigade morale check failed resulting in its units dispersing. |
 |
| Worse was to follow. Rey's brigade that had captured the redoubt and opened a gap in the British line, suffered a serious blow when one of its battalions charged the 2/53rd Line (middle left). The British volley scythed through the French column causing it to rout. Rey's brigade test also failed and as this was the second time it had broken, it also departed the battlefield leaving the gap around the redoubt as shown in the photo. To the right the Polish battalions charged the far right of the British line. The defending battalion failed to halt the Polish charge despite inflicting serious casualties and decided not to hang around waiting for the impact. They retreated leaving the British defensive line in something of a mess! |
 |
| Sebastiani, fearing a blood bath, issued orders for all his units to retire in order to reform. Apart from the cavalry, his orders were ignored! With his brigade commanders still on assault orders, Chasse's Dutch brigade and what was left of Grandjean's brigade jointly charged the two British battalions in the centre of the photo. |
 |
| The two British battalions once again cut down significant numbers although this was partially negated by being spread across 4 battalions. Three of those were stopped but one, the 2/4th Dutch Line, marched on into the 97th Line (middle of photo). The Dutch column defeated the 97th causing it to retreat. |
 |
| That victory though was offset by the collapse of Grandjean's two battalions who participated in the charge. Already badly battered, the losses sustained tipped them over the edge which lead to the demise of the brigade. One of the Polish battalions, dangerously extended into the British position, formed square as cavalry approached. |
 |
| The Poles simply refused to retire and still on their assault orders, launched another charge (top of photo) against the British composite battalion. Already exhausted, the Poles faltered under the British musketry. The failure to retire when ordered cost the Poles dear with the square charged by the fresh 1/45th Line. The column ploughed into the square causing the Poles to rout. The two heroic battalions that had been the centre of the French left flank success so far, now collapsed dispersing from the field. |
 |
| The failure to retire when ordered proved catastrophic for Sebastiani's Corps which now consisted of just two Dutch battalions. This brought to an end any hope of breaking through into the rear of the British line with Milhaud's cavalry having to revert to merely screening the British. |
 |
| In the centre the last British artillery battery was finally destroyed by counter-battery fire. This left the British with just one battery left on the Medellin. |
 |
| More French artillery was brought to bear against the British line and the constant drip of casualties was beginning to have an effect. The thinning line was fraying British nerves! Consolation was the recapture of the Pajar redoubt on the right. |
 |
| In the valley north of the Medellin the final cavalry showdown is about to begin. Bad news for the British from the start as the last Dragoon Guards regiments fails to rally and disperses from the field leaving the Spanish to hold the line. |
 |
| The Spanish hope to replicate their earlier success and charge the oncoming French dragoons. Their luck did not hold out with the Spanish cavalry routing. |
 |
| A subsequent Spanish brigade test lead to a broken result causing several regiments to flee the field. |
 |
| With just two shaky regiments left, the Spanish reformed ready to take on the approaching French cavalry. Their only saving grace being that the French attack was delayed by several of their regiments having blown horses and needed to recover. On the left, with the threat from the Spanish cavalry largely removed, Ruffin's division moves out of squares into attack columns in preparation for the assault on the Medellin. |

 |
| Two overview shots at the end of turn 22. The demise of the French left flank resulted in a French army morale test which it passed with ease. However, it signalled just how much they had suffered and victory could not be assumed. The clock is also ticking towards nightfall with much valuable time wasted in dealing with the allied cavalry to the north of the Medellin. The French must now press their attack to achieve victory. For the British, it is imperative that Mackenzie's brigade now move as quickly as possible to reinforce the Medellin. With Cotton's cavalry now holding their right flank against the French cavalry threat they have no further reserves! |
 |
| In what they hope will be the final assault in the valley, the Fremch 26th Dragoons charge the Spanish 2nd Hussars. The Spanish conscripts are determined not to go down without a fight and hold the more numerous French dragoons to a draw. |
 |
| Despite the mellee in the valley, Ruffin is ordered to begin his assault on the Medellin. The French simply cannot waste any more time. Here his division begins its advance. |
 |
| As the French cavalry steadily move along the valley floor, the 2nd Hussars charge the last of the Spanish cavalry, the Linea Infante (right of photo) who counter-charge. Despite a heroic fight (the Spanish roll a double '6'!) and inflicting a light wound on Beaumont, they are defeated. The Spanish also fight well in the continuing melee on the left but French numbers told in the end destroying the Spanish 2nd Hussars. |
 |
| The Spanish failed their brigade test signalling an end to allied cavalry resistance in the valley. |
 |
| All French battalions are now ordered to assault the British centre and on the Medellin. |
 |
| As their columns approach the Medellin, Tilson moves his brigade forward from the reverse slope. |
 |
| As the first of the French columns move into effective musket range, the 83rd Line and 2nd KGL line deliver shattering volleys. One of the French columns and..... |
 |
| Solignac's horse bolts straight into British lines and he becomes a prisoner! |
 |
| A view of the main French advance from behind their lines. |
 |
| Milhaud decides that the story is not yet over for the French on their left flank. The infantry may be pretty much destroyed but his cavalry is still intact and fresh. The 1st Brigade launches a charge towards the British lines with the 5th Dragoons being met by a counter-charge of the 14th Light Dragoons lead by Cotton. The momentum of the slightly heavier French cavalry won the day pushing the British back. In their elation the French would pursue them but failed to maintain contact. |
 |
| The 12th Dragoons failed to charge home against a British column (middle right). Two other battalions of Mackenzie's brigade begin their march to reinforce the Medellin. |
 |
| The 2nd Brigade were slower of the mark but finally got their charge underway. Counter-charged by the 16th Light Dragoons only one of the French dragoon regiments charged home, the other having faltered. Another victory for the French, this time more comprehensive forcing the British cavalry to retreat. |

 |
| Two overviews at the end of turn 24. The British right flank is suddenly thrown into confusion by the marauding French Dragoons. They have nothing left to counter the threat and can only hope that Cotton recovers his Light Dragoon brigade. For the French it is now all or nothing. The clock is ticking with just 8 moves left before nightfall and they throw everything into one last huge attack. The British line is perilously thin with few reserves and many of their battalions in the centre have been battered by French artillery. |
Well, this is rather nicely poised for a cracking denouement! I honestly thought the French would have won by now, but stubborn resistance (or unlucky die rolls!) leaves the British with a glimmer of hope, praying for the sun to set to save them to fight another day.
ReplyDeleteThe Spanish cavalry north of the Medellin, rather than take flight at the first hint of trouble as expected, caused problems for the French cavalry (yes dice rolls!!) seriously delaying their attack on the Medellin. Not turning out as I expected either.
DeleteThis is nail-biting stuff and has got me on the edge of my seat - please, please, don't make us wait too long for the denouement.
ReplyDeleteMedals all round for the Spanish cavalry!
Many thanks for that Rob. Pleased you are enjoying it so far.
DeleteThanks for yet a thrilling and well paced narrative. Still hopoing for Joseph to prevail in the end - will he commit his guard? Great set-up and what looks like a fun game.
ReplyDeleteI was wondering what role skirmishing has in the game - would the french be able to engage with skirmishers and wear down the british or it is only anstracted. And secondly, why don´t any of the french form line to engage in firefights with the british...
Many thanks Sparta. I am going to cover skirmishers in the post action wash-up. I have been using them, mostly in the abstract, but not ideal in this scale.
DeleteThe French did form line in the centre and occasionally elsewhere. They are at a disadvantage against the British whose rate of fire was greater. It is relatively minor in the rules but enough to make a difference in a protracted firefight. They are also up against the clock so cannot waste too much time trying to wear them down. If they can get their columns into melee the advantage switches to the French with potentially dramatic results!
Thank you for the explanation. I look forward to the post game write up on skirmishers, which I think is such a vital part of Napoleonic warfare even at this scale. I can see your point about melee. I am used to playing without melee as a possibility, so did not understand the mechanic. Historically it is interesting how the French never did not deploy as they did on the European battlefields in 1809.
DeleteGood morning Jon, a very interesting scenario you have left us with. Must admit the Spanish have held well and certainly delayed a French victory. There is part of me though that feels the British will throw a spanner in the works with a tactical manoeuvre and recover the situation, to be seen in your next report.
ReplyDeleteRegards Peter
Currently being played through. Interesting stuff!
DeleteVery interesting aar. The scope of the game really shows off the collections, and I too was rootng for the Spanish cavalry.
ReplyDeleteMany thanks pancerni. Yes it is nice to see the Spanish cavalry perform well for a change. Makes all that painting worthwhile!
DeleteGripping narrative Jon! Can’t wait for the next one.
ReplyDeleteMany thanks Mike.
DeleteIt is set for a close finale! Mackenzie's brigade seems to have been marching there and back all day. Are they going to play a crucial role, I wonder?
ReplyDeleteRegards, James
Keeps the lads on their toes according to Mackenzie!
Delete