Turns 1 - 4

The preliminary turns saw the Royalist foot regiments negotiating the crop fields and hedgerows. Another turn was taken up reforming and it was now turn 3 before they could move into musket range. The yellowcoats of Strode's regiment were the first to open fire. At long range they proved to be of minimal effect. Hertford's redcoats declined to reply knowing that at this range it would be lucky indeed if they scored a single hit.
Continued -

The situation with the Royalist's left division was little different with Popham's better trained bluecoats succeeded in knocking down a couple of casualties from each of Godolphin's regiments.


On the Royalist right flank the smaller company of Hopton's dragoons make their way through the crop fields.

Across the entire front of both armies musket fire erupted. The Parliamentarians had the better of it early on thanks to the benefit of cover. Casualties though were still relatively light.

The Royalist cavalry to the rear were delayed by the difficult terrain and were still forming up having passed through the hedgerow.
Turns 5 - 8
Turns 5 - 8

The order to charge was given to all the Royalist foot regiments. Buck and Travannion's own regiments refused the order and were content to exchange rather ineffectual shots.

Travannion had joined Hertford's redcoat regiment leading the charge into Strode's yellowcoats who had been joined by Strode himself. Neither side gained the upper hand with the melee continuing. Tragedy befell the Royalists when Travannion found himself on the sharp end of a Roundhead pike. His demise triggered morale checks which were passed.

Godolphin and Mohun's veteran regiments charged home but were successfully repulsed by the heavily outnumbered bluecoats of Popham's regiment. Both were pushed back 3cm but the two supporting ranks of each regiment absorbed some of the pressure reducing that to 1cm.
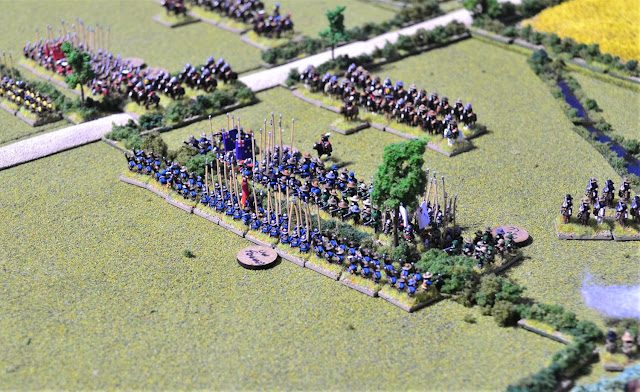
 An overview at the end of turn 6 with the Royalists struggling to break through the thin Parliamentarian line.
 Vaughan's bluecoat horse regiment turns to threaten Hungerford's dragoons who reply with musketry downing one of their number. The remaining dragoons continue their furious firefight with Hopton's dragoons who steadily advance towards them through the crops.
 Hertford's redcoats are pushed back by Strode's yellowcoats and begin reforming ready for another charge.
 Vaughan orders his regiment to charge the dragoons accepting that the ditch will disorder them. However, his raw troopers had other ideas. As more casualties were inflicted by the dragoons they refused to budge!
 The veteran regiments of Godolphin's left division again charge into Popham's bluecoats with the latter losing their good order due to a morale test. The two royalist regiments fail to capitalise on the disordered Parliamentarians with both sides continuing their melee into another turn.
 At last a breakthrough for the Royalists. The raw redcoat regiment of Buck and Maurice on the left of the photo failed to charge. Trevannion's veteran bluecoats in the centre had other ideas. They successfully charged the raw greycoats of Pyne who had no intention of waiting around and promptly routed pursued by the royalists.
 The routing greycoats caused several morale tests to be carried out. All passed with the exception of Popham's dragoons who retreated from their position.
 Vaughan this time managed to initiate a charge but as his troopers galloped towards the waiting dragoons, another volley downed 2 more of their number and once again, the raw troopers lost heart and halted. Hopton's dragoons had now moved into close range with Hungerford's dragoons on the right. A good set of dice rolls turned the tables on the Roundheads with several getting shot down.
 The melee continued between Godolphin's regiments and Pophams bluecoats with neither side getting the upper hand again. The melee will continue into a 3rd turn.
 Hertford's redcoats refused the order to charge and contented themselves with exchanging fire with Strodes Yellowcoats lining the hedgerow.
 An overview at the end of turn 8. Pyne's regiment failed to rally and continued routing swirling around the cavalry regiment to their rear (far left). Trevannion's bluecoats (far left) pursued for another turn before rallying leaving them exposed to Roundhead cavalry. Royalist cavalry however began taking advantage of the gap left in the line and began moving towards the centre of the Parliamentary position (upper left).
To be continued in Part 3.....


To be continued in Part 3.....
Your battlefield is so pleasing to the eye and enhanced by your photography. Enjoyable battle account. Thanks!
ReplyDeleteMany thanks Jonathan.
Delete+1 to that. Lovely textures to the battlefield and a very realistic look, just makes the narrative all-the-more alive.
ReplyDeleteMany thanks Norm.
DeleteVery good account Jon.
ReplyDeleteRegards
Peter
Many thanks Peter.
DeleteI just love seeing the 'photos of your games as they as so good! Coupled with a great AAR what more could one want? Loking forward to the next instalment.
ReplyDeleteMany thanks for that Steve.
DeleteWhat a splendid looking game!
ReplyDeleteMany thanks Jim
DeleteLove it. Top notch stuff. More please.
ReplyDeleteThanks for that.... yep more coming. When I get over this damn cough and cold! Manflu definitely hit.
Delete