We now move on to Day 2 with the arrival of Hooker's and Richardson's divisions reinforcing the beleaguered Union troops. Both sides lost an equal number of casualties during Day 1 and with half of those returning overnight losses amounted to 106 overall each.
The revised orders of battle for Day 2:


Continued -
It is now 4.30a.m. There will be 36 moves for Day 2 with the battle concluding at 1.00pm. Both sides deployed as follows:

The pressure will be on the Union force to drive the Confederates from Seven Pines. Not an easy prospect given the battering they took on Day 1.
 |
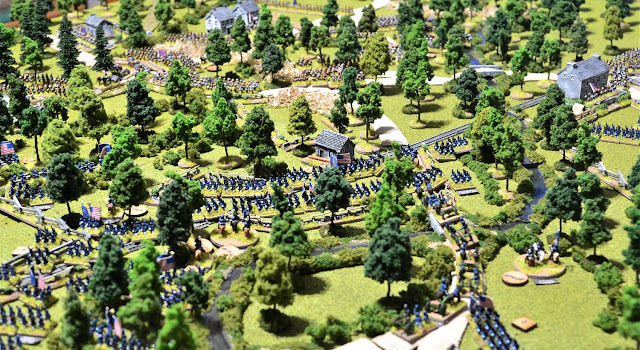
| Overview looking west. |
 |
| Centre of Union position. |
 |
| Whiting's Division |
 |
| View across Seven Pines. |
 |
| Richardson's Division |
 |
| From behind Union right flank. |
 |
| Seven Pines looking north west |
 |
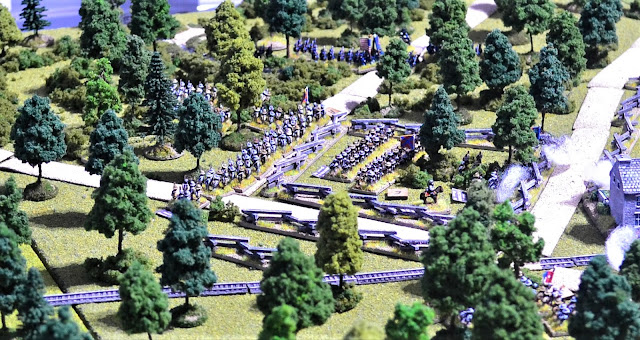
| Closer view of Pickett and Rodes' brigades. |
 |
| Seven Pines. |
4.30am - 5.00am (turns 1 - 2)
 McClellan was faced with two principle options. Go for the right hook driving the Confederates from Fair Oaks and descending on Seven Pines from the north. Or go for a direct assault on Seven Pines. As both options had pros and cons I decided to settle the matter with a dice roll. The direct assault on Seven Pines it would be.
With the Confederates gaining the initiative, Wilcox, Colston and Pryor's brigades advance through the woods to form a defensive line next to Pickett's brigade (right of photo). The are supported by Jenkins and Kemper's brigades (middle left).

 The opening shots of the 2nd day's fighting were fired by two Confederate batteries sited near Seven Pines. Their targets being advancing Union infantry.
 Almost the whole of the Union army, with the exception of Sedgwick's division, moves towards the direction of Seven Pines.
 Some congestion is caused, particularly with artillery as they are held up in a road block at a river crossing.
 Whiting's Confederate division advances to their designate defensive positions. They will be tasked with holding the Confederate left flank together with Fair Oaks station.

 Segdwick's Division moves out of the woods advancing towards the Confederate left flank.
 Sedgwick has ordered his brigades to take up position behind the limited cover of the fences around Adams' house.
5.00am - 5.30am (turns 3 - 4)
 Sedgwick's Division takes up position and prepares to open fire. He is facing Hampton's and Pettigrew's brigades who have occupied the woods and fields on the opposite side of the road.
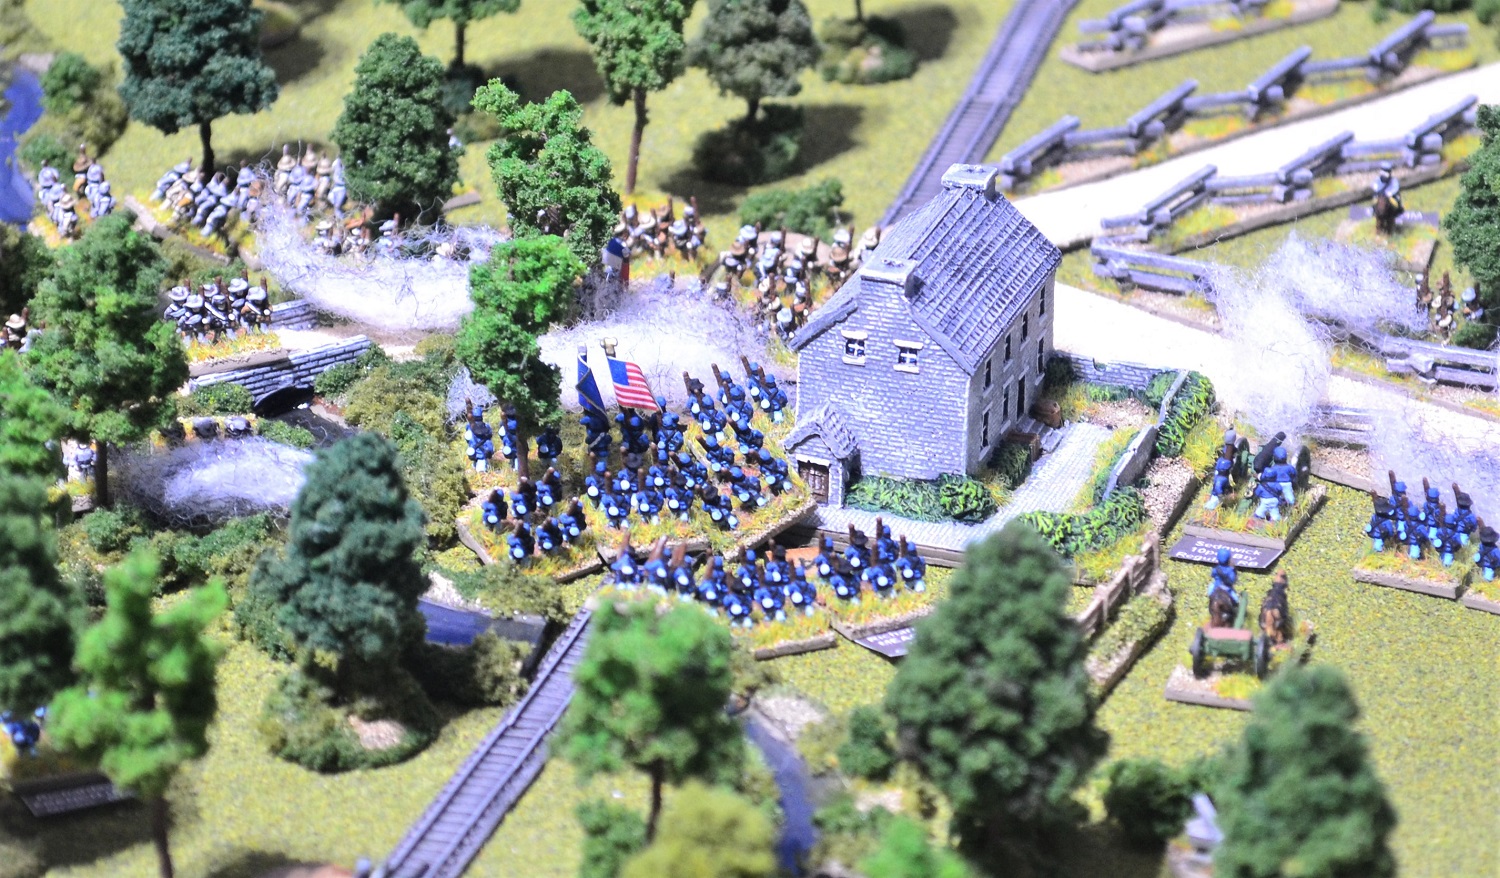
 A furious firefight erupts along the whole length of Sedgwick's division including with Confederate troops who have now occupied Fair Oaks. The Union troops fair badly in that initial exchange with Dana's brigade in and around Adam's house quickly running low on ammo (a double '1' thrown!). To their left, Gorman's brigade 'Goes to Ground' as the Confederate fusilade cuts a swathe through their ranks.

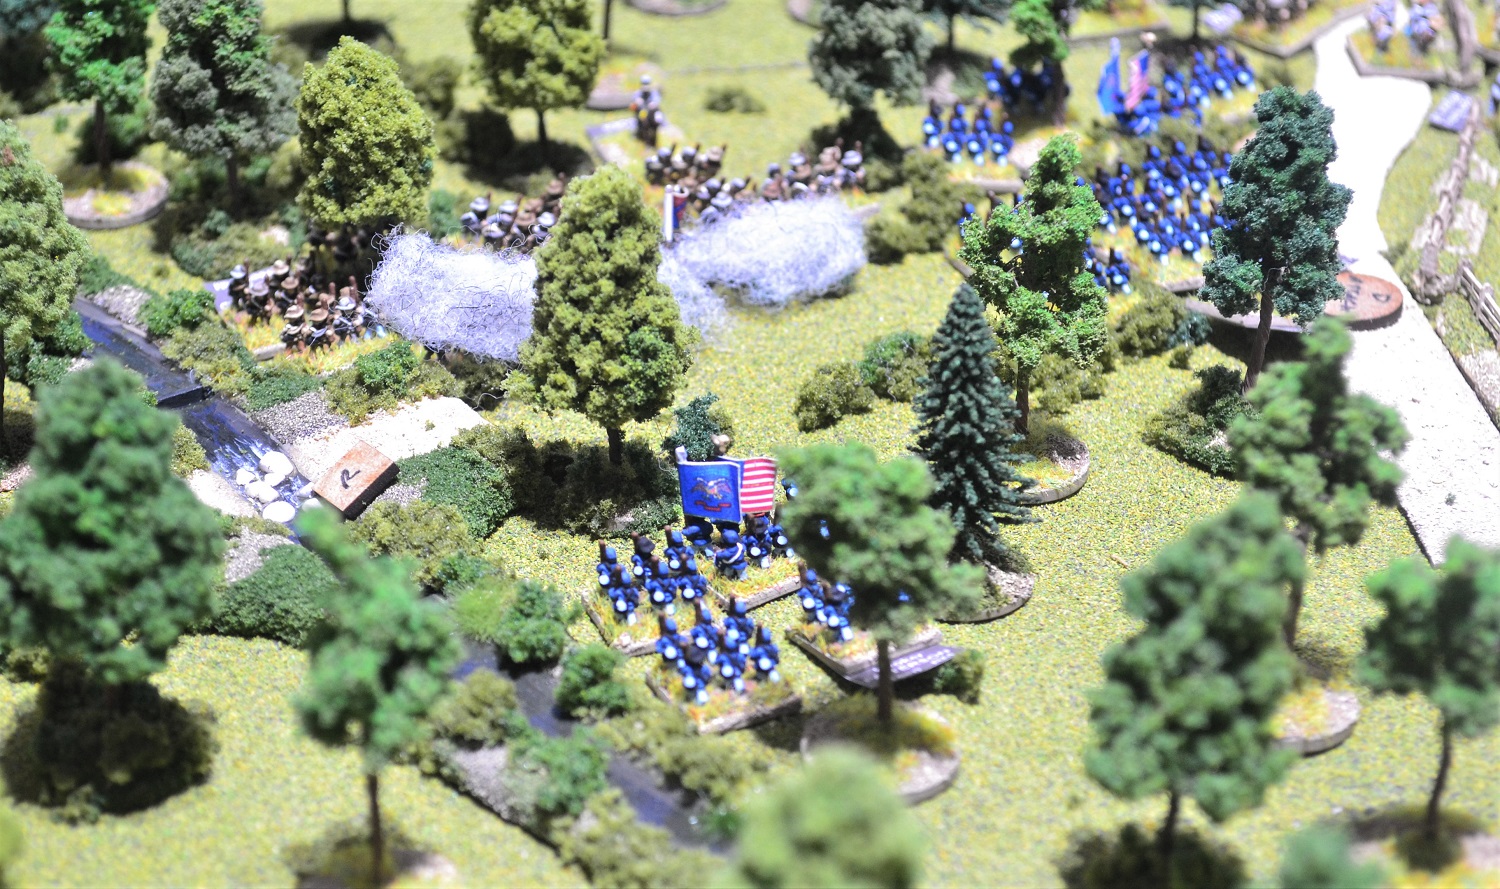
 The two moves of Keyes' Corps demonstrates the slow progress in the terrain they have to traverse. As they move around woods, rail tracks, buildings, and over fences, they struggle to maintain formation and frequently have to slow up to avoid intermingling with other units. In the second photo the Union troops hear gunfire and see musket smoke rising in the distance (middle right).
 At Seven Pines the Confederate artillery continues to pour fire into Hooker's Division as they advance across the Williamsburg Stage Road.
 Huger's Division lines a track to the south of Williamsburg Road and in the far distance to the right is Pickett's Brigade in position along Nine Mile Road.

 An overview of Seven Pines as the main Union attack closes the gap between the two forces.


 As Richardson's Division crosses the rail line they see Hood's brigade in the distance moving past Fair Oaks station and threatening their right flank.


 With Dana's brigade running low on ammo, Sedgwick decides to launch that formation and Burns' brigade (bottom right) into an attack on Hampton's brigade who were causing them so many problems.


 The number of Union formations concentrated in a small area of the battlefield is causing problems with unit cohesion in the difficult terrain. This is slowing their advance and causing bottlenecks. The Confederates on the other hand are comfortable with their defensive positions with only Hood's brigade in any sort of difficulty. The Union troops really need to break out and put the Rebels under pressure.
6.00am - 6.30am (turns 7 - 8)
 As the Union forces finally get in something like the position they want to be, the general order is sent down the entire line to attack.
 As the front line formations continue to engage several misunderstand their orders!
 Hooker's division fails to launch a co-ordinated attack with Patterson's brigade launching themselves into a charge towards Huger's Confederates but Sickles suffers a command blunder and goes onto hold orders. With Patterson's brigade having to soak up most of Huger's firepower they did well to merely halt and fire off a volley.
 Events were more dramatic around the crossroads at Seven Pines. Casey leads his Divisional column at the head of Naglee's brigade out from the woods towards the crossroads (upper middle). To his left Jameson's brigade charges into Mahone's Confederate brigade expecting Sickles to be joining him. Sickles' failure to charge would leave the Union troops outnumbered 2:1 in melee.
Casey has a similar problem. With troops to his right failing to move out it left him exposed to 2 batteries of artillery and a brigade of infantry pouring fire unhindered into his lead brigade. As they crossed the open field the confederates duly cut a swathe through their ranks as a combination of canister and musket balls struck the lead formation. Inspired by Casey waving his sword out in front seemingly impervious to the hail of lead his division ploughed on unbowed. The overconfident Confederate artillery left it too late. From the swirl of smoke Casey's troops emerged to strike both batteries quickly cutting them down to a man.
 A view of Jameson's brigade (middle of photo) now engaged in melee with Mahone. The large confederate brigade held their ground decimating the Union brigade. The survivors fled the field.
 To the north of Seven Pines, Howard's brigade launched his charge against the confederate line. The defensive fire was all too much for them halting the charge.
 A major turn around of events at Fair Oaks occurred when Meagher, on his own initiative, saw an opportunity of turning the tables on the confederates. With Hatton's confederate brigade's attention at Fair Oaks focussed on Union troops engaging him in a firefight, Meagher launched a charge on a narrow front from the woods at bottom right of photo. His brigade, in a column of attack, surged towards Fair Oaks shrugging of desultory fire from the defenders. Hatton's brigade, startled by this unexpected turn of events and resolute attack by Meagher, did not wait for impact and abandoned Fair Oaks retreating towards their rear.
Hood's brigade, situated astride the rail line, was in no position to counter-attack. His faltering brigade were struggling against the attention of 2 Union artillery batteries. Meagher, having occupied the space left by Hatton did not wait. He ordered his men into another charge towards Hood. The confederates immediately retreated but were not quick enough and were caught by the victorious Union troops (situation as depicted in above photo). With the Confederates in disarray and morale collapsing they were quickly dispatched by Meagher's bayonets. With Hood's brigade now destroyed it left Fair Oaks in Union hands once again.
 Top left of photo shows Meagher's initial attack. Bottom left is Dana's retreating Union brigade. Dana's repeated attempts at rallying his men failed as they initially routed followed by a complete breakdown as they fled the field. Sedgwick had more success elsewhere. Top middle of photo Gorman's brigade together with a battery of artillery were now able to focus on Pettigrew with Fair Oaks secured.
To the bottom right, Burns' Brigade recovers from its prone position and delivers a shattering volley (a double '6'!). Hampton's Brigade falters having lost significant casualties and their commander receives a light wound taking him out of action for a turn.
 Burns takes advantage of the situation and immediately orders a charge. This is too much for the Confederates who immediately retreat.
So here is the situation at 6.30am (end turn 8).
 The situation at Fair Oaks and with Whiting's division is looking precarious for the Confederates. To the south of the Richmond Railroad the Union attacks are making little headway against a well positioned Confederate defence.
6.30am - 7.00am (turns 9 - 10)
 Howard launches an attack on the Confederate lines north of Seven Pines. They barely get into their stride when the Confederates open up a devastating volley. The heavy losses prove too much for the Union Brigade who promptly retreat. Worse was to follow when Howard attempted to rally his men they fled the field!
 With Howard gone it left just the thin blue line of French's Brigade to face the combined firepower of 3 Confederate brigades.
 At Seven Pines crossroads there was a brief lull in the fighting as Naglee's Union brigade were unformed following the previous melee and the Confederates failed to take advantage when an order to charge into the disordered troops was ignored.
 Rodes' Brigade was not so hesitant second time around and charged Naglee's Union Brigade. The latter recoiled and faltered once again causing congestion in the woods to their rear.
 Sickles Brigade launched a successful charge against Mahone's Confederates and in the ensuing melee got the better of them. The Confederates at last looked a little shaky to the south of Seven Pines. Patterson's Brigade to their left however, failed for a third time to get to grips with the Confederates. As a result they continued to receive significant casualties from musketry.
 At Fair Oaks, Meagher was in the process of retaking the rail station for the Union.
 In a close fight at Fair Oaks, Meagher's Brigade won a narrow victory pushing Law's Brigade back. Fair Oaks station would now be back in the hands of the Union.
 Concerned about the situation on their northern flank, Jenkins and Kemper's brigades were ordered to reinforce Whiting.

 Seeing the Union most of the Union attacks around Seven Pines founder, Hill decides now would be an opportune time to switch from defence to attack. Changes of orders were issued to all Confederate brigades in and around Seven Pines with almost all responding appropriately, helped by the high quality of their commanders.
They were not yet able to make the most of their situation with Wilcox and Colston's brigades failing to charge home.


 A view to the north of Fair Oaks showing the dispersed nature of the fighting. Sedgwick's Division have so far not quite been able to deliver the knock out blow.
 Burns' brigade lead by Sedgwick pivots towards the south with the aim of bringing pressure onto the Confederate forces threatening Fair Oaks.
 A chance here for Gorman's Brigade along with it's supporting battery of artillery as they reduce Pettigrew's brigade to below 50% strength. With Whiting's encouragement who had joined the brigade, they passed their dispersal test. They were hanging on for now.
 Pettigrew may not have long to wait as a rallied Hatton's Brigade along with Jenkins' Brigade were arriving as reinforcements.
7.30am - 8.00am (turns 13 - 14)


 Sedgwick himself at the head of Burns' Brigade looks on as a great mass of Confederates advance towards his position.


 In the middle of the photo, Garland moves towards Palmer's brigade in preparation to launch a charge. Palmer has deployed his diminished brigade into a line formation to maximise firepower.

 Sedgwick's last brigade, that of Burns, once again engages in a firefight with Hampton's brigade.
 The confederates take advantage of the void left by Gorman's brigade and now move to outflank the main Union body.

 .Hooker's Division still holds the Union left flank south of Seven Pines but is in a precarious state. Sickles' brigade in the middle of the photo continues to engage with Mahone within the woods. The rear of his column receives unwelcome attention from a Confederate battery raking its ranks with canister fire.
 In the middle of the photo, Garland's Confederate brigade charges into the woods forcing the Union troops to retreat. To their left, Abercrombie's brigade continues to prevent Pickett's brigade from charging home through effective fire.
 The view south across the Seven Pines position shows the shrinking Union line in the face of overwhelming Rebel forces.
 At Fair Oaks station, Meagher's brigade is driven out by the fresh troops of Jenkins' brigade.


 Meagher's brigade is destroyed by Jenkins' rebel brigade who now take complete possession of Fair Oaks Station.

 The situation at the end of Turn 18 as Abercrombie's brigade finally succumbs and flees the field.


Total points awarded on Day 2 was Union - 15, Confederate - 68. When added to the Day one scores they equalled: Union - 48; Confederate - 109.
With the confederates also in control of Seven Pines this was a resounding Rebel victory.
Clearly the right hook should have been the Union strategy at the start of day 2. Had more resources been available they would have been able to capitalise on Sedgwick's early success. Even without that backup, Sedgwick succeeded in drawing Confederate forces north from the area around Seven Pines.
The large number of Union brigades concentrated in a small area within difficult terrain prevented them from organising a coordinated attack. The piecemeal charges by individual brigades rarely threatened the Confederate line although one did momentarily gain the Seven Pines crossroads indicating what could have been achieved with a massed attack.
This of course turned history on its head with the Confederates coming off worst in the actual battle.
A few tweaks were required to my 'brigade' level Guns at Gettysburg rules but overall I am pleased with the way they played. This was a useful test-bed for the rules to be used in my Gettysburg game.

With the Confederates gaining the initiative, Wilcox, Colston and Pryor's brigades advance through the woods to form a defensive line next to Pickett's brigade (right of photo). The are supported by Jenkins and Kemper's brigades (middle left).

A closer view of the advancing brigades of Anderson's Division.


Hatton and Hood's brigades quickly advance towards Fair Oaks station.


5.00am - 5.30am (turns 3 - 4)


Anderson's Division begins to form up to the left of Pickett's Brigade.


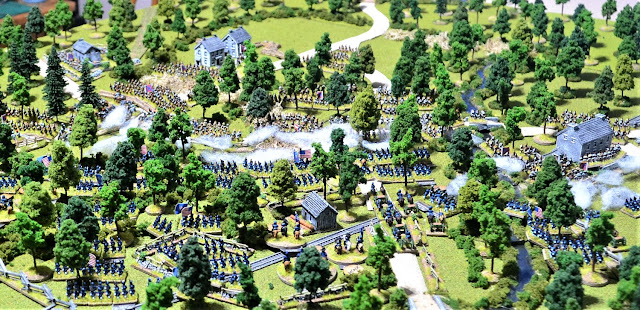
An overview of both sides converging around Seven Pines. Here turn 3.

And turn 4.


Hatton's brigade has occupied Fair Oaks Station and is engaged with Gorman's brigade of Sedgwick's Division.
5.30am - 6.00am (turns 5 - 6)

An overview as both sides become increasingly engaged.


Both brigades charge towards the Confederates who fire off a devastating volley downing numerous Union troops. This was too much for Dana's brigade who are forced to retreat before making contact. Burns' brigade is made of sterner stuff but nevertheless goes to ground rather than charge home.

At Fair Oaks, two Union artillery batteries are causing a headache for Hood as his brigade are flayed by successive rounds of canister fire. They attempt to respond but only kill one of the Union crew.

At Seven Pines the advancing Union forces gradually move within effective musket range and the Confederates duly oblige.

The entire front of both sides erupt into exchanges of musketry. Berry and Birney's brigades in the woods (middle right) suffer badly at the hands of Pickett's brigade and 3 Confederate artillery batteries. Despite using the cover of the woods they lose heavily and it is all their brigade commanders can do to hold them in line.

6.00am - 6.30am (turns 7 - 8)


Casey has a similar problem. With troops to his right failing to move out it left him exposed to 2 batteries of artillery and a brigade of infantry pouring fire unhindered into his lead brigade. As they crossed the open field the confederates duly cut a swathe through their ranks as a combination of canister and musket balls struck the lead formation. Inspired by Casey waving his sword out in front seemingly impervious to the hail of lead his division ploughed on unbowed. The overconfident Confederate artillery left it too late. From the swirl of smoke Casey's troops emerged to strike both batteries quickly cutting them down to a man.


Hood's brigade, situated astride the rail line, was in no position to counter-attack. His faltering brigade were struggling against the attention of 2 Union artillery batteries. Meagher, having occupied the space left by Hatton did not wait. He ordered his men into another charge towards Hood. The confederates immediately retreated but were not quick enough and were caught by the victorious Union troops (situation as depicted in above photo). With the Confederates in disarray and morale collapsing they were quickly dispatched by Meagher's bayonets. With Hood's brigade now destroyed it left Fair Oaks in Union hands once again.

To the bottom right, Burns' Brigade recovers from its prone position and delivers a shattering volley (a double '6'!). Hampton's Brigade falters having lost significant casualties and their commander receives a light wound taking him out of action for a turn.

So here is the situation at 6.30am (end turn 8).

6.30am - 7.00am (turns 9 - 10)


Hampton successfully rallies his brigade and begins to reform.
7.00am - 7.30am (turns 11 - 12)

They were not yet able to make the most of their situation with Wilcox and Colston's brigades failing to charge home.

More success was to be had at Seven Pines with Rodes charging into Naglee's faltering troops (bottom right). The Union brigade was decisively beaten with the survivors fleeing the field.
Pickett's brigade (middle) charged into the woods, but rather than enter into melee they halted and fired a volley into the severely weakened brigade of Berry. The resultant casualties reduced Berry's brigade to below half strength. They almost passed their morale test but not quite enough to prevent the them dispersing.
 Pickett (middle of photo) again launched a charge, this time towards the lead brigade in Couch's Division, Abercrombie's. The latter successfully counter-charged The ensuing melee was evenly balanced with neither side gaining the upper hand. The melee will continue into a second turn.
 To the south of Seven Pines, Patterson's battered brigade sustained a command blunder and was ordered to retire. This left Sickles' brigade (top right) exposed being the last Union brigade near the crossroads.


An overview of Seven Pines shows the position very firmly in Confederate hands.

At Fair Oaks Station, Meagher's Brigade take up position around the building.


7.30am - 8.00am (turns 13 - 14)

An overview of the area around Seven Pines as the Union line begins to buckle.

A closer view shows two isolated Union artillery batteries (middle right) having just delivered shattering rounds of canister stopping the Confederates in their tracks directly ahead of them.

In the foreground Hooker's Division holds its own but nevertheless fails to make much headway towards Seven Pines.
Middle right of photo shows a charge by Rodes Confederate brigade which is counter-charged by Palmer's brigade. Consolation arrives for the Union side as Rodes is comprehensively beaten compelling them to retreat. The Union forces in this area are severely weakened and unable to capitalise on this success.

The dire state of the Union position north of Seven Pines is apparent here. Wilcox's Confederate brigade had charged into French's Union troops forcing them the recoil.

They continued to follow up the faltering French's brigade (middle) driving them back to the rail line. Another melee ensued which proved too much for the tiring Union troops who routed.

The success of Wilcox's attack now threatened the isolation of Union troops at Fair Oaks (top right) and the flank of the main Union position (bottom left).

Sedgwick's Union Division, which looked as though they could have turned the Confederate flank to the north of Fair Oaks, now looks very precarious. Disaster struck when Gorman's firefight with Pettigrew's confederates (upper middle of photo) took his strength below 50% strength. A subsequent morale check sent them dispersing from the field. The area to the right of the artillery battery was now empty of Union troops.


Another view from behind Sedgwick's position. The artillery battery (far left) had seen enough and through a failed morale check will abandon its position.

An overview at the end of turn 14.
8.00am - 8.30am (turns 15 - 16)


Two views of Seven Pines at the end of turn 15. Orders go out to all Union brigades to switch from 'Attack' orders to 'Hold'. In the middle left of the second photo, Peck and Deven's brigades of Couch's Division both suffer 'Command Blunders' and retire, removing their support to Abercrombie's Brigade who had been sparring with Pickett.

In the middle of the photo, Sickles' brigade has successfully counter-charged an attack by Mahone's brigade while to the left, Patterson's Brigade holds off an attack by Armistead.


The two Union artillery batteries that had caused much damage on the Confederate formations, now limbers up to evade a charge (middle of photo).


With 2 Confederate brigades now massing before an attack on Fair Oaks, Pettigrew's heroic severely depleted brigade is allowed to recover in comparative safety (middle left in centre of field). Having successfully held his brigade steady when it lost over 50% of its strength, it was just 2 figures away from its automatic dispersal point of 25% remaining.
8.30am - 9.00am (turns 17 - 18)


An overview of the main focus of action at the end of turn 17.

Hooker's Division finally gives way. A determined charge by Mahone's rebels butchered many of Sickles Brigade bringing his strength below 50%. Morale collapses and they flee the field. Peterson's brigade to the left retreats in the face of a charge by Armistead's troops.

The last Union brigades attempt to form a last defensive line. Abercrombie's brigade with Couch at its head is hopelessly outnumbered as it is steadily pushed back (middle left).
To the right Peck's brigade fends off Wilcox's Confederates (right of photo).


Sedgwick with Burns' brigade continues its firefight with Hampton's brigade with neither side getting the upper hand.


An overview at the end of turn 18 at which point I called it a day with no hope of any coming back for the few Union brigades left on the field. The handful of brigades in the middle of the photo together with one retreating brigade (far left) and Burns' brigade (top right) is all that remains of the Union Army.
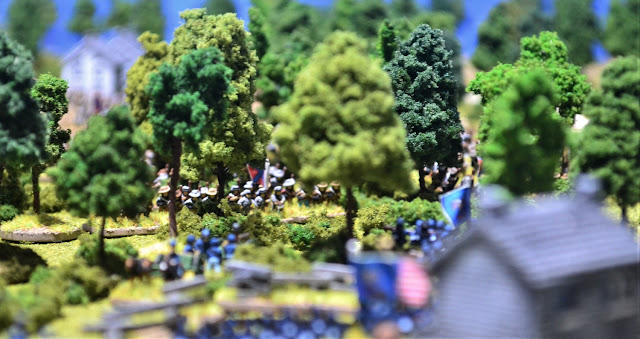
I will finish with a few ground level shots from behind the Union lines as they observe the grey horde descending on them:


With the confederates also in control of Seven Pines this was a resounding Rebel victory.
Clearly the right hook should have been the Union strategy at the start of day 2. Had more resources been available they would have been able to capitalise on Sedgwick's early success. Even without that backup, Sedgwick succeeded in drawing Confederate forces north from the area around Seven Pines.
The large number of Union brigades concentrated in a small area within difficult terrain prevented them from organising a coordinated attack. The piecemeal charges by individual brigades rarely threatened the Confederate line although one did momentarily gain the Seven Pines crossroads indicating what could have been achieved with a massed attack.
This of course turned history on its head with the Confederates coming off worst in the actual battle.
A few tweaks were required to my 'brigade' level Guns at Gettysburg rules but overall I am pleased with the way they played. This was a useful test-bed for the rules to be used in my Gettysburg game.
Amazing table and amazing effort - thanks Jon.
ReplyDeleteMany thanks Norm
DeleteJust a wonderful looking game that really gives you the feel of a big battle. As always excellent 'photos and text to allow one to follow the action.
ReplyDeleteMany thanks Steve.
DeleteWonderful pictures, and a dramatic narrative. Who could ask for more?
ReplyDeleteMany thanks AP.
DeleteVery fine table, excellent looking troops and photography, and a marvelous narrative. What more can one want from a game and AAR?
ReplyDeleteMany thanks Peter.
DeleteMany thanks, Jon. I can only second the comments above regarding the quality of miniatures, photography and narrative.
ReplyDeleteMany thanks for that Kevin.
DeleteA very pleasurable read! Thank you!
ReplyDeletePleased you enjoyed it Jonathan.
DeleteFantastic looking miniatures and scenery, I enjoyed reading your battle report.
ReplyDeletehttps://www.10mm-wargaming.com/
https://www.10mm-wargaming.co.uk/
Take care
Andy
Hi Andy. Many thanks for your comments and pleased you enjoyed reading the AAR,
DeleteAll the best
Jon
You are welcome
Delete