As a reminder of the current situation at the end of turn 16 -

Turn 17

The turn begins with 2/2nd Chasseurs of the Old Guard launching an assault along the south eastern access road into Grissburg. The Prussian 2/15th Line attempts a counter-charge but routs in the process. The charging Chasseurs now turn their attention towards the church. The defending Landwehr battalion put a brief fight before being ejected from the church which was now occupied b the French.

In response to the threat posed by the Old Guard, the Fusiliers of the 25th Infantry are ordered to the area.

Schmalensee is also ordered to the area with his 2 battalions of Neumark Landwehr.

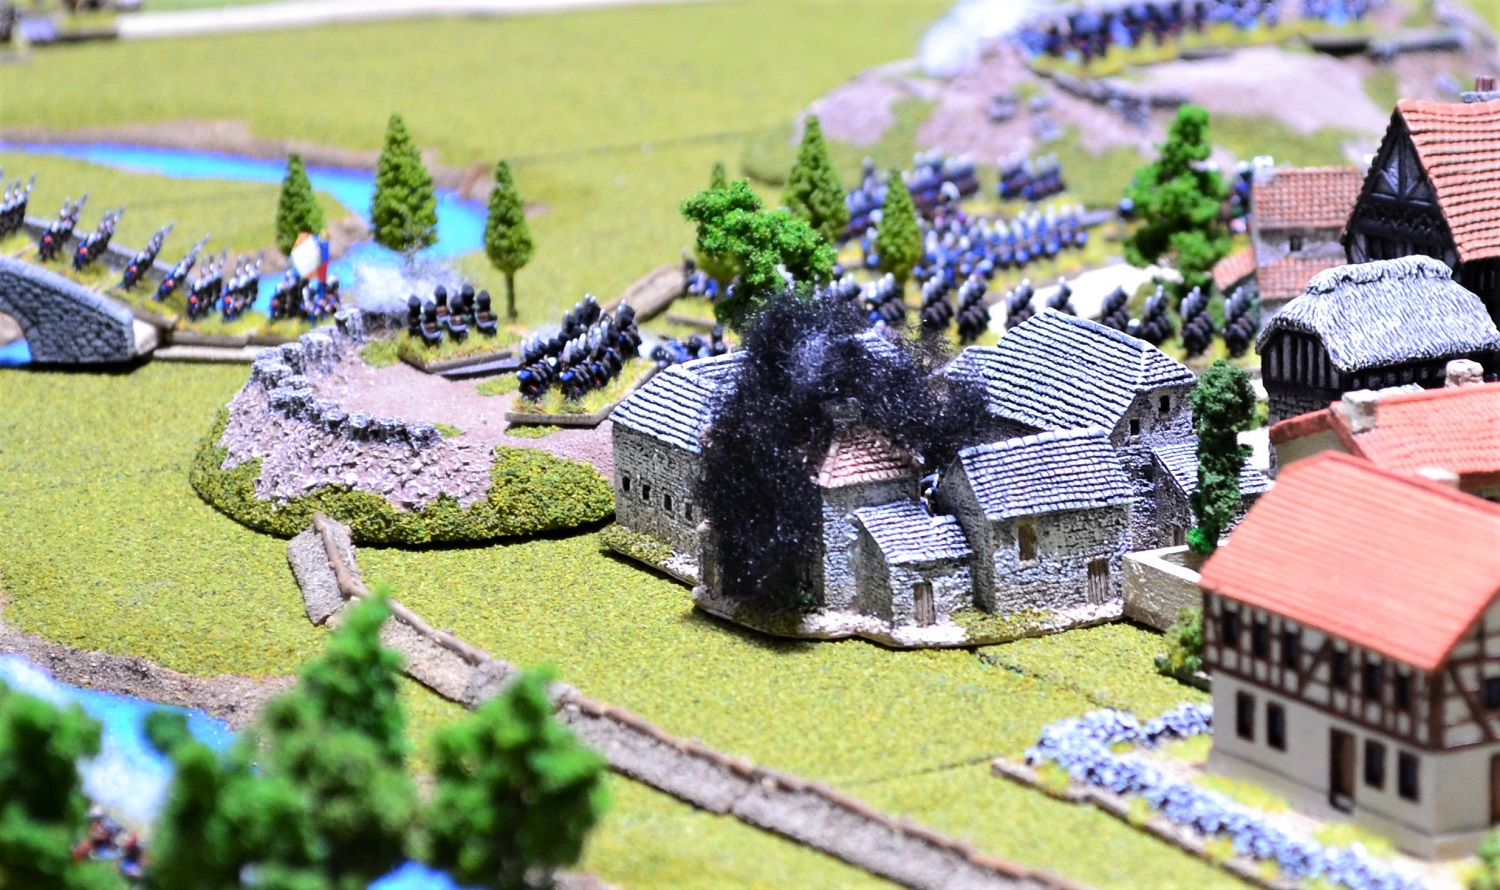
An overview of the French left flank as more troops complete the river crossing and the combined batteries of Guard 12pdrs begin to bombard the western redoubt.

The Prussian batteries in that redoubt decimate the 4/2nd Light battalion (just to the left of the windmill). A double '6' is rolled causing 4 casualties plus 2 more in the battalion next to them.

A melee ensues between the Prussian Uhlans and the 5th Lancers. The French narrowly win pushing back the Prussians. The French Lancers now have blown horses and will have to retire next turn to recover.

The scene among the Industrial buildings as the remnants of the Prussian 3rd and 4th Brigades begin to organise themselves for defence of the area. The 15th Brigade is positioned in and around the buildings.

The 3rd Corps offensive on the northern perimeter has stalled with Prussian reinforcements now rebuilding their defensive line. The French battalions find themselves outgunned by the Prussian volleys who take a heavy toll.
Turn 18

The church is now fully under Old Guard control. The first of Grissburg's buildings to fall.

Now it is the turn of the 1st battalion of 2nd Chasseurs of the Old Guard to charge the house adjacent to the church. They are victorious in their melee with the defending 1/15th Infantry who are pushed back out of the building which is now occupied by the Guard.
A double '6' rolled by one of the batteries bombarding a Chateau causes a fire to break out.

The Middle Guard approaches Grissburg along the south western access road who face a daunting task ahead.

Schmalensee leads his 2 Landwehr battalions through the streets of Grissburg in an effort to counter the Old Guard incursion.

The deployed 12pdr Guard batteries now bombard the western redoubt. It is at long range and this first salvo has no effect.

With the Dragoons now forming up, Soye's Brigade of the 6th Division commences to cross the river. They are tasked with targeting the western redoubt.

Columns of the French 9th Division pour along the road towards the Industrial Suburbs.

The French now enter the woods approaching the Industrial buildings occupied by the 15th Brigade. To the right, Baudiun's brigade has charged the Landwehr holding the wood. All 3 French battalion columns charged home. The Landwehr had seen enough and routed prior to contact.

An overview of the Prussian preparations for defence of the Industrial Suburbs. In the bottom left of the photo is a cavalry melee. The 5th Lancers about to retire with blown horses are caught by the Prussian Hussars lead by Schwerin himself. The Lancers are defeated and will retreat the next move. The Hussars received a 'Superb Discipline' result from its pursuit test which would prove extremely valuable in the next turn.

The final units of the 14th Brigade have now reformed. The 3 battalions of 2nd Pomerania Landwehr and the cavalry detachment now form a reserve behind the great redoubt.

More shattering volleys from the Prussian line including canister poured into the hapless French battalions atop the north west redoubt cause untold problems for the French. The most notable being Billiard's Brigade who were holding the redoubt. One battalion routs and as a result the shaky Brigade breaks. More battalions disperse as a result leaving the Brigade falling back with just 2 weakened battalions remaining.
It is not all good news for the Prussians though. In the morale phase Friccius' Landwehr regiment, whose Landwehr battalion had routed in the face of Baudiun's charge, broke. As this particular battalion was the only survivor its dispersal meant the loss of the entire regiment further weakening the defence around the Industrial suburbs.
Turn 19

The 2/1st Chasseurs of the Old Guard advance along the south eastern access road reinforcing the two battalions who had formed a bridgehead into the Prussian capital.

A short distance ahead of the reinforcing Guard battalion a furious firefight had broken out between the new occupants of the church and it's yard, and the Prussians in the surrounding buildings.

You may recall (see previous move above) that the battalion leading the Middle Guard attack was last seen advancing along the south western access road. This is that same battalion, the 1/3rd Grenadiers, advancing onto the small redoubt. It had just performed 3 stupendous charges in succession. Firstly it charged the 1/25th Infantry who attempted to counter-charge along the road. The Guards ignored casualties it took from a blast of canister and charged home. The 1/25th promptly lost heart and retreated prior to contact.
The Grenadiers had only used up part of their charge move and the artillery battery that had fired at it was only a short distance away. This battery was charged who promptly routed.
Not finished yet, the Grenadiers then turned their attention towards the Prussian infantry occupying the redoubt. They too retreated before contact was made leaving a gaping hole in the Prussian line.

The rest of the Middle Guard advancing towards the gap left by the Grenadiers find that the Prussians have hurriedly plugged it!

Soye's Brigade of the 6th Division begins to form attack columns as more of their battalions complete the river crossing.


2 photos of the 9th Division as they make progress towards the Industrial suburbs.


Vathiez' Lancers present a sorry sight. The Prussian Hussars to their right who had a Superb Discipline result in the previous turn, used their extra move to position themselves to charge the 6th Lancers. The latter routed in the face of the Hussars' charge but did not put enough distance between them allowing the Prussians to make contact. The Hussars cut down a significant number of Lancers causing the survivors to disperse.
The 5th Lancers failed their morale test and will continue to retreat.
Turn 20
Before I recount this turn, a brief update on skirmishers. For the first dozen or so moves I used the rules as contained within GdB. As the game progressed my fears were realised that it was simply too fiddly for this scale, especially with a large battle such as this. From this point on I am reverting to my own rules which maintain the basics of GdB but skirmishers are deployed in the abstract rather than physically detaching skirmisher bases. The only exception to his is where there are skirmisher companies in their own right, such as Jagers, or where a light battalion deploys its entire unit as skirmishers.
 The French had the initiative this turn and took the opportunity to launch a charge into Grissburg. A battalion of Chasseurs assaults the large house (middle right) occupied by a battalion of Landwehr. The Landwehr put up a good fight but the quality of the French troops gave them the advantage. The Landwehr were pushed out of the building which was now occupied by the Chasseurs.
 The firefight continues between the Chasseurs occupying the church and Prussian infantry in the compound of the Granary opposite. A company of Prussians firing from the upper floor windows add to the firepower from the compound. To the left another Chasseur battalion has crossed the river and advances towards another Grissburg building.
 A consequence of intense artillery fire is apparent here with 3 batteries now running low on ammo.
 The attack of the Middle Guard which initially saw so much promise, has taken a rather more concerning turn for the French. The 1/3rd Grenadiers that had successfully captured the small redoubt now found its flank exposed to a Landwehr battalion which took the opportunity to charge (middle right). There was nothing the Guards could do to prevent the Landwehr from ploughing into their flank. There could only be one outcome and the Grenadiers were comprehensively beaten. They were forced to retreat with the Landwehr maintaining their formation.
To the left another melee ensued when the 2/3rd Grenadiers charged along the road into the Fusiliers of the 2nd Infantry. The latter attempted to counter charge but failed its morale test and faltered. The fusiliers had already been weakened through protracted skirmisher exchange of fire earlier in the day and were now in no position to halt the charge. They were routed by the Grenadiers.
 An overview of the French left flank as the 12pdrs continue to pound the western redoubt. The artillery in the latter however continues to takes its toll on any French units passing within its sights. Here the dragoons experience the consequences of that losing several to the incoming cannon balls.
 The view from the Prussians in the Industrial suburbs looking along the road and the approach of Jamin's Brigade. 2 battalions have pealed off into the woods.
 Elsewhere in the Industrial buildings, the Prussians continue to prepare defensive lines to meet the oncoming French columns.
 Vathiez failed to rally the 5th Lancers leading to the loss of the entire brigade. The victorious Prussian cavalry now turn their attention to the approaching Dragoons.
 Lafol's patience wears thin and orders Corsin to get a move on and break the Prussians in the area of the north western redoubt. Here Corsin leads the advance as 3 of his 4 battalions cross the redoubt.
 To be met with a hail of fire from artillery and a line battalion. Amazingly, 2 of his battalions withstand the blast but the 2/64th Line (nearest the camera on top of the redoubt) lost almost a third of their number. This was too much for them and they will retreat the next turn.
 Once again battalions of the 3rd Corps prepare for another assault on the gap between the two redoubts. The Prussians have reformed their line completely behind the earthworks.
 The 11th Division now receive orders to attack the eastern perimeter of Grissburg and they turn into the cover of woods as they make their approach.
 The Prussians are increasingly concerned about the success of the Old Guard in penetrating the south eastern suburbs of Grissburg. Brandenstein's 2 battalions of Landwehr (middle of photo) that had been held in reserve to support the northern perimeter, were now ordered to relocate in an attempt to eject the Old Guard on the opposite side of the town.
Turn 21
Blucher's staff are increasingly concerned about his safety with the French now penetrating Grissburg. They desperately attempt to persuade him to evacuate the town advising him that he was too important to lose. They will have to fight their way out and each turn that passes makes it that much harder. Therefore, starting this turn in the movement phase, a D6 will be rolled. If a '6' is rolled Blucher finally sees sense and reluctantly accepts their advice. The dice roll is made each turn until either he decides to evacuate or he is captured.
When, or if he is evacuated, the escorting cavalry brigade will be used in an attempt to facilitate his escape. He insisted in remaining this turn!
 The fighting around the south eastern suburbs of Grissburg intensifies. The Prussians have the initiative this turn and order a counter-attack. Schmalensee's 2 Landwehr battalions lead the charge. In the bottom left he leads the 1/3rd Neumark in a charge on the Chasseurs holding the house and its grounds. They are fought to a standstill with neither side getting the upper hand. The melee will continue the next turn but without Schmalensee who sustains a light wound and retires for medical assistance.
 Here the 2/3rd Neumark Landwehr charges the Chasseurs who are occupying the building in the middle left. They have not had chance to fully occupy it yet and therefore do not benefit from its full defensive capabilities. The 2/3rd Neumark are fired up having captured an eagle in the last battle and storm into the Chasseurs. They comprehensively eject the Old Guard battalion causing it to retreat with heavy casualties. Any units that capture a flag/eagle I give +1 to all morale throws for the next battle they are involved in. Any that lose their standard suffers a -1 in the next battle.
 The 1/1st Chasseurs of the Old Guard charge the Landwehr holding the gardens of a house near the Seminary. The Landwehr fight back well but are nevertheless pushed back. The two companies of Landwehr holding the house will be the next target for the Chasseurs.
 For the Middle Guard entrance into the south western part of Grissburg, the 2/3rd Grenadiers turn their attention to the 2/1st Elbe Landwehr. The latter falter in the face of the charge and then comprehensively routed in the ensuing melee.


 The first French attacks are made on the Industrial suburbs of Grissburg. They have mixed success with one battalion defeated by a Prussian counter-attacking column (to the right of the building on the left). Another battalion attacks a weakened Landwehr battalion defending the stone walls of the warehouse on the right but it to is forced to retreat. However, there is French success for the 2 battalions attacking the Warehouse itself on the right. The combined attacks prove too much for the Landwehr defending the building and they are forced to retreat.

 This photo of the north western redoubt is the aftermath of a disastrous turn for Corsin's Brigade. In desperation the two battalions that had been left on the redoubt lauch charges at the Prussian infantry battalion in line (middle left) and the deployed batteries at the foot of the redoubt. The battalion attacking the artillery was literally shredded by canister with the handful of survivors routing from the field.
The battalion attacking the Prussian infantry had more success and charged home. It was to no avail as they too were comprehensively defeated. The Brigade suffered a Broken Brigade morale test result which meant that this battalion too would rout from the field. All that was left of the brigade is the one battalion on the reverse slope of the redoubt and the wounded Corsin.
 All 3rd Corps units in area between the two northern redoubts were ordered to charge. Two battalions were successful causing the 2/11th Infantry holding the centre of the line to rout prior to contact. The two battalions now wheeled occupying the space left. The problem facing the commanders in this sector was precisely what they had for the entire battle so far. Success proved to be a struggle to exploit with the lack of available units to support any breakthrough. Other units that had been involved in the attack elsewhere along the line had been repulsed and were now in the process of reforming. There are though a couple of battalions in attack column formation (off camera to the right) who might be able to bring to bear in the next turn.

Turn 20
Before I recount this turn, a brief update on skirmishers. For the first dozen or so moves I used the rules as contained within GdB. As the game progressed my fears were realised that it was simply too fiddly for this scale, especially with a large battle such as this. From this point on I am reverting to my own rules which maintain the basics of GdB but skirmishers are deployed in the abstract rather than physically detaching skirmisher bases. The only exception to his is where there are skirmisher companies in their own right, such as Jagers, or where a light battalion deploys its entire unit as skirmishers.


To the left another melee ensued when the 2/3rd Grenadiers charged along the road into the Fusiliers of the 2nd Infantry. The latter attempted to counter charge but failed its morale test and faltered. The fusiliers had already been weakened through protracted skirmisher exchange of fire earlier in the day and were now in no position to halt the charge. They were routed by the Grenadiers.


Turn 21
Blucher's staff are increasingly concerned about his safety with the French now penetrating Grissburg. They desperately attempt to persuade him to evacuate the town advising him that he was too important to lose. They will have to fight their way out and each turn that passes makes it that much harder. Therefore, starting this turn in the movement phase, a D6 will be rolled. If a '6' is rolled Blucher finally sees sense and reluctantly accepts their advice. The dice roll is made each turn until either he decides to evacuate or he is captured.
When, or if he is evacuated, the escorting cavalry brigade will be used in an attempt to facilitate his escape. He insisted in remaining this turn!


Brandenstein continues to wend his way through the streets of Grissburg.

Soye's Brigade of the 6th Division continues to deploy into attack columns.

The 2nd Dragoons lead by Piquet charges the Prussian Uhlans who retreat prior to contact. They then turn their attention on the deployed battery of horse artillery who promptly limber up and evade (bottom right). This is the situation at the end of the turn with the Uhlans (middle of photo) continuing to retreat.


Elsewhere in the Industrial suburbs the Prussians await the onslaught.

The battalion attacking the Prussian infantry had more success and charged home. It was to no avail as they too were comprehensively defeated. The Brigade suffered a Broken Brigade morale test result which meant that this battalion too would rout from the field. All that was left of the brigade is the one battalion on the reverse slope of the redoubt and the wounded Corsin.


I finish this posting off with an overview of the current situation in Grissburg. The buildings marked in blue have been captured by the French (Old Guard in this instance). The building with a green marker had been captured by the French but has been successfully re-occupied by the Prussians.
Blucher's staff had planned an escape route along the eastern access road but developments to the north may make that road an easier option.
To be Continued -
I thought it was all over with the capture of the church and the later heroic efforts of the 1/3rd Grenadiers but as you point out the French so far are unable to exploit their various successes. Intriguing.
ReplyDeleteYep, a mix of failed command tests and bad positioning has adversely affected the 3rd Corps progress particularly badly. The Prussians though have had some very impressive dice rolls in that sector. They are clearly fired up in seeing off the French!
DeleteAnother gripping instalment of your game, which as always is a joy to behold. I've played the Prussians in a couple of recent Bloody Big Battles Napoleonic games, so am certainly rooting for them in this one!
ReplyDeleteThe Prussians are bedevilled by a high number of inexperienced troops especially compared to the largely veteran and Guard French forces. Nevertheless the French are not finding them to be a walkover by any means.
DeleteStunning visual treat! Your last overhead photo makes the situation clear. My sense was the French were making more inroads than they actually achieved. So far, the Prussians are plugging the gaps. Solo play is ideal for this type of detailed replay. Great Stuff!
ReplyDeleteMany thanks Jonathan. It is proving to be great fun to play solo with an almost 'Rorkes Drift' feel to the game with the Prussians desperately holding on.
DeleteSolo Wargaming at its best. Well done Jon.
ReplyDeleteRegards
Peter
This has been a fantastic scenario, it has a bit of everything, open battlefields, river, bridges, redoubts and in particular the 'streets of Grissburg'. It must be a fairly unusual game to have street fighting, but perhaps because of this, it is quite fascinating.
ReplyDeleteLast year I bought Hexasim's battle of Ligny (boardgame), one of the scenario is called 'Streets of Ligny' and it covers the fight for this sort of urban setting. this unusual gaming topic for our battalions, regiments and brigades, made it quite a memorable game.
All good.
Many thanks Norm. Hopefully it will capture the chaos of street fighting. I am already finding commands getting broken up with units split from their Brigades. I am using the basics of BUA melees contained within the rules but adding my own take on it using some of the lessons I learnt when fighting Waterloo, particularly Hougoumont. I will be expanding a little more on this in my next posting.
DeleteAnother one of the benefits of playing solo. You don't have an opponent crying foul!
Yes, I think on such a big battle / project, you need the freedom to be able to manage and tweak things as you play through the game, to ensure that the game stays viable through to its conclusion, a conclusion based on situation and not by rule limitation or restriction - your skirmisher changes being a case in point.
ReplyDeleteThanks for your views Norm and pleased you agree with my approach to tweaking the rules. The next challenge, if it actually happens, is planning Blucher's escape which I am sure will require more tweaks. If all goes according to plan it will hopefully be an enjoyable little scenario within the overall battle. A game within a game!
DeleteRules can never cover every conceivable situation, so at times a bit of common sense can resolve the situation. We had this earlier in the week where a unit was forced to retreat but, looking at its postion re: enemy units, decided that it would become hors de combat. Much simpler and we all agreed that this was a fair outcome.
DeleteI agree Steve. Occasionally rules have to be overruled!
DeleteThe French seem to be taking heavy losses, but if they succeed, the loss of the Prussian Capitol, and, potentially, a substantial chunk of their army, may prove decisive!
ReplyDeleteThe 3rd Corps in particular are receiving a mauling and it may prove no easier for the 11th Division attacking the eastern perimeter. They have to advance through rough terrain halving their movement rate giving the Prussians more time to pour fire into them. The loss of their capital will be a serious blow to the Prussians but at what cost to the French?
Delete