I was pleasantly surprised how Hail Caesar rules played out in the my last Ancients game 'The attack on Mona'. It has been sat on my bookshelves for at least 10 years and had only ever played it briefly using 15mm figures. I decided that a closer look was needed to determine if this was going to be my go-to ruleset for my Ancient games.
I turned to the Hail Caesar supplement 'Caesar's Gallic Wars' as a source of scenarios and for which I pretty much had the required figures, although the Early Imperial Romans will have to stand in for the Late Republican Marian Romans.
The scenario I have selected is the first involving the Romans against the Gauls. It is June 58BC and Caesar moves against the Helvetii after appeals for help arrived from the Aedui tribe whose farms were being raided.
When the two armies approached, Caesar discovered that the majority of the Helvetii had already crossed the Arar River and only the Tigurini tribe was on his side of the river. Caesar decided to move against them at once.
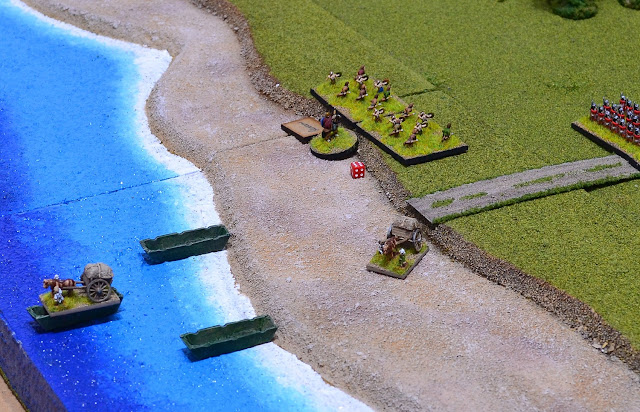
The Tigurini were surprised and have two objectives in this battle. 1. To defeat the Romans who they outnumber and 2. To get as many supply wagons as they can across the river.
A slight adjustment to the order of battle was made to enable my existing collection to be used. 3 Helvetti light infantry units were replaced by 2 warbands. 3 wagons were used rather than the 4 in the scenario.
The scenario gave the table size as 8' x 4' for 28mm figures. I have reduced this to 3'9" x 2'3" for 6mm. All units are standard size (2 bases per unit). Distances are reduced from inches to centimeters.
Victory conditions: If only a maximum of wagon safely crosses the river = a Roman victory. 2 wagons = a draw. All 3 wagons = Helvetii victory. Each wagon rolls for activation each turn. 8 or less they are allowed one move.
Continued -
ORBATS
Romans
Division
1: Julius Caesar, L 9
2 x
Legionaries Heavy Inf
2 x raw Legionaries Inf
Division
2: Titus Labienus, L 9
2 x
Legionaries Heavy Inf
2 x raw Legionaries Inf
Division
3: Publius Considius, L 8
1
x Gallic medium Cav (spears)
1 x Gallic light inf (javelins)
1
x Gallic light Cav (javelins)
Helvetii
Division
1: Divico, L 9
2 x light
inf (javelins)
2 x light inf (slings)
Division
2: Garomaros, L 8
2 x light
inf (javelins)
2 x light inf (slings)
Division
3: Atikoryos, L 8
3 x heavy
warbands (swords and javelins)
Division
4: Dubnoris, L8
2 x light
cav (javelins)
1 x light inf (javelins)
3
carts with supplies, L 8
 |
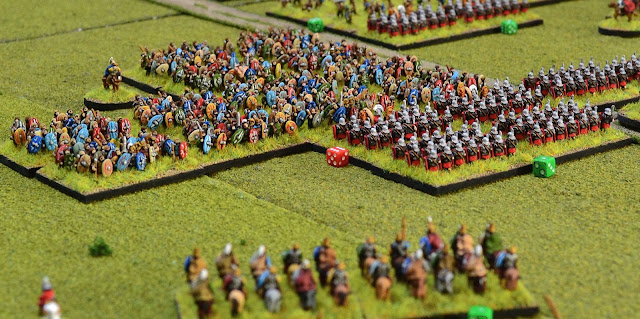
| The situation at the end of turn 1. One wagon failed to activate but otherwise all the Helvetii divisions were successful in receiving their commands. Although more sluggish the Romans made some progress. |
 |
| The centre wagon failed its activation test causing a slight unnerving delay! |
 |
| First blood to the Helvetii. Slingers peppered the medium cavalry unit causing one casualty and forcing it to retreat in good order. A similar attempt was made on the Legionaries but failed to register any hits. |
 |
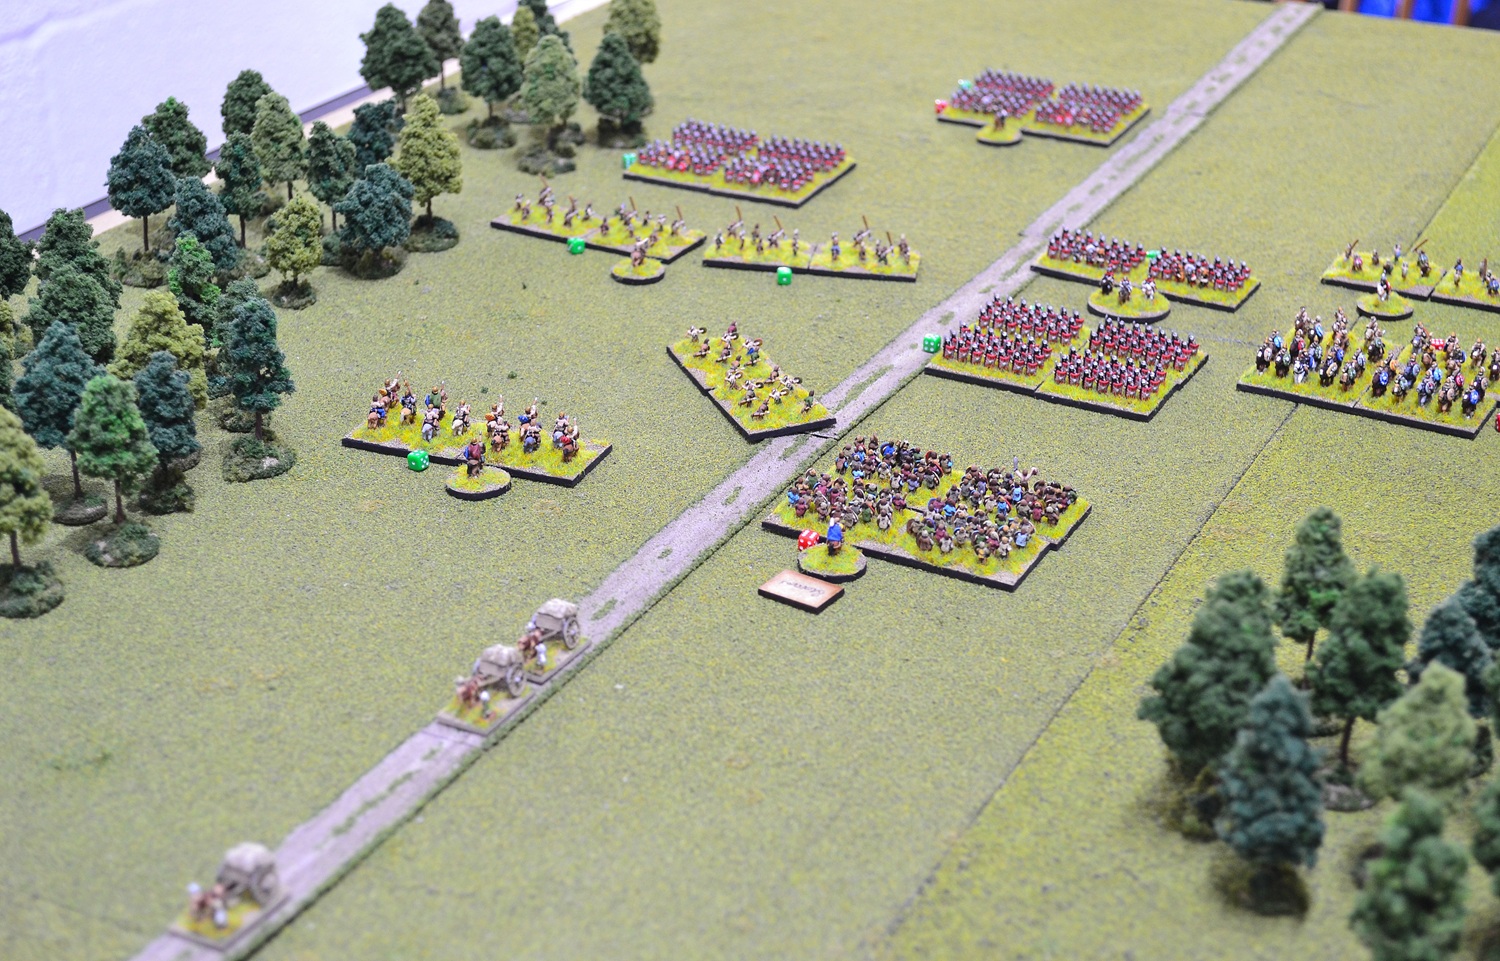
Caesar launches his division forward aiming to close the gap as quickly as possible on the slow moving wagons. A veteran Legionary unit supported by a raw unit charges the slingers who launch ineffectual closing shots.
The melee proves devastating with the slingers destroyed outright. A sweeping advance by the legionaries into supporting javelinmen repeats the process with the javelin unit similarly destroyed. |
 |
| The aftermath of the melees. Caesar's elation at the easy victory is tempered by concern over the non-appearance of Considius on his left flank. The result of a failed activation test. |
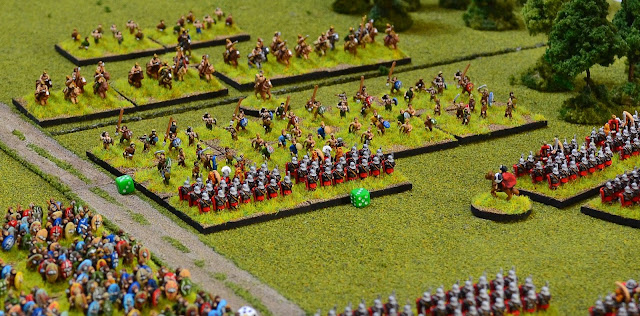
Helvetii Turn 2
 |
The Helvetii take advantage of Caesar's exposed flank and pile in with two warbands. Divico's remaining javelinmen sweep around onto the legion's flank while his slingers (bottom left) inflict a casualty on the Roman light horse unit who retreats in disorder.
The Legion puts up a heroic defence narrowly defeating the warband (inflicting 4 casualties for the loss of 3) but with the loss of an additional casualty from the flanking javelins they are now shaken. The warband passes its break test continuing the melee. |
 |
| Garomaros advances his division with both slinger units firing on Caesar's legionaries who shrug off the hail of shot. |
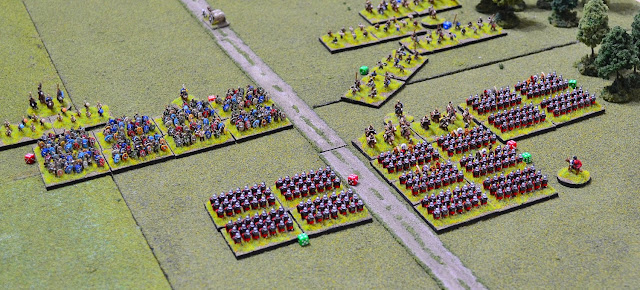
Roman Turn 3
 |
| Caesar brings up another unit to support the ongoing melee leaving a sole veteran unit to charge the slingers (middle right). Labienus hurries his division forward (far right) but with only 2 activations falls short of making contact. Considius attempts to make a charge with a cavalry unit (below left out of camera shot) but with only 1 activation the charge fails. |
 |
| The Romans successfully fight off the javelinmen on their flank who fail their break test and are destroyed. They are beaten by the warbands though and give ground in good order. The warbands follow up maintaining contact. |
 |
| The single Roman unit in melee with the slingers finds itself outnumbered but succeeds in defeating the slingers who pass their break test and the melee will continue. |
Helvetti Turn 3
 |
| All 3 wagons pass their command rolls and inch ever closer to the boats. |
 |
| With the loss of another javelin unit, Divico's division breaks. He joins its last slinger unit as it retires. |
 |
| The warbands again narrowly defeat the battered veteran Roman unit who, for the second time, gives ground in good order. The warband unit is now also shaken and does not follow up. |
 |
| The Helvetii light infantry fail to defeat the lone Roman unit and suffer the loss of the slingers. The supporting javelin unit gives ground passing through the light cavalry to their rear. The Romans though are now shaken. |
Roman Turn 4
 |
Caesar knows that if the Romans do not get a grip there will be little chance of intercepting the supply wagons. Ordering a fresh unit of legionaries to charge the mass of warbands supported on its flank he hopes that Considius finally gets his division into the fray on his left. Considius attempts to comply but once again his command rolls are lacklustre. His medium cavalry unit is almost there! (Bottom left). Caesar's last command was to rally a shaken legionary unit (bottom of photo).
On his right Labienus charges his division into the light troops of Garomaros (far right). |
 |
| Caesar's boldness paid off with the destruction of a warband. The victorious legionaries surge forward to engage a retreating supporting warband which was now disordered. Another victory followed forcing the warband to give ground. The legionaries were now shaken due to heavy casualties. |
 |
| Labienus' legionaries destroyed the slingers which caused the supporting javelinmen to fall back. A sweeping advance was made towards a light cavalry unit who counter-charged but their bravery failed to make an impression on the Legion and they were thrown back in disorder. |
Helvetii Turn 4
 |
On the left of the photo, the two surviving warbands are shaken and it will now require a successful rally in the next turn to prevent the division from breaking. Divico has utilised a "where's your courage" command to rally his last unit and removing the 'broken' status.
On the right, Dubnorix joins a light cavalry unit in a desperate charge to halt the legionary advance. |
 |
| The charge proves successful as the cavalry ride down the already shaken legionary unit. The first loss for Caesar leading to the supporting units giving ground in good order. The light cavalry follow up without their leader this time. |
 |
| Seeing the danger, Labienus joins the legionaries and they successfully push back the cavalry who give ground disordered. Legionary losses mount however, and the veteran unit that was involved in the melee is now shaken. |
Roman Turn 5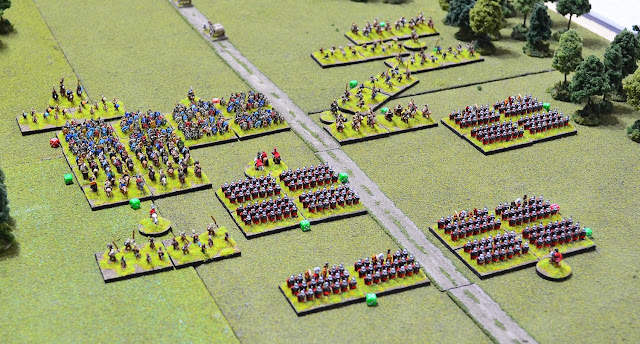 |
On the right, Labienus intends to rally move up his reserve raw cohort and rally his shaken unit but fails his command roll!
In the centre, Caesar moves up his rear unit and successfully rallies from shaken his lead cohort.
On the left, Considius springs to life and charges his cavalry into a shaken warband with dramatic results. The warband is destroyed resulting in a broken Helvetii division. |
 |
| The victorious cavalry make a sweeping charge into the slingers lead by Divico. A heroic defence inspired by Divico sees the cavalry fought to a standstill with each side losing 4 casualties resulting in the medium cavalry unit becoming shaken. The melee will continue. |
Helvetii Turn 5
 |
| All 3 wagons pass their command test and hurry as fast as they can towards the river bank acutely aware of the ever growing din of battle behind them. |
 |
Atikoryos slowly withdraws his last warband now that his division is broken. Divicos knows that if the cavalry break through the wagons will be at risk and he launches himself into the fray. Even though the cavalry are now shaken, the slingers are disadvantaged which is only partially helped by the presence of Divico. Nevertheless their superhuman efforts are rewarded with victory inflicting 4 casualties for the loss of 3. Their elation evaporates with the discovery of the loss of Divico. Killed while fighting on the front line saps their morale which has the effect of cancelling out their victory downgrading it to a draw. Divico is replaced by another commander who will have less influence and impact on future melees.
On the left, Garomaros fails his command role leaving any initiative to Dubnorix who launches a light cavalry charge on the shaken legionary unit (top right). This proved suicidal with the total loss of the Helvetii cavalry. |
Roman Turn 6
 |
| Top right and Labienus fails his command roll - again! Caesar attempts to charge the last warband and despite having 3 actions the legionaries fall short. The melee continues at the bottom of the photo. |
 |
| Success for the cavalry. They destroy the slingers and kill the reserve commander but the additional casualties sustained now means both cavalry units are shaken. |
Helvetii Turn 6
 |
| One of the wagons fails its command roll as they continue their painfully slow trek to safety. For the remaining Helvetii it is now all about buying time for them. Atikoryos with his broken division of warband falls back being his only option. The other 2 divisions seek to form a screen of sorts with its last cavalry unit forming a reserve. |
Roman Turn 7
 |
| Poor Roman command rolls once again limits their actions. Only Caesar is able to bring units into contact with a charge on the last warband. The result was decisive with the warband being destroyed meaning the end for Atikoryos' division. |
Helvetii Turn 7
 |
| All 3 wagons pass their command rolls with one tantalisingly close to reaching the boats. |
 |
2 battered divisions are all that remains of the 4 Helvetii and it is now imperative that they conserve themselves as best they can to delay the Romans. Their command rolls do not fare much better than the Romans. Garomaros forms his 2 light javelin units in a screen to the left allowing them to pepper the legionaries with javelins with all hits saved by the Romans.
Dubnorix joins his last light cavalry unit who hurry to throw a line across the track. His light javelin unit launch their javelins at a legionary unit but its single hit is saved. |
Roman Turn 8
 |
Considius on the right failed his command roll which is unfortunate given that his cavalry was counted on to intercept the wagons!
Caesar in the centre moves up his raw legionaries using their drilled status to pass through the shaken veterans to attack the Helvetii light horse who counter-charge. |
 |
| The legionaries destroy the light horse and make a sweeping advance towards the wagons. |
 |
| Another of Caesar's legionary units charges the last unit in Dubnorix's division, his javelinmen now accompanied by a reserve commander following Dubnorix's death in the melee with his light horse. The javelinmen give ground followed up by the legionaries. |
 |
| Labienus charges his legionaries into the Helvetii javelin units but his unit on the right falls short. The legionaries win the melee with both Helvetii units shaken but they hold on to fight another round of melee. |
Helvetii Turn 8
 |
| The first of the wagons is about to begin loading onto one of the boats but the last in the line fails his command roll! |
 |
By rights the Helvetii should be defeated at this point as 3 of the 4 divisions have broken. However, for this scenario I have determined they will fight on in a heroic attempt at saving their wagons.
On the left the javelins of Dubnorix's division are again defeated and give ground in good order. The legionaries are now shaken preventing the follow up.
At top of the photo the legionaries comfortably win the melee but the shaken javelinmen refuse to give up. |
Roman Turn 9
 |
| The first wagon is captured! On the right the cavalry make an appearance although both units are currently in a shaken state. |
 |
| Labienus orders is legions into the few remaining light javelin units leading to the destruction of the one on the right. The division is now broken and as a result, the Helvetii are now devoid of divisions in good order. |
Helvetii Turn 9
 |
| One wagon loads up with the second hurrying across the river bank. |
 |
| The remnants of both broken divisions fall back towards the river. |
Roman Turn 10
 |
| It is now a race against time as the Romans hurry towards the struggling wagon. On the right, Considius rushes to wards this light cavalry in order to rally them from shaken. |
 |
| Labienus' legionaries launch themselvs at the last of Garomaros' javelinmen comprehensively destroying them and him. |
Helvetii Turn 10
 |
| As the first wagon pulls away from the shore disaster for the 2nd wagon - a failed command roll! |
 |
| Dubnorix and his last javelin unit will provide little help. |
Roman Turn 11
 |
| On the right, Considius successfully rallies his light cavalry. Caesar fails to gain more than one activation for each of his legionary units giving the Helvetii hope. |
Helvetii Turn 11
 |
| The wagon successfully activates and begins loading onto its boat with Dubnorix covering as best as he can. |
Roman Turn 12
 |
| They have spent most of the battle faffing about in the rear but at long last the light cavalry spring to life and race across the river bank seizing the wagon before it could get away. For good measure the legionaries destroy the last of the Helvetii. |
The Tigurini tribe have been wiped out and with 2 wagons captured a resounding Roman victory.
I am definitely warming to Hail Caesar rules and this was a fun little scenario to play through. Mistakes are still being made albeit fewer than last time. With fewer interruptions to read up the rules the game flows well and can provide for some exciting moments.
I have acquired the recently published Wars of the Roses supplement and I may well dust off my WotR figures for another Hail Caesar outing.


Glad to see you are warming to these rules Jon:). I find them just the right balance of playability and historical accuracy, plus of course they work so well for solo games. Not everyone's cup of tea, but they work for me!
ReplyDeleteAs always the figures and terrain look superb and really show 6mm in a brilliant light. I just wish the magazines would showcase the smaller scales, but I doubt this will ever happen.
I should have given these another try years ago. Agree about the suitablility for solo games especially the unpredictability of command rolls. With regard to magazines, I agree. I can recall an early edition of Miniature Wargames back in the '80's, had a photo of 1/300 scale WW2 on the front cover I believe (frustratingly cannot find it now). It was a 1940 game and showed a column of German tanks winding their way up hedge-lined road among stunning scenery. It really showed off the scale in a great light and I believe they have missed a trick not including them more than they do.
DeleteThat was an interesting game - a nice scenario with a good time pressure element.
ReplyDeleteBTW I think what you're looking for was not on a MW cover but an article in MW #12, p22, 'Steven Dunn: Describes his 1/300th Scale Terrain'.
Thanks for that info Rob. It is a very long time ago and for some reason had it fixated on my mind that it was the cover!
DeleteAnother great looking game and excellent report Jon.
ReplyDeleteHopefully for Considius his capturing the second wagon will make up for his early tardiness 😂
Many thanks Ben. Considius was indeed a disgrace for most of the battle. Although it could of course be his Gallic allies telling him where to shove it!
DeleteGreat report, Jon. Are you using first or second edition rules, out of interest? Cheers, Aaron
ReplyDeleteMany thanks Aaron. I used 2nd edition for this one and 1st edition for the Mona game.
Delete