Turning now to what could be the final action of the campaign, the Roman invasion of Mona (Anglesey).
The 9th Legion have crossed the Menai Strait and landed on Mona. The scenario book gives the option of a beach landing but as I will be trying out another set of rules I have decided to keep this more simple. The Romans have just landed when the warbands turn up with one command still on the beach.
For this game I will be using 'Hail Caesar' rules. The original, not the 2nd edition. It's hard to believe now but it is over 10 years since I trialled them using 15mm figures. They did not grab me at the time and they have languished on my bookshelves ever since.
Using this campaign as a testbed for various rules and given that they were designed for Hail Caesar it seemed silly to not at least give them a try.
Few changes are needed for conversion to 6mm. I will be using cms instead of inches. The unit sizes are as follows: Small = 1 base, Standard = 2 bases, Large = 4 bases. Each base has a 40mm width.
The orders of battle are a combination of those contained within the book, my own and what I have available.
Board size is 5'3" x 3'9".
Continued -
Orders if Battle
9th Legion
CinC
4 units of Legionaries
1 unit of Auxiliaries
1 unit of Medium Cavalry
Sub commander
4 units of Legionaries
1 unit of Auxiliaries
Sub commander
1 unit of Legionaries
1 unit of Auxiliaries
1 small unit of Batavian Cavalry
1 unit of Batavian Auxiliaries
Britons
CinC
6 Fanatic warbands
4 small units of Skirmishers (2 x slingers, 2 x javelins)
2 small units of light cavalry
Sub commander
5 warbands
2 small units of Skirmishers (1 x slingers, 1 x javelins)
1 small unit of light cavalry
Sub commander
4 warbands
2 small units of Skirmishers (1 x slingers, 1 x javelins)
1 small unit of light cavalry
Druids - up to 3 additional attacks when attached to a unit in melee.
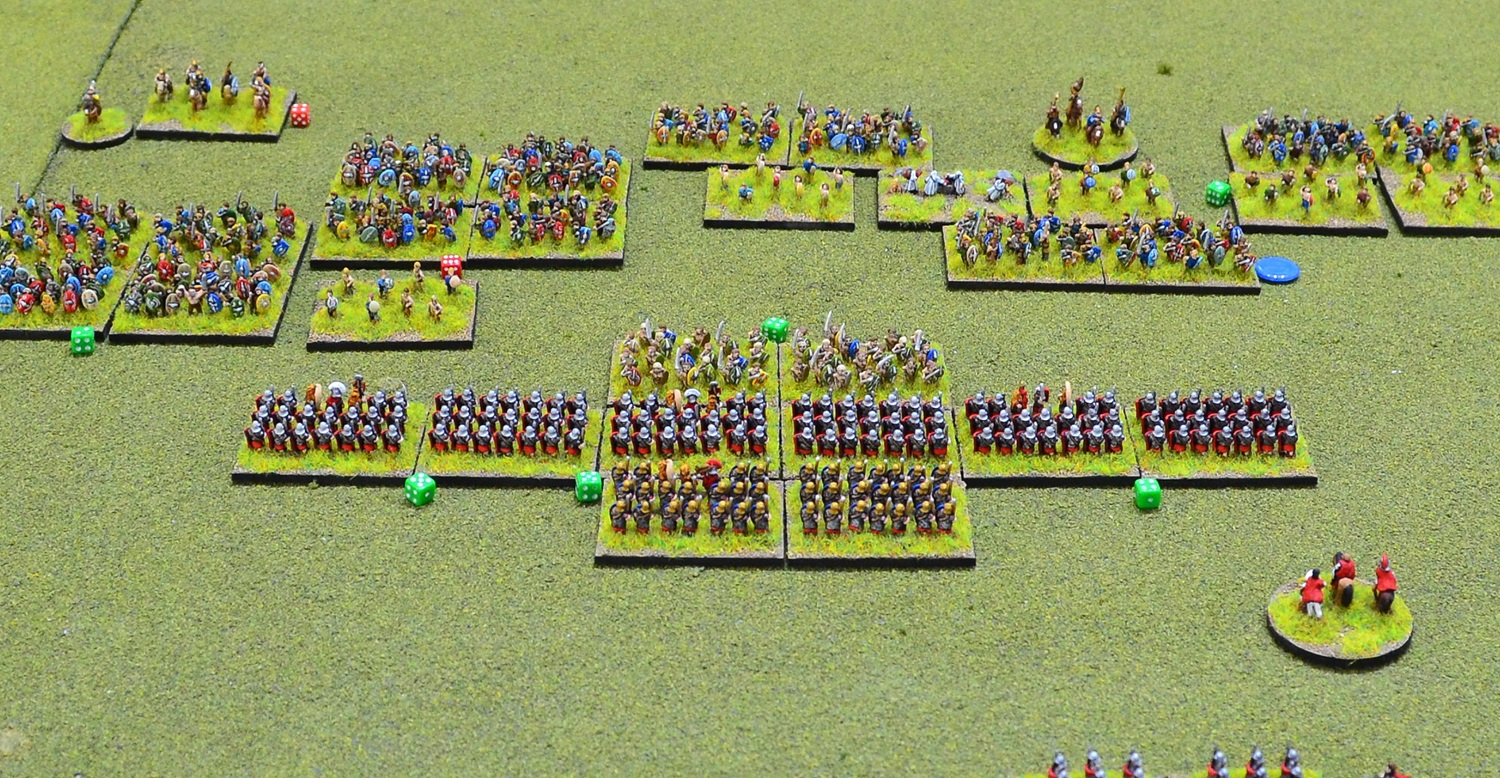
 |
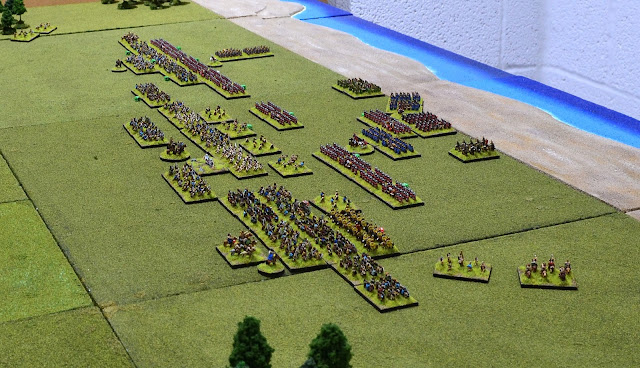
| An overview at the start. The Romans have managed to get 2 commands off the beach as the warbands make an appearance. |
 |
| The Briton CinC's division occupies the centre with the fanatics at its core. |
 |
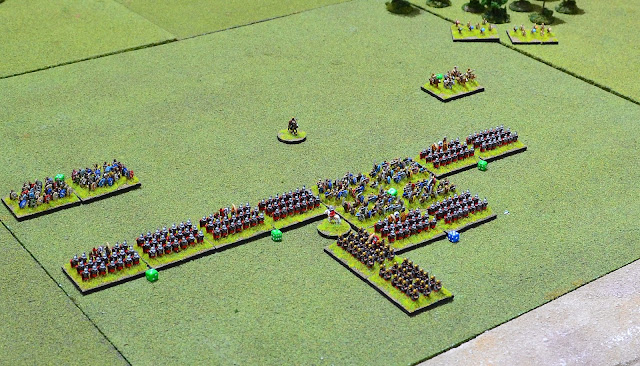
| The Druids make a final sacrifice. |
 |
| The villagers go about their daily chores in blissful ignorance of what is unfolding on their doorsteps. |
 |
| The 9th Legion with the CinC's division on the right. |
 |
| It is now turn 2 and the Britons have rapidly closed on the Romans although a little disjointed due to varying command rolls. The Romans have advanced a short distance to put some distance from the beach. The newly disembarked units had failed to activate twice and continued playing in the sand! |
Turn 3
 |
| The first action of the game when the Roman medium cavalry charge the two small units of light horse. The latter has the option to evade but decide that attack is the order of the day. The Romans narrowly win the melee. |
 |
The aftermath of the action with the Briton light horse falling back in disorder. Elsewhere, the first missiles are thrown with British slingers firing on the legions causing a single hit.
The Roman division stuck on the beach activate with 3 actions allowing them to form column and begin a move towards the Roman left flank.
In the middle left the druids have joined a naked fanatic warband whipping them up into a murderous frenzy. |
Britons Turn 4
 |
| A mistake I made in the previous turn was to move the Roman Cavalry in a follow-up post melee to maintain contact with the defeated British light cavalry. That has now been corrected and another defeat was inflicted on the Britons. 1 unit gave ground in disorder the other maintaining contact with the Romans for another round of melee. |
 |
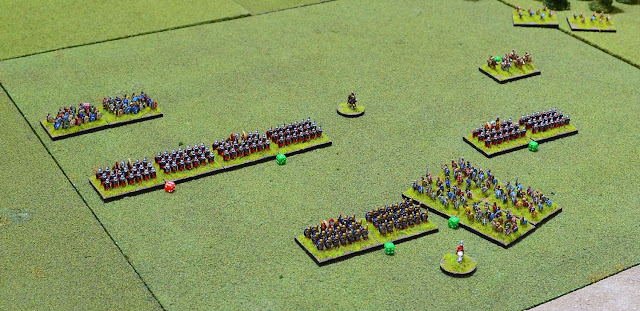
On the left of the photo, a single warband launched a wild charge at the Roman line. The Romans closed ranks and absorbed the impact narrowly winning the melee inflicting 3 casualties to the Britons 2. The Britons passed their break test and continued the fight.
In the centre a Roman cohort behaved shamefully. A unit of slingers inflicted 2 casualties and generating a break test which the Romans failed. They gave ground disordered leaving a gaping hole in the line!
|
 |
| The photo shows the aftermath of the Britons' left flank attack. The entire line of warbands launched themselves at the Romans. 2 were defeated and gave ground and the other 2 were held to a draw. |
Roman Turn 4
 |
| Another aftermath shot! The Roman cavalry defeated the small light cavalry unit in melee destroying it outright. Following up their success they charged the disordered light cavalry unit (middle left of the photo) confident of causing mayhem. The small British cavalry unit had other ideas and supported by slingers defeated the Romans who fell back disordered. Both cavalry units were now shaken due to casualties sustained. |
 |
| The Roman CinC failed his activations despite a re-roll! The only action this turn was the conclusion of the melee (bottom left) which saw the warband thrown back shaken. |
 |
| On the Roman right flank one they won both continuing melees with 1 warband falling back disordered and another remaining in the fight. The commander on this flank was concerned about the possibility of being outflanked and as a precaution began moving the reserve auxiliary unit to counter that threat. |
Britons Turn 5
 |
An overview of the situation. On the Britons left flank the commander ordered another charge into the Roman line. On the right flank a similar charge was made hitting the Roman cavalry. A successful command roll also allowed for a unit of skirmishers and light cavalry to make a sweeping move threatening the Roman flank.
In the centre the CinC taking his cue from his opposite number, failed his command roll including the re-roll! |
 |
| On the Britons right flank the Roman cavalry moment in the sun ended abruptly. The warbands piled into the shaken horsemen inflicting 8 casualties for no loss destroying the Roman unit. |
 |
| Using their initiative move, the British skirmishers retired behind the oncoming warbands who duly launched their wild fanatical charge. Such was the suddenness of their attack they left the druids behind (I forgot to move them!). The Romans were rocked back on their heels but nevertheless managed to hold them to a draw. |
 |
| The British lost 3 of the 4 melees on their left flank with 2 warbands destroyed. Crucially though one succeeded bursting through the Roman line supported by a 2nd warband. |
Roman Turn 5
 |
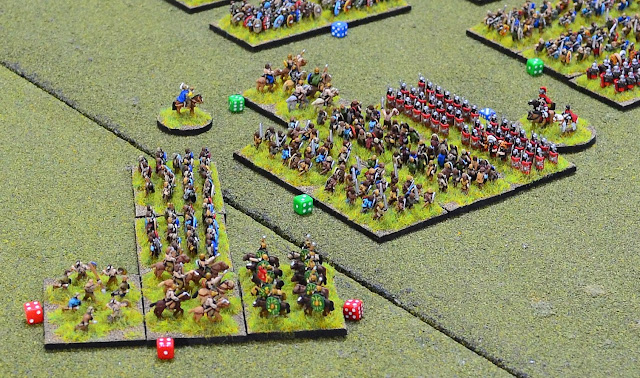
| Seeing the threat to the Roman left flank materialise, the commander still struggling to clear the beach ordered the Batavian cavalry to charge the British light horse. The latter counter-charged. The Batavians narrowly won with the light cavalry now in a shaken state but still in the fight. |
 |
| The Roman CinC succeeded in stabilising the centre seeing off most of the fanatics for now with just one still engaged. |
 |
On the Roman right, 2 cohorts launched a charge at a single warband (middle left) who fought tenaciously leaving both engaged units in a shaken state but the Romans had been thrown back.
The Roman cohort now disordered and fighting a great mass of victorious warbands was in danger of collapse. The commander moved the auxiliary cohort in support and personally joined the legionaries to add his 2 allowed attacks. It proved disastrous! The cohort was destroyed and the commander killed. |
 |
| The aftermath with the warbands now swinging to towards the auxiliaries. The commander has been replaced but his command value has been reduced from 8 to 7 and can now only add a maximum of 1 attack to a unit he joins. |
Briton Turn 6
 |
| Javelinmen were moved up to support the now shaken light cavalry. |
 |
| The Britons' CinC unleashes all available fanatics including skirmishers in a supporting role at the Roman line. This time including the druids! One warband is disordered and will not be available until the next turn. |
 |
From left to right. The cavalry melee continued with the Batavians successfully holding the reinforced enemy to a draw. The Batavians were, however, now also shaken.
Although they could not charge, the disordered warband launched their javelins at the Roman cohort to their front inflicting a casualty which took them to 'shaken' status (legionaries with a red dice).
Then a mixed blessing for the Romans. In the large melee they successfully destroyed a fanatical warband unit and what's more, they killed the druids!
The final melee on the right was a victory for the Britons destroying the Roman cohort. |
 |
| The victorious Britons of their left flank division swung into the flank of Roman auxiliaries. |
 |
Their blood was certainly up as they massacred the auxiliaries with ease (I made an error here not realising I could have turned the auxiliaries to face the warbands as no other units were in contact. They would have been disordered and as it turns out the dice rolls were such that the outcome would have been no different).
The warbands now used their sweeping advance moves to close on the rear of the legionaries. |
Roman Turn 6
 |
| And still the cavalry melee rumbles on with neither side getting the upper hand. Additional casualties though caused the supporting javelinmen to become shaken. |
 |
| There was little Roman movement in the centre. Their auxiliary unit that had been supporting the legionaries charged into the warbands on the right to shore up their right flank. The CinC successfully rallied a cohort from shaken. |
 |
| The Roman division to the rear once again failed its command role! It's sole Legionary cohort used its free move to close on the rear of the auxiliaries to provide support. |
 |
| The commander of the Roman right flank division successfully rallied a cohort. In the upper right of the photo, the lone cohort used its initiative to charge the light cavalry unit in an effort to clear the Britons away who were preventing it from joining the main body. They won the melee causing the cavalry to give ground. |
Briton Turn 7
 |
The Briton right flank division ordered a warband to support the cavalry melee but still the Batavians held out fighting them to a standstill.
2 warbands charged the flank of a Roman cohort who turned to meet them but in doing so disordered. Seeing the threat the Roman CinC joined the cohort adding 3 more to their attacks. All was in vain however, as the cohort was utterly destroyed and the CinC wounded. |
 |
| In the Briton centre, more warbands were thrown against the weakening Roman line. |
 |
| The Roman centre desperately held on as the victorious warbands on their left flank swept in to join the melees. Despite the overwhelming barbarian horde both the Legionary and Auxiliary cohorts held their ground albeit both now shaken. With more than 50% of the CinC's division destroyed and the remainder shaken the entire command was now broken. |
 |
| The commander of the Britons' left flank division did not need to order his wild warbands to charge as they took it upon themselves to pile into both the front and rear of a Roman cohort. The Romans survived benefitting from a supporting cohort and the commander joining them. They were shaken though but then so was the warband fighting them to their front. |
Roman Turn 7
 |
| The commander of the Roman reserve division sprung to life! Finally having a decent command dice roll he ordered his cohorts in various directions in a desperate fire-fighting exercise. His single Legionary cohort being the only one able to participate in any of the melees supporting the engaged Auxiliary unit (middle of photo). |
 |
| And still the Romans held on in the centre but failed to beat off the fanatical warbands. At the bottom of the photo the Batavian cavalry finally succumbed and fell back but still in good order albeit shaken. |
 |
| With the melee continuing the lone cohort to the right made another attempt at clearing away the very annoying light cavalry unit. |
 |
| The light cavalry has been destroyed at last but bad news for the rest of the division. The cohort lead by its commander was destroyed and the commander wounded. The result of this was a broken division. |
 |
| With 2 of its' 3 divisions broken the consequence was a defeat for the Roman 9th. An overview of the hopeless situation with the Menai Straits to their rear! |
This was an unexpected turn of events! I felt sure this would be the last action of the campaign but it could not have been worse for the Romans. With nowhere to retreat the 9th Legion was utterly destroyed.
The campaign will now continue with the Romans having to restore their reputation and finally deal with the lunatics in residence on Mona.
I made a number of mistakes in the rules although it is unlikely there would have been much of a difference to the outcome. Roman dice rolls were not in their favour and after the previous easy successes, I was overconfident they would do the same here.
The intention is to continue with Hail Caesar for now before making a final decision for the long term. All the rules I have trialled have their merits but I am a sucker for a fistful of dice. Their is something therapeutic about rolling a handful of them and observing the potential devastation that follows. As I am getting older and the memory cells are not performing as they used to, there is a clear advantage in sticking to the same family of rules for various periods whenever possible.
These are from the same family as Blitzkrieg Commander and I am also considering Pike & Shotte for the ECW. Additionally I will be looking at my Wars of the Roses collection afresh using Hail Caesar. Whether I will extend this to Black Powder for the AWI, Napoleonic, ACW and Colonial is another matter but not dismissed out of hand.
Hope you all enjoyed what should have been the final battle of the campaign and I would be interested to hear your opinion of Hail Caesar. Pike & Shotte and Black Powder.


Fantastic report Jon, and as always a lovely looking game.
ReplyDeletePoor Romans, a very hard battle if you are rolling ones for initiative.
Many thanks for that Ben.
DeleteGreat report as always Jon, but the Druids obviously got the ear of the fickle Dice Gods in this game! At least you get to continue the campaign, so every cloud and all that...
ReplyDeleteAs for the rules, I'm very much one for keeping to a core set with very similar games mechanics, which makes it much easier to chop from one period to another, without massive brain ache on the rules front. Also designing scenarios, forces etc becomes much easier. So I play BKCII, Hail Casar II (better than the first edition, but few lists, but goes up to the WotR), Black Powder II (19thC), Pike & Shotte with the 'To Kill A King' supplent for the ECW and finally Honours of War for the 18thC/SYW.
Personally they all give very good games, are solo friendly, play out in a few hours and are easy to use for simple, narrative driven campaigns. They just work for me:).
Many thanks Steve and thanks for the advice. I have just bought Hail Caesar II and currently reading through it. Definitely better laid out than the original. Have also acquired the WotR supplement and will be looking to play some games from that in the not too distant future.
DeleteI may well be following your example and extending this across all periods. Considering also taking a look at one or two of the 'Epic' rulebooks. Have you tried any of these and are they better suited for 6mm rather than the 28mm in the originals?
Hi Jon,
DeleteI like the WotR supplement, which I hope to gather some figures at some point to make two small forces to kick things off. But as will all things wargames related, when theat may be, who know;)!
I've not tried any of the Epic books, only the originals as it were. With my 10mm figures, I use 1" square bases, with 4 making a unit and so having a frontage of 4"/10cm. With these I simply halve all of the measurements or just use cm's instead of inches, although I prefer the former as it is easier for me when playing a game.
Thanks for that Steve. I will be sticking with my 15mm x 15mm bases for 6mm and yet to decide on a unit size for those. A combination of what looks good and practical.
DeleteCracking looking game, and the gods were clearly smiling upon the Britons!
ReplyDeleteThey certainly were for this game. Those druids have a lot to answer for.
DeleteClearly if you see a recruiting party for the 9th Legion you need to make yourself scarce p.d.q. A cracker of a game - has this been enough of a set-back to threaten the Roman position in Britain?
ReplyDeleteMany thanks Rob. Certainly a set-back but the Romans do not accept failure!
DeleteA great looking game and excellent battle report - we Brits say Romans go home!!!
ReplyDeleteAgree with your sentiment Stryker.
Delete