NEY'S ASSAULT
Turn 1
 |
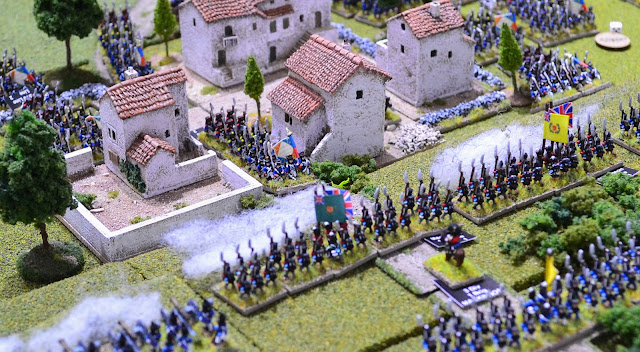
Ney's advance begins with Marchand's Division ascending 'The Spur' and Loison's heading towards Sula. A swarm of Voltigeurs engage primarily the rifles of the 60th and 95th regiments along with Cacadores deployed as skirmishers. Both sides take early losses but an early stroke of luck lands with the British when a double '6' is rolled upon Lawson's 6pdr foot battery (far lower right) engaging in counter-battery fire with a newly deployed French foot battery (just below the advancing columns).
The French lose one of its 4 guns and will have to withdraw. |
 |
| Mermet's Division is in a supporting role as the entire corps advances towards the ridge. At the bottom of the photo, Junot's Corps is held in reserve. |
Continued -
Turn 2 |
| Marchand's Division continues its advance along the spur and is about to enter the difficult terrain leading up to the ridge summit. French skirmishers enjoy for more success this turn with 2 double '6's rolled. Suffering particularly badly on the left of the photo is Pack's 4th Cacadores. They fail a morale test and will retreat in the next turn. |
 |
| Loison's Division begins to enter Sula and although it's skirmishers have the better of the British with many of the latter falling back towards their lines, the French suffer heavy casualties from a battery firing canister into its dense ranks. |
Turn 3
 |
| The French columns advancing through Sula shrug off mounting casualties with their own skirmishers giving good account of themselves (another double '6' rolled taking a heavy toll of the 95th Rifles). |
 |
| Skirmishers from Packenham's and Stopford's Brigades pull back giving a clear field of fire for the two batteries on the ridge (right of photo). Both batteries roll poorly with one a double '1' resulting in a low on ammo penalty for the rest of the game. Despite the dense mass of troops advancing towards them only a couple of casualties was inflicted. |
Turn 4
 |
| Most of the British skirmishers have now been recalled to clear the way for battalion volley fire. Several battalions poured their musketry into the closing columns failing to slow the advance. Ferey's Brigade have overrun Sula with the 6/66th Line advancing directly up the road through the defile. |
Turn 5
 |
To the right, 3 battalions of Maucune's Brigade elect to take a chance and launch a charge at full speed risking disorder. All 3 incredibly succeed in holding their formation only for their charges to be stopped in their tracks in the face of casualties from musketry and artillery fire.
On the left Ferey and Simon's Brigades move out from Sula towards the ridge. |
Turn 6
 |
More columns emerge from Sula adding to those on the spur. Several attempts are made to charge the ridge line but all failed. And what's more, Ferey was killed. The first loss of a French General so far.
There is one slight silver lining for the French. Both artillery batteries firing on units on the spur are now low on ammo degrading their ability to inflict damage (top left). |
Turn 7
 |
4 French battalions launched charges towards the ridge. The 2 foot artillery battery crews decided not to wait around and fell back abandoning their pieces. At the bottom of the photo, the British 1/79th Line opened fire on the two approaching columns inflicting severe casualties causing both to falter.
To their left, the 2/1st Portuguese Line similarly fired an effective volley into the single French battalion opposing it also causing it to falter.
In the middle left of the photo success for the French. The 1/6th Light battalion of Maucune's Brigade were not deterred by the Portuguese musketry and hit the 2/16th Portuguese Line. In the ensuing melee, the inferior Portuguese infantry gave a good account of themselves pushing back the French battalion. |
 |
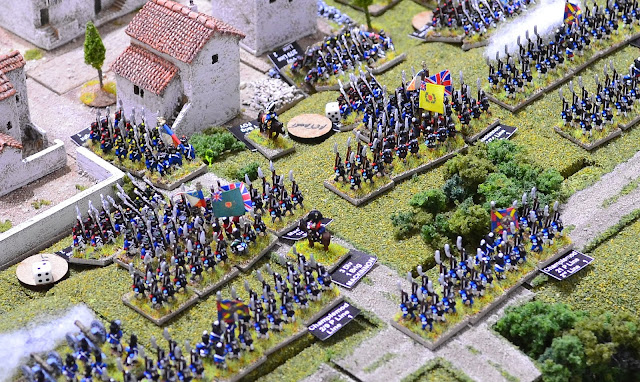
| Although his centre is holding out well against Reynier, Wellington is concerned about relative weakness in this sector and orders Champlemond's Portuguese Brigade to relocate. His troops are newly arrived and there is much grumbling about having to return the way they came! |
Turn 8
 |
| Loison takes direct control of Ferey's Brigade and orders more charges along with Marchand's Division on his left. The Portuguese battalions along with Packenham's British Brigade (extreme right of the photo) stand their ground pouring volleys into the advancing columns. So tightly packed are the advancing columns that when some suffer morale breakdowns they disorder their neighbour battalions and none succeed in making contact. |
 |
| The aftermath as morale begins to break down in the French formations. One battalion flees the field with others retreating or faltering. Two brigade morale checks are triggered which are only narrowly passed. |
REYNIER'S ASSAULT
Turn 1
 |
Most of the Anglo-Portuguese skirmishers are deployed in or near San Antonio. This is a mixed blessing for the French as it gives a clear target for the batteries on the ridge.
Merle's Division (left of photo) suffers heavy losses as cannon balls rip through rip through the dense ranks. The skirmishers though make a good account of themselves wiping out one of the gun crews.
Elsewhere there is a fairly even exchange in and around the village with no notable winners.
|
|
Turn 2
 |
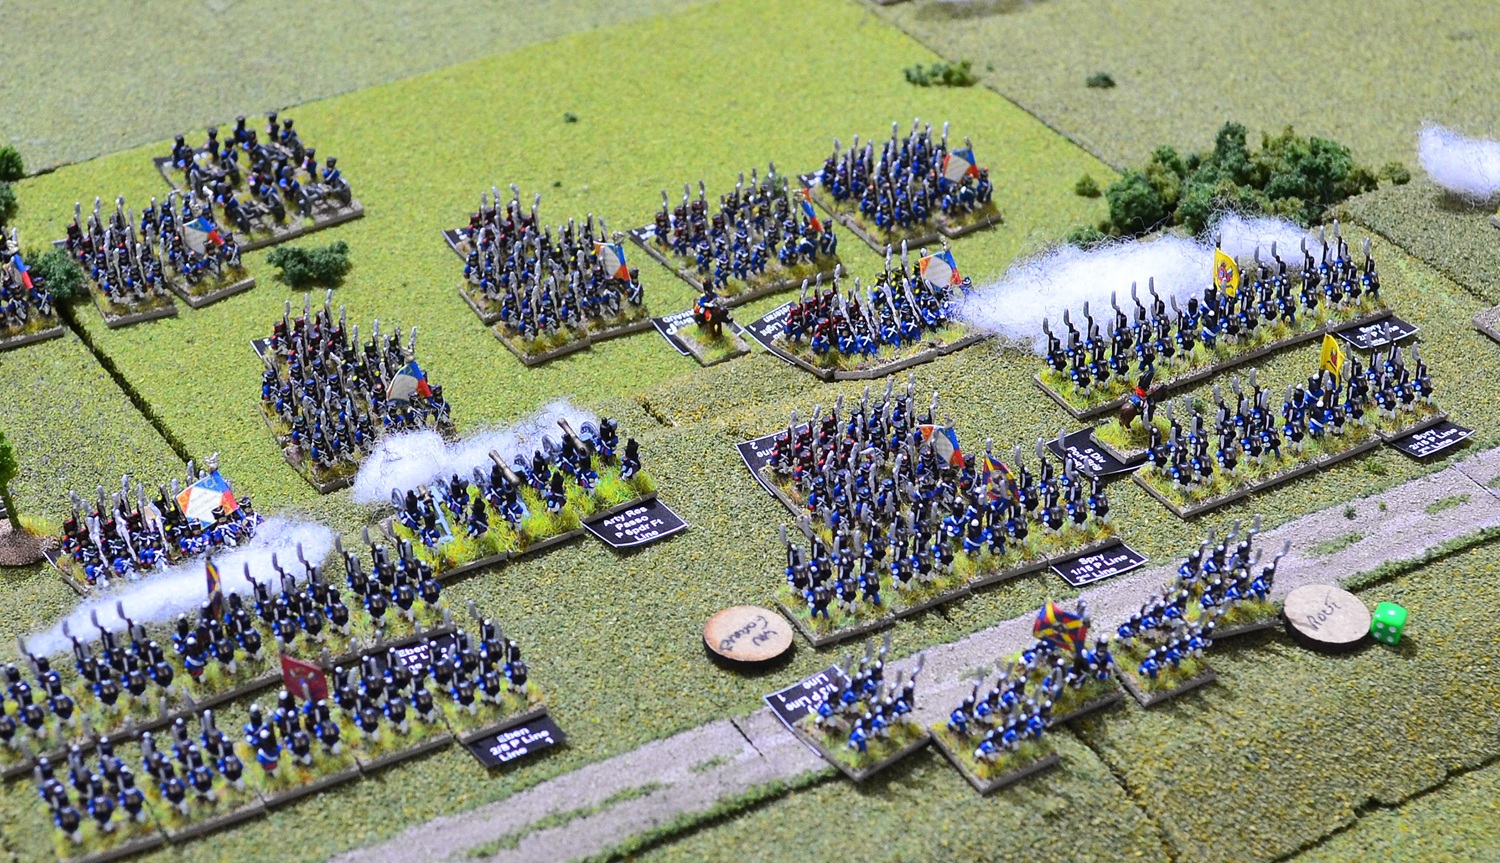
Merle's Division have now begun to climb the ridge and have elected to move at half speed to maintain good order. Both batteries on the ridge fire canister into the nearest battalion column inflicting 7 casualties and generating a morale test which it passed with ease.
Top left of photo is a French foot battery attempting to deploy in support but suffers from repeated hits from another British battery off camera to the left. For the second turn in a row it fails its subsequent formation test preventing it deploying. |
 |
| Foy's Brigade begins to enter San Antonio with a lead battalion changing formation to a march column allowing it to pass unhindered through the village. |
 |
| More of Foy's battalions skirt the southern edge of the village while Arnaud's Brigade advances across open ground on the right. Skirmishing continues across the front. |
Turn 3
 |
The head of Merle's Division comes under murderous fire from the ridge. At the bottom of the photo the 88th Line reveals itself pouring a volley into the 1/2nd Light battalion inflicting 4 casualties. The real damage was caused by the two batteries on the right firing canister into the column. Freira's Portuguese battery rolled a double '6' and when added to the casualties caused by Thompson's neighbouring battery a total of 9 were suffered by the 2/2nd Light and a further 4 on the 4/2nd Light to their rear.
The 2/2nd Light had now suffered well over 50% casualties and promptly dispersed from the field having failed their morale test. 5 battalions will be taking morale tests in the next turn as a result. |
 |
| The 1/70th Line emerging on the track from San Antonio is met by two of Mackinnon's battalions firing into their column. They lost 5 of their number but this did not check their advance. |
 |
| The Portuguese increasingly engaged with the advancing French columns to the south of San Antonio. One of the lead French battalions of Arnaud's Brigade lost their nerve and will be retreating in the next turn. |
Turn 4
 |
| An overview of Reynier's assault. |
 |
| Merle's Division continues to struggle with the 1/2nd Light battalion suffering badly from a devastating volley from the 88th Line. They will be retreating in the next turn. |
 |
| The 1/70th Line attempted to charge along the road onto the ridge summit under the orders of Foy which lead to their utter destruction. The photo was taken after the event with the battalion no longer present! |
 |
| The French decided to pick up the pace as casualties began to mount as the Portuguese infantry opened fire. This lead to most of them becoming unformed and one battalion retreating. |
Turn 5
 |
| Foy orders two battalions to charge out of San Antonio towards the ridge. On the left the 3/70th Line never really gain traction as they stumble out of the village unformed. In the middle of the photo though the 3/17th Light battalion charges up the track from San Antonio pushing through the musket volleys towards the elite 1/45th Line. The British battalion is taken by surprise at the ferocity of the charge and falters as the French column piles in. |
 |
The 1/45th Line successfully pushes back the 3/17th Light back into San Antonio but that was a close call!
Sarrut's Brigade on the left of the photo continues to suffer badly with a battalion destroyed by artillery fire from the ridge and another fails to rally fleeing the field.
In the foreground, Champlemond repositions his Portuguese Brigade to plug the gap in the line. |
 |
| Arnaud orders 2 battalions to charge the Portuguese and again risk disorder. No such luck here with both battalions becoming unformed by the terrain and the charge is halted. They are now at the mercy of musket volleys by the defenders. |
Turn 6
 |
| Merle calls his division to a halt in the face of crippling losses. He deploys his skirmishers to engage the artillery in particular hoping to diminish their threat prior to a renewed assault. |
 |
| Foy's 1/17th Light now takes up the reigns launching a charge along the track out of San Antonio. The British 1/45th Line have yet to reform and their ragged volley only claims one casualty. The French battalion charges home and in the ensuing melee the result is exactly the same with the 1/17th Light being pushed back. |
 |
| Battalions from Heudelet's Division withstand musket fire from the ridge and reform ready to launch a fresh assault. |
Turn 7
 |
3 French battalions launched attacks on the ridge with 2 easily stopped in their tracks. Of particular note is a double '6' rolled by the 2/3rd Portuguese Line (top right) leading to the destruction of the French 2/31st Light Battalion and the wounding of Arnaud. Although he survived his ability is diminished for the rest of the battle rating him now as 'poor'.
One French battalion, however, proved to be more resilient and in the middle of the photo is the charge of the 2/47th Line is seen gaining the ridge summit. Their charge routed the 1/3rd Portuguese Line who unformed the 1/15th Portuguese Line to their rear as they fled through their ranks. The 2/47th continued their charge and although unformed, the 1/15th embarrassed their more experienced 1/3rd battalion by standing their ground and receiving the charge. |
 |
On the right of the photo, Spry joined the 2/15th Portuguese and successfully changed their formation to deal with a possible breakthrough by the lone French battalion.
They need not have worried as their fellow battalion heroically defeated the French 2/47th forcing them to retreat with heavy loss. |
 |
| An overview of Reynier's assault clearly struggling to make headway. It did not go all the allied way though with the loss of a Portuguese artillery battery losing out to counter-battery fire (gap in the line top right of photo). The already shamed 1/3rd Portuguese Line hit new lows by failing to rally and fled the field! |
 |
| Barnes' British Brigade arrives which could prove opportune in this sector. |
Turn 8
 |
| The whole of Barnes' Brigade is now on the table and moving across the ridge. |
 |
| Foy orders 2 more battalions up the slope out of San Antonio, and what is proving to be a rarity, they succeed in making contact. Only to be sent back down the slope having been comprehensively defeated in the melees. Mackinnon's elite battalions are beginning to suffer though from the relentless attention. The 1/45th in particular on the left have now suffered over 20% casualties. |
 |
| Across the rest of the centre to the south of San Antonio, the Portuguese continue to hold off French attempts to gain the ridge. |
This brings to an end this segment of the game with the mist now lifting. In turn 9 I will be free to attempt to change the course of history. The experience of the French so far has exposed the folly of attacking in huge dense columns on narrow fronts. It is nevertheless going to be difficult for the French given the steepness of the slopes cancelling out the benefit of column attacks. A lucky breakthrough though could change all that.
 |
| An overview at the end of turn 8. Both Ney and Reynier's assaults have largely stalled and it may well come down to Junot's Corps held in reserve to break the deadlock. |
.jpg)


Jon,
ReplyDeleteMy goodness Sir, your table and figures are absolutely breathtaking! You do Napoleonics the way I wish I could do Napoleonics, truly amazing in terms of the scale and sweep of the engagement. Looks like things aren’t going well for the French, but that’s okay, isn’t it ;)
V/R,
Jack
Many thanks for those kind words Jack. The French really are struggling to make any headway at all! Could all change yet though.
DeleteMany thanks Ben.
ReplyDeleteJon -
ReplyDeleteMan, that looks hellova good as a spectacle - but it don't look very hopeful for the French. Napoleon: 'What was Messena thinking?!'
Cheers,
Ion
Many thanks Ion.
Delete"They came on in the same old way..." A really good start to this game Jon and it does show the folly (famous last words) of the French tactics given the terrain they were fighting over. Looking at the situation Junot does have a big reserve, but again is facing tricky terrain and to my eyes still a well formed defensive line. The Allied left flank does look strong and could possibly make a flank attack or simply relocate units along the ridgeline to block any holes etc. Can't wait for the next update!
ReplyDeleteMany thanks for that Steve. The centre certainly looks vulnerable if Junot concentrates on that sector. I am working on the basis that most of those unengaged troops are still on reverse slopes so Massena will be unaware of the allied strength. It will probably be decided on a dice roll!
DeleteA cracking start, and it looks pretty bay for the French. It seems a purely attritional approach might possibly succeed but the how long are the troops going to let themselves be fed into the mincing machine before they refuse?
ReplyDeleteMany thanks Rob.
DeleteWonderful
ReplyDeleteMany thanks Richard.
Delete