Turn 21
 |
| The Imperial Guards have now defeated the whole of the Prussian left flank and are beginning to concentrate on their next phase of assisting Vandamme defeat the centre. |
 |
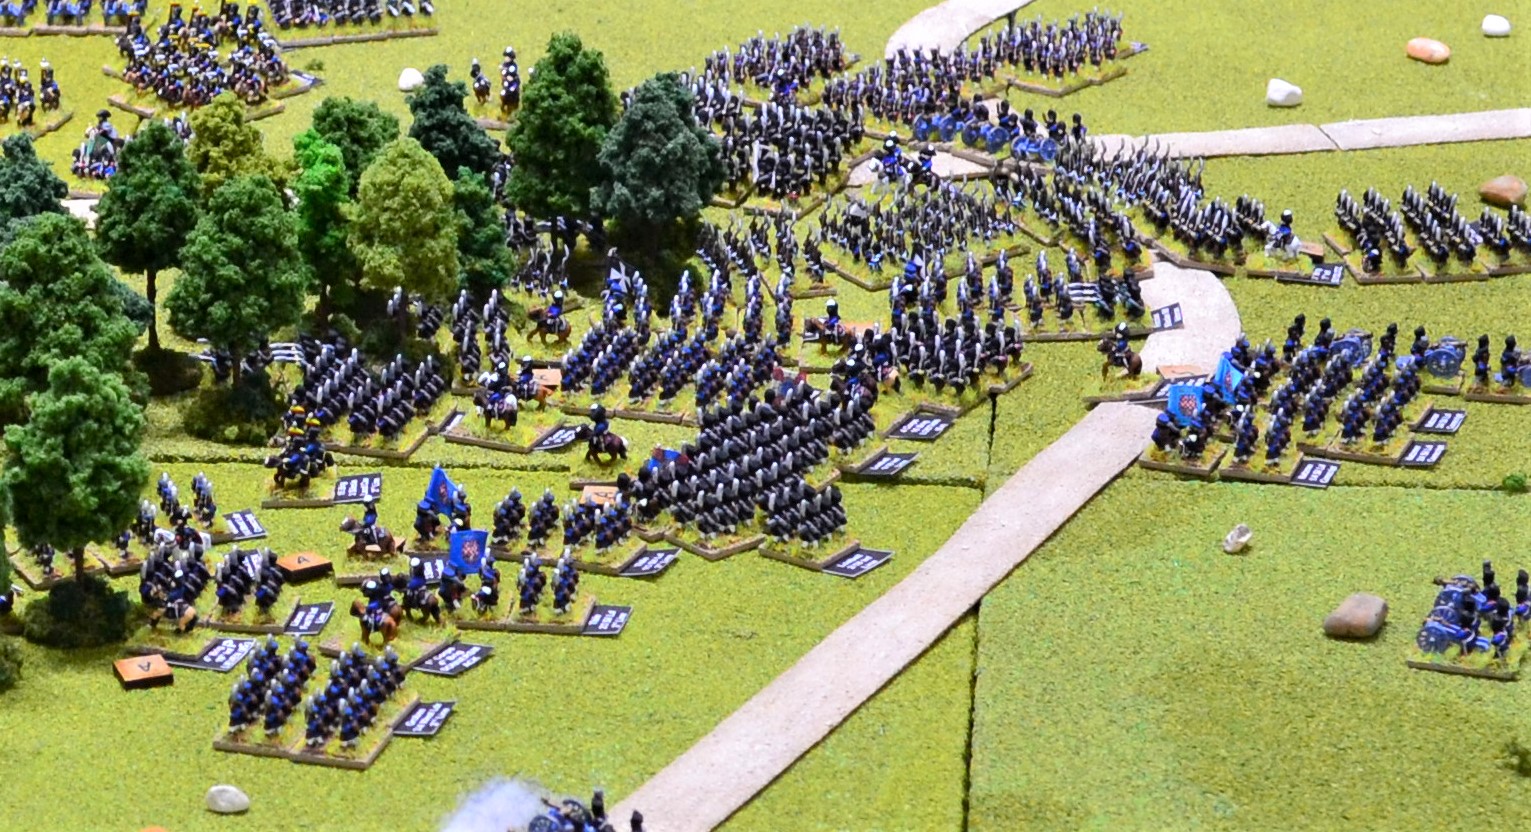
| In the Prussian centre, the Grenadiers a' Cheval continue their devastating attack. Having maintained superb discipline they press on to charge the 1st Dragoons. Thurmen leads the Dragoons into a counter-charge. The Prussians put up a spirited charge but are no match for the Grenadiers who inflict heavy losses on them (8 figures). This forces the Dragoons to retreat but some respite is awarded to the Prussians when the Grenadiers become unformed. |
 |
| Beyond the Grenadiers the Empress' Dragoons successfully negotiate the mass of intantry to emerge into the Prussian central position. |
 |
| In the middle of the photo, the 2nd Cuirassiers have finally found a way through the press of men and launch a charge at Thurman's 6th Dragoons who counter-charge. The higher numbers of Dragoons swing the melee in their favour defeating the Cuirassiers who are pushed back Just beyond this melee Bismarck's Landwehr are finally routed by a French column and consequently flee the field. |
 |
| The last Prussian infantry unit holding a forward position in the centre is the 2/2nd Elbe Landwehr who occupied a small wood. They are charged by the veteran 2/64th Line but the Landwehr are going nowhere. They unceremoniously defeat the French inflicting heavy casualties. |
 |
| Two infantry columns from Billiard's Brigade launch a charge at the 2/21st Infantry who have been threatening the flank of Vandamme's Corps. The Prussians immediately retreat but are caught by the French who inflict severe casualties on them. This has bought valuable time for the French centre who have yet to sort themselves out from the chaos! |
 |
| On the Prussian right flank, artillery batteries pound Jerome Napoleon's Division. |
 |
| Elsewhere on the right flank the first breakthrough occurs for the Prussians. In the bottom left corner the 2/4th Westphalian Landwehr charged Soye's 1/2nd Line who promptly routed. Other battalions from Soye's Brigade successfully held off Prussian attacks. |
 |
| At the junction of the 6th and 9th Divisions at the south west corner of the woods, Kemphen launched a charge at the defending battalion of Gauthier's Brigade successfully forcing it to retreat. |
 |
| Ziethen's columns continue to press Bachelu's 5th Division with another battalion pushed back by the 1st Westphalia Landwehr on the left of the photo. |
 |
| Tragedy struck one of Jamin's battalions. The rather complacent 1/100th Line who were in the process of reforming, failed to notice the gap that had opened up ahead of them allowing the 1st Hussars to launch a charge towards them. There hurried volley was ineffectual and the 1st Hussars set about them with gusto. The ensuing slaughter very nearly wiped out the French battalion with the survivors escaping to flee the field. |
 |
| The 1st Hussars maintained superb discipline and continued towards the French rear. A newly formed square faltered at the sight of destruction and the confident Prussian Hussars. Only the arrival of Vathiez' Lancers protected the French infantry. |
 |
| The French artillery now began counter-battery fire but the Prussian grand battery had other ideas. They targeted Hubert's Chasseurs to the rear sending a large quantity of shot plunging into one of the Chasseur regiments causing 4 casualties. The end of the turn saw a shocking development for Reille's 2nd Corps. Soye's Brigade of the 6th Division lining the woods and defending against the Prussian right flank, experienced a collapse of morale. The Brigade broke exposing the flank of the 5th and 9th Divisions. |
Turn 22
 |
| The Prussian centre clings on - but only just. The Empress' Dragoons utterly destroyed the 1st Silesia Landwehr cavalry leading to a brigade morale test for Sydow. His increasingly shaky brigade narrowly passed. Vandamme's Corps has been ordered to withdraw to support Reille's Corps to their rear. Capturing Grazzbenn would now rest on the Imperial Guard. |
 |
| A surprising victory for the Prussians came with a Cuirassiers charge meeting a counter-charge by the 4th Kurmark Landwehr lead by their cavalry commander Jurgass. They pushed back the 3rd Cuirassiers inflicting heavy losses while maintaining superb discipline. Obviously Jurgass proved inspirational! |
 |
| Equally surprising was a defeat for the Prussians when Schulenburg lead a charge of the 5th Kurmark Landwehr against the 2/37th Line lead by Corsin. The French column just had enough time to turn to face the charge and then rolled a double 6! The Prussians were routed and their guidon was captured. |
 |
| Having defeated a Prussian column, the 2/23rd Line and 2/15th Light battalions lead by Billiard did not have time to recover before they were hit by the 3rd and 5th Hussars lead by Watzdorf. In a closely fought melee the 2/23rd were pushed back but the Light battalion defeated the 5th Hussars causing it to retreat. Billiard's Brigade was now holding the left flank of Vandamme's Corps with the other brigade of the 8th Division, that of Corsin, receiving heavy casualties. |
 |
| The Prussian right flank now sought to capitalise on the breaking of Soye's Brigade advancing into the now vacated woods. |
 |
| Soye's brigade reformed into attack columns in the hope of stabilising their flank. No small task given what is heading in their direction. |
 |
| More bad news for Reille. The veteran 1/108th Line from Campy's Brigade had been faltering and did not have time to recover before the Westphalia Landwehr cavalry of Lutzow II's Brigade took advantage and charged them. The result was devastating with the French battalion utterly wiped out. |
 |
| Better news for Reille came with the charge of the 5th Lancers seeking to stabilise the situation. The Prussian 1st Hussars lost their nerve at the last moment and failed to counter-charge. They paid a heavy price and were force to retreat. |
 |
| The French observed with some concern, 3 regiments of Treskow II's Brigade begin to move out to the west. One regiment, the 4th Hussars, remained to cover the artillery. |
 |
| An overview at the end of turn 22. Napoleon seeks to reposition 2 of the 3 divisions of Vandamme's 3rd Corps to their rear to support the 2nd Corps. The 8th Division was tasked with protecting their left flank supported by the Dragoons of Piquet's Brigade. |
Turn 23
 |
| An overview of the Prussian centre. Near the top of the photo, 3 of the last 4 infantry battalions make their way to Grazzbenn. The last of their cavalry hang on including a couple of heroic charges. |
 |
| The heavily outnumbered 1st Pomerania Landwehr cavalry are charged by the Grenadiers a' Cheval. They launch an outstanding counter-charge. In melee they roll a double '6' to the Grenadiers 3 in total! The ecstatic Landwehr capture the Grenadiers flag and cause 3 casualties. The Grenadiers are forced to retreat but their sheer number kills 3 of the 7 Landwehr. |
 |
| Another unexpected success was the 4th Kurmark Landwehr cavalry once again overturning a Cuirassiers charge (the French rolled a double '1'). The 8th Cuirassiers are pushed back with heavy loss but the victorious Landwehr suffer from 'blown horses'. |
 |
| The Old Guard (left) and Middle Guard (right) begin their advance east towards Grazzbenn. |
 |
| Vandamme's 10th Division begin their march towards the direction of Reille. The heavily battered 11th Division on the right of the cavalry also begin their move to join them. |
 |
| The equally mauled 8th Division endeavour to clear the way for dragoons and carabiniers to sweep all before them! |
 |
| Bauduin's Brigade of the 6th Division begin to withdraw from the wood following the collapse of Soye's Brigade exposing their flank. Prussian artillery sends a round of shot in their direction causing a handful of casualties. |
 |
| South of Grazzbenn, the Prussian cavalry prepare to greet the approaching French heavy cavalry. |
 |
| With the woods vacated ahead of them the Prussian 3rd, 4th and 15th Brigades swarm to occupy the French position with only the broken terrain slowing their advance. |
 |
| Ziethen's troops join the crush to move forward. |
 |
| The turmoil among the 2nd Corps with Soye's broken brigade having reformed (upper middle of photo). 3 battalions dispersed from the field leading to another collapse of brigade morale, this time that of Gauthier of the 9th Division (far middle left). His brigade now consisting of just 1 battalion! |
 |
| With significant Prussian forces approaching his flank, Reille makes the decision to withdraw to a new position where he can better protect that flank. Bachelu's 5th Division is given the task of rearguard. |
 |
| The French cavalry are really not performing this turn. The 5th Lancers launched an uncontrolled charge at the column of the 1/24th Infantry. The Prussian infantry held their nerve decisively defeating the Lancers inflicting heavy casualties. |
 |
| The Prussians have not had it all their way losing several units themselves due to failed rally rolls. However, Reille observes the approaching 10th Division willing them to arrive quickly. |
 |
| As the surviving Prussian cavalry rally and their infantry moves into Grazzbenn, the infantry of the Imperial Guard prepare their advance on the Prussian town. |
 |
| The Old Guard form up on the left of the Photo with the Middle Guard on the right. The Guard horse artillery on the high ground continue lobbing round shot at long range on the Prussian cavalry. |
 |
| The 8th Division continue in their attempts to extricate themselves to clear the way for Kellerman's heavy cavalry to deal with the approaching Prussian light horse. |
 |
| The first contact by Kellerman's dragoons did not end well. The 2nd Dragoons charged the 8th Hussars lead by Watzdorff. The Prussians rolled a double 6 to the dragoons total of 3. A comprehensive defeat for the dragoons who are routed. Fortunately for the French no further damage was suffered as a result of the Prussian dice roll. |
 |
| Bachelu's 5th Division frantically endeavour to hold back the Prussian tide allowing the rest of the 2nd Corps to regroup. Bachelu himself joins the veterans of the 1/61st Line as they are charged by Othegraven and a column of the 2/12th Infantry (upper middle of photo). They fail to halt the Prussians and are forced to retreat with heavy loss. |
 |
| The massed Prussian columns begin to emerge from the woods with much of the French 6th and 9th Divisions having to contend with rallying retreating and routing units. |
 |
| Soye's Brigade of the 6th Division also start to emerge from the woods having been ordered to retire on the rest of 2nd Corps. |
 |
| Prussian columns continue to funnel into the woods eager to assail Reille's Corps. |
 |
| An overview at the end of turn 24. Although there is still much to play for, the French position is increasingly precarious. Only one of the 3 divisions of the 3rd Corps remains in good fighting condition and all 3 divisions in the 2nd Corps have suffered a mauling. Even the Imperial Guard has not escaped lightly with the Middle Guard in particular having suffered heavy losses. The French cavalry are still reasonably strong but they have suffered from some unexpected losses. The initial Prussian left flank and centre east of Grazzbenn are all but destroyed. This does not overly concern Blucher as his main offensive force, that of his right flank and Ziethen's reinforcements, are still very much intact and pressing an increasingly dishevelled 2nd Corps. A flanking move by Treskow II's cavalry brigade (bottom left) is intended to disrupt the Imperial Guard. Grazzbenn is reasonably well defended and even if the Imperial Guard successfully capture it they have the castle to contend with. |
 |
| The same view with formations marked. For those not familiar, Prussian brigades were their equivalent of divisions. I have named the commanders of each Prussian cavalry brigade to reduce the amount of text on the photo. |
TO BE CONTINUED
Those ‘bird’s eye view’ shots are really impressive! Great table, that!
ReplyDeleteImpressive layout and fantastic reporting of the swing of fortune makes this a great read. I slowly understand the lure of this scale.
ReplyDeleteGo for 6mm pancerni. You know it makes sense ;-)
DeleteWow, what can one say but "Huzzah!" for the Prussians, especially their cavalry, that really did put up a spirited performance. Things are nicely posied but I can't see any advantage to the French continuing to try and take the town, given the overall positions of both sides as shown in the last photo. A fighting withdrawal seems a good option to me, but I await the final outcome of the battle with keen interest:).
ReplyDeleteA fighting withdrawal is certainly on the cards. It very much depends on the 2nd and 3rd Corps being able to defeat the Prussian threat from the south. A good deal will also hinge on the French cavalry who have so far been underperforming considerably!
DeleteExcellent as always the big picture images look great Jon.
ReplyDeleteMany thanks Elenderil.
DeleteGood morning Jon, expecting a French fightback for some reason.
ReplyDeleteThat is what they are going to attempt Peter but going to be a tall order.
Delete