This scenario is taken from the Rapid Fire! supplement 'Market Garden'. Converting Rapid Fire orders of battle to Blitzkrieg Commander IV is relatively simple. Artillery is translated 1:1 as are support weapons. Infantry have 3 bases to a company (1 base = 1 platoon). Mine are based in multiples of 4 figures and given that RF companies average around 8 figures it is a simple matter of increasing numbers by 50% to calculate how many are needed for the reduced German battalions.
Where there is transport that needs to be increased slightly to ensure all units have a vehicle assigned. Tanks are a little different. In RF the tank ratio is 1:5 compared to 1:3 or 4 in BKC. A squadron of 3 tanks therefore becomes 5 and so on.
This will mean rather more tanks and vehicles travelling along the road from Joe's Bridge and the increased possibility of a traffic jam! Should be interesting.
The scenario book recommends a table size of 8' x 5' for 20mm (although allows for flexibility). I calculated that 4'6" x 3' should be sufficient for 6mm.
Game details:
Table Size - 4'6" x 3'
Figures - Heroics & Ros 1/300 (Brit carriers GHQ 1/285)
Rules - Blitzkrieg Commander IV
ORDERS OF BATTLE:
Continued -
A reminder from the preview of the terrain the British will have to battle across. They will be arriving along the road in the foreground with Joe's Bridge just off the table.
All German forces are concealed at the start of the game. The British objective is to capture Valkenswaard at the top of the photo by turn 15.
All vehicles are confined to the road until they reach Valkenswaard. The road is 2 vehicles wide and if 2 are knocked out side by side then it is blocked. The Dozer tank will be required to clear the road.
The two British infantry battalions from the 69th Brigade arrive either side of the road to support the armoured advance.
The Irish Brigade order of march:
 |
| The game begins with an off-table rolling barrage from 25pdrs. A 75mm anti-tank gun with its tow vehicle are knocked out. Another 75mm is suppressed as is a dug-in infantry platoon. |
 |
| One of the flanking infantry battalions tentatively making their way across open fields. |
 |
| The 2nd infantry flanking battalion makes its way through the woods. |
 |
| 'A' squadron of the Irish Guards armoured battalion make steady progress off Joe's Bridge. Tanks 3 - 5 have a company of the Irish Guards as tank riders. I do not have any suitable models so a note is made of this fact. |
 |
| As the front of the armoured column enters the woods there is still no sign of the Germans. Did the barrage wipe them out? |
 |
| Another view of the armour strung out along the main road. |
 |
Contact is finally made. A platoon of Fallschirmjager tucked behind the hedge open fire on 'B' company who has moved out ahead of the rest of the battalion on the west side of the road. German fire is remarkably accurate very nearly taking out the company HQ platoon. A call to the supporting 81mm mortar failed to get through much to the relief of the British. One more hit on the HQ platoon would have finished it off!.
|
Turn 2
The rolling barrage continued moving 6" up the board. All German units survived although several had become suppressed.
 |
| The British armoured column slowed its advance to avoid overtaking the rolling barrage. As it entered the woods the only visible sign of the enemy was a burning truck and knocked out 75mm AT gun. The tank riders kept their eyes pealed when gun flashes erupted around them. |
 |
| The Sherman Firefly was the first to erupt into flames from a Panzerfaust fired from a nearby trench. The tank riders were killed instantly. A Sherman immediately ahead was hit in the flank by a hidden 75mm anti-tank gun. It survived the first hit with the tank riders quickly dismounting. No sooner had they hit the road surface their Sherman suffered another it from the 75mm and promptly brewed up. The hapless troops had no time to recover before they came under sustained fire from hidden German rifle units. They had no chance being caught in the open. |
 |
| The Panzerfausts from within the trench in the centre of the photo turned their attention on the OP tank (just to the left of the fence) which was quickly despatched. The 81mm mortar to the right in the photo targeted the exposed bren carriers transporting 'A' company of the Irish Guards. A direct hit was scored on one carrier which it survived only to be hit by a second finishing it off including the embarked troops. |
 |
| What the British would not have known is that they had come up against SS Battalion Richter. These fanatics had been well concealed and timed their opening shots to perfection (helped by the fact that Richter had rolled a double '1' command dice allowing 2 activations on top of the 2 already used thus far). The 3 lead Shermans together with the surviving platoon of tank riders from 'B' company were now isolated from the rest of the column by a string of destroyed armour. |
 |
| The 75mm having revealed itself has caused the Irish Guards one hell of a headache! |
 |
| The infantry battalion to the west of the road was now making good progress but not without loss. The SS platoon occupying the trench at the top of the photo used their activations to maximum effect destroying two British platoons caught in the open. |
 |
| The battalion on the east side of the road also made good progress and although caught by the German ambush suffered only suppressed units with one falling back (right side of photo). |
Turn 3
 |
| The infantry battalion to the west of the road became bogged down. Having used their initiative to pour fire at the SS platoon in the trench (top left) and the Fallschirmjager platoon behind the hedgerow (bottom left) they failed to activate in the command phase and thus were unable to follow up. |
 |
| Their opposite number on the east side of the road faired little better. Having got into position behind a fence they failed to press on. |
 |
| The Irish Guards had more success. 'A' company successfully stormed the SS platoon holding the trench (middle of photo). This platoon with its Panzerfaust had caused so much mayhem the Guards were only too pleased to remove this continuing threat to the column. |
 |
| The surviving platoon of tank riders from 'B' company had plunged into the woods lining the road to take stock of the situation. |
 |
| On the opposite side of the road an SS platoon with Richter nearby came under sustained fire from two Shermans. They survived but had become suppressed and had fallen back further in to the woods. |
 |
| The 88mm now revealed itself (bottom) sending a shell towards the front of the Armoured column. |
 |
| The lead Sherman received a direct hit but luckily survived albeit suppressed. |
 |
| The main column was now making slow progress hindered by the burning wreckage of destroyed armour. The HQ Sherman had taken the lead but was abruptly brought to a halt as a burning tank exploded directly in front of it. |
Turn 4
 |
| More time wasted by the infantry battalion west of the road who yet again made little progress. The Fallschirmjager platoon holding out at the hedgerow now withdrew towards its parent battalion. |
 |
| To the east of the road a general advance was ordered with the entire infantry battalion advancing across open fields. This was too much of an invitation for the hidden Germans who collectively opened fire. Several British units were suppressed but none destroyed. |
 |
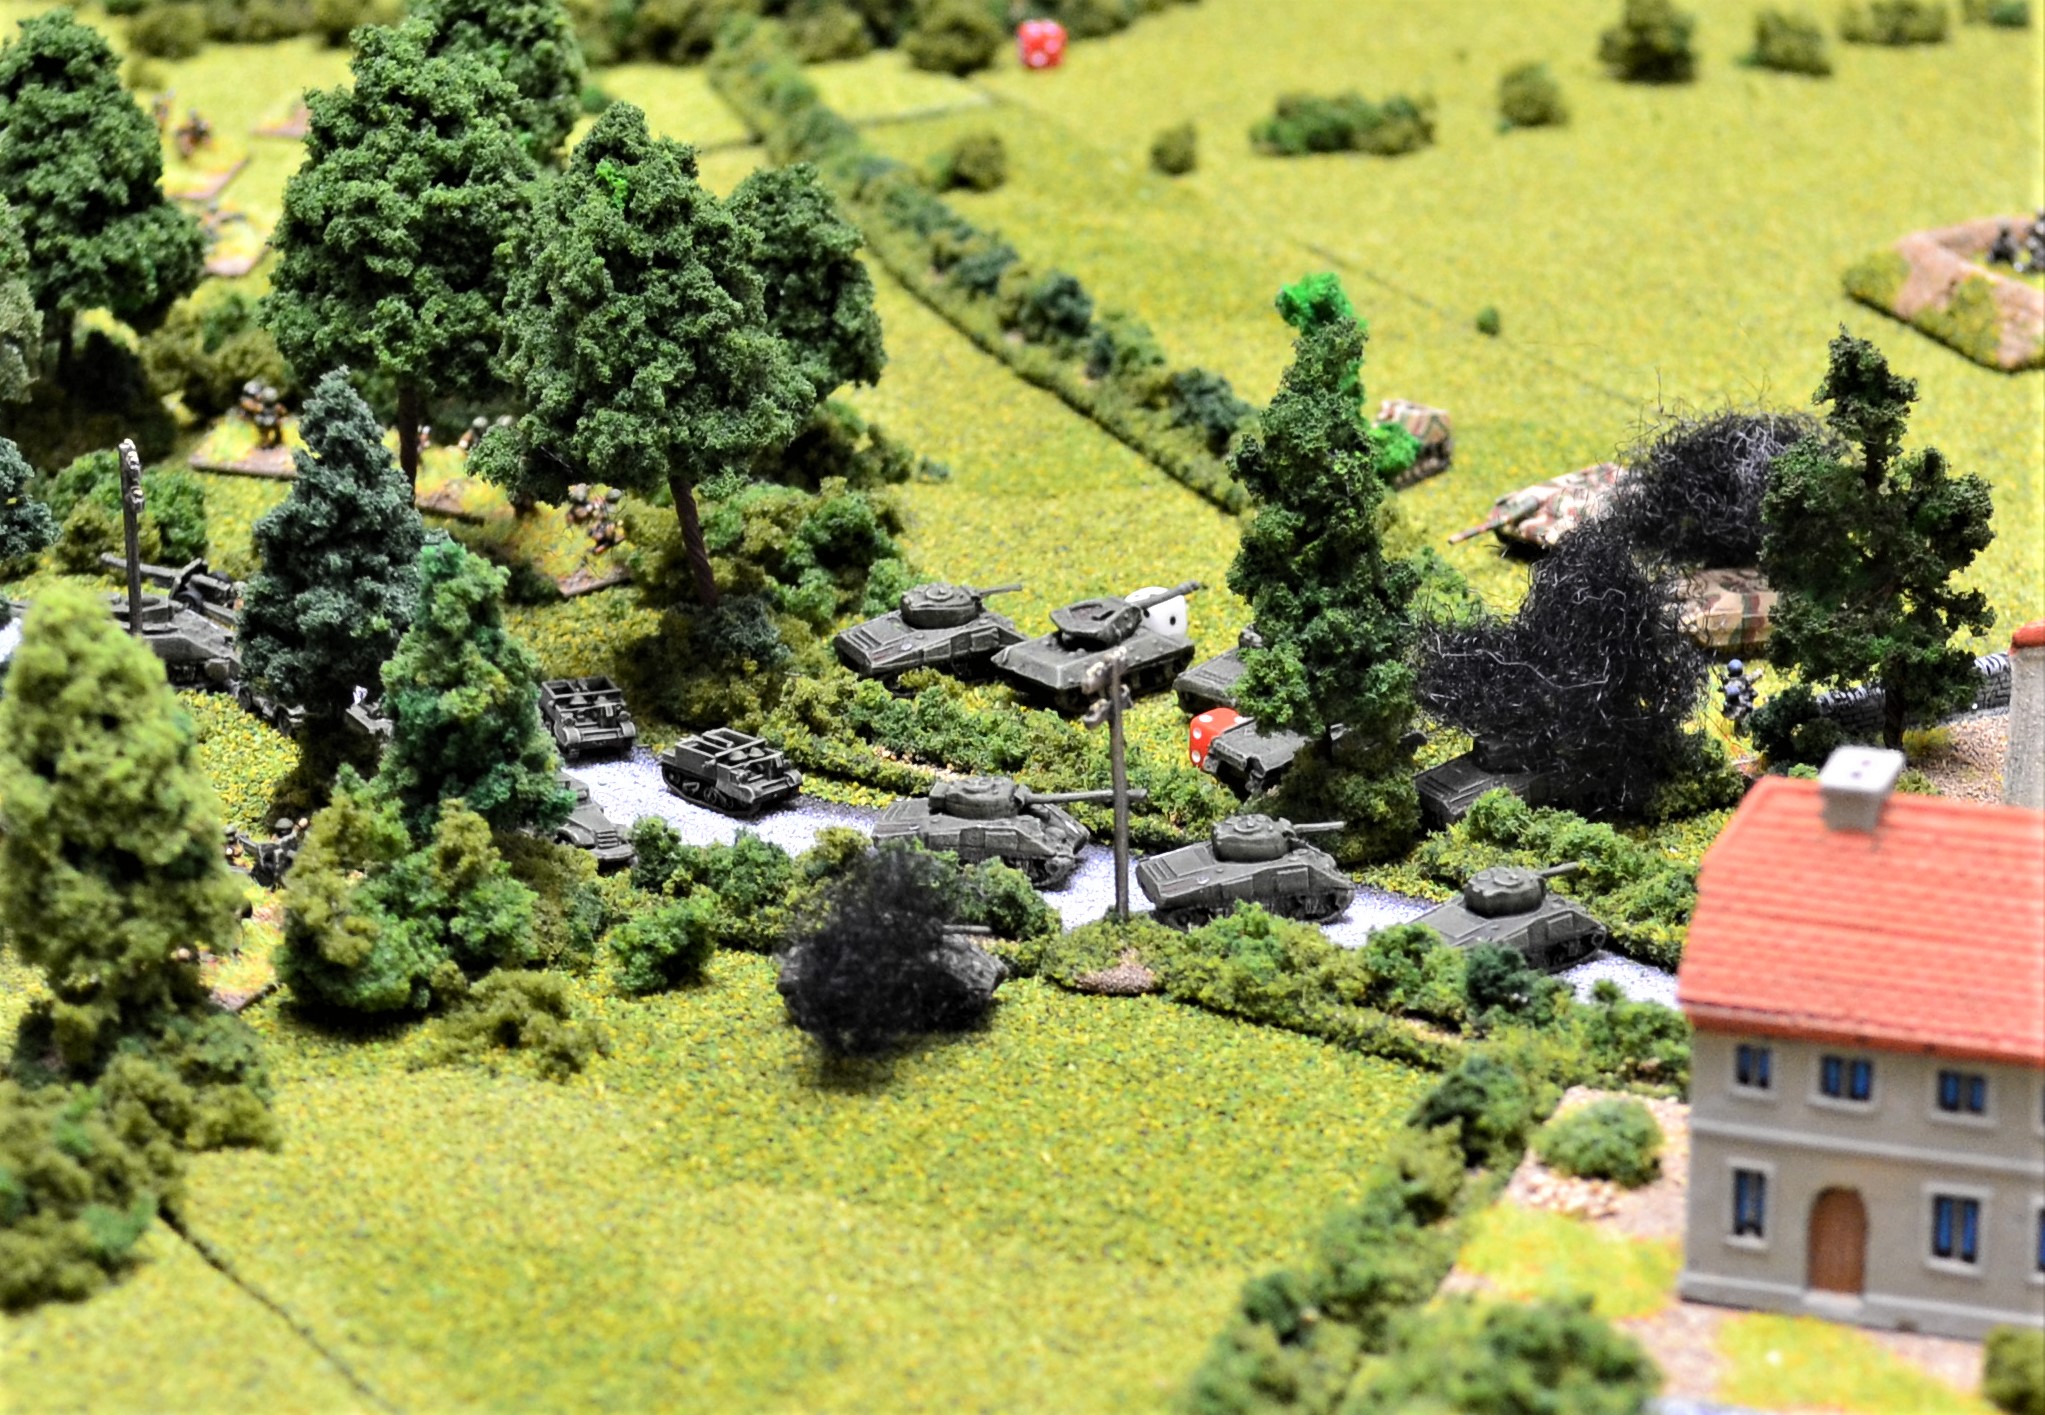
| 'A' company of the Irish Guards charged into the trench occupied by an SS 81mm mortar successfully overrunning it with ease. 'A' company of the infantry battalion cheering on the success of the Irish Guards suddenly came under fire from a hidden MG42 hidden in the woods suppressing one of the platoons (unit with the red dice). |
 |
| The surviving platoon from 'B' company (tank riders) supported by 'A' company successfully destroyed the SS rifle platoon holding out in the woods. Richter hurriedly departed from the scene! |
 |
| The 3 isolated Shermans at the head of the column were fighting out their own battle. Alarmed by the sudden appearance of the 88mm, the lead Sherman sent 2 shells in quick succession towards its position. Both struck plumb onto the German gun knocking it out. Elated with their success more activations saw the Shermans became a little over-confident. 2 Shermans (the third was recovering from suppression) advanced further along the road unsupported and ran into a hidden Panzerfaust (the base can be seen to the right of the road in the middle of the photo). The lead Sherman survived, but only just and was now suppressed. |
 |
| The main armoured column continued to make painfully slow progress. It should be noted that the road along this section of the board should be elevated. I therefore made vehicles travelling along this section more visible to units either side of the central wood. The consequence of that can be seen with the Achilles SP gun having suffered a hit from a 75mm AT gun situated in one of those fields. Only minor damage was caused on this occasion. |
Turn 5
 |
| At last the British start to make significant headway. The battalion to the west of the road makes it to the nearest hedgerow to see the lone Fallschirmjager platoon in the open retreating across the field. Those that can open fire downing he exposed Germans. |
 |
| 'D' company of the same battalion pour fire into the last advanced German platoon occupying the trench in middle of photo. A second activation proved too much for the German platoon as more rifle fire hit them including shells from a supporting 3" mortar. |
 |
| The battalion to the east of the road enjoyed similar success. Several activations saw them fire everything they had at the 2 trenches and SS troops behind the hedgerow. All were destroyed. |
 |
| The suppressed lone 75mm anti-tank gun was now in danger of being outflanked. A platoon of the Irish Guards can be seen in the woods having engaged and destroyed the concealed MG42. The SS Battalion Richter now ceased to exist. |

|
The convoy of armour still struggled to get past the burning wreckage littering the road. The Sherman Dozer tank was brought forward to begin clearing the various burning wrecks.
|
 |
Caught among the traffic jam the Airlink halftrack struggled to get into a position where it could call in air support. With the supporting infantry now moving forward more rapidly and with some of the wrecks cleared, the British hope to make better progress.
|
 |
| The lead Shermans advance more cautiously to allow the supporting infantry to catch up. |
Turn 6
 |
| To the west the battalion made better progress with 'A' company advancing to a field boundary where it dug in. In the background platoons from 'B' and 'C' companies came under fire from German troops hidden in the woods. One platoon was destroyed. 'A' company was targeted by an MG42 also hidden in the same woods with one platoon suppressed. |
 |
| German activity had drawn the attention of the Irish Guards units moving through the woods. A platoon here creeps up on German Fallschirmjagers who had been firing on the aforementioned battalion. They opened fire suppressing the German unit. |
 |
| Having successfully cleared the trenches and destroying the 75mm anti-tank gun, the battalion to the east of the road advanced to the hedgerow prior to making their move towards Valkenswaard. |
 |
| 'A' company from that battalion advance through the woods in the same direction. |
 |
| The front of the column makes steady progress but the rear section struggles to close the gap due to wrecked vehicles slowing their speed. |
 |
| The Dozer continues to clear the road of wreckage as more of the column arrives. |
Turn 7
 |
| The German 81mm mortar crew now abandon their trench in the face of overwhelming odds. |
 |
| In the adjacent woods the Irish Guards do a good job clearing them of Fallschirmjagers. |
 |
| The Germans, including a Wespe, open up on the battalion advancing to the west of the road suppressing several units. |
 |
| The battalion to the east move out from behind the hedgerow and immediately come under a hail of fire from behind the hedgerow ahead of them. |
 |
| Several units are lost with 'B' company almost wiped out. |
 |
| The lead Sherman tank now emerges from the wood travelling towards the outskirts of Valkenswaard but is immediately hit be a Panzerfaust (right of photo) and - |
 |
| a 37mm anti-tank gun. The combined firepower destroys the tank. |
 |
| The column immediately behind the lead tank. To the left 'A' company loses a platoon to an MG42 and rifle fire from a nearby building. |
 |
| The view of the column from the German position. |
 |
| More of the column arrives. |
 |
| A view along the road as the column endeavours to close the gap with the lead elements. |
Turn 8
 |
| At last the FAC gets himself into a position where he can call in an air strike. 2 rocket firing Typhoons are tasked with hitting Valkenswaard. A good deal of anti-aircraft fire was amassed with German HQ and CO concentrated in the area. They failed to drive off either aircraft and with only 3 hits the Typhoons would be making 13 strikes on each target. It proved pretty devastating with 2 MG42 teams and the 37mm anti-tank gun knocked out. The infantry platoon occupying the building in the middle of the photo with an adjacent Battalion HQ were suppressed. |
 |
| Over on the east side of the road the supporting battalion is becoming increasingly bogged down. The two lead companies begin to suffer from concentrated fire including the Wespe losing two platoons in the process. 'D' company (extreme right) have been ordered to make a flanking move in the hope of closing on the defending Fallschirmjager. |
 |
| To avoid annihilation to the west, the battalion commander orders a withdrawal to cover with 'B' company scrambling for the woods (top right). Most are suppressed as they retreat from continued intense fire from the SS troops. |
 |
| The two lead Shermans managed to suppress the Panzerfaust that posed a significant threat but otherwise no progress made. It did allow the rear of the column to catch up with the Dozer having cleared the road. |
Turn 9
 |
| Whilst little progress was made in the west the battalion's 3" mortar successfully suppressed the Wespe. In the woods to the left another Irish Guards platoon was destroyed by MG42's. |
 |
| On the east more losses were sustained leaving the supporting battalion looking incredibly threadbare. It did have the remnants of 'A' and 'B' companies now in the cover of the adjacent woods. |
 |
| A Fallschirmjager platoon moved up to the hedgerow bordering the road containing the lead elements of the armoured column and fired its panzerfaust into the side of the lead Sherman. Luckily for the latter it survived but was suppressed. |
 |
| Vandeleur in the Daimler Dingo (middle of photo) began to get a grip of the column which was now resembling a traffic jam. Ordering the recce units to the side of the road he waved through a Sherman squadron and trucks containing 'C' company of the Irish Guards. Time was running out and momentum had to be regained. |
Turn 10
 |
| 'D' company at last are making good progress. They come under fire from an MG42 but with no serious damage caused. Bad news for the Irish Guards though in the woods. They come under sustained fire from all German troops positioned behind the hedgerow including the Wespe, mortar and MG42's. There are no surivivors! |
 |
| 2 Jagdpanzers aggressively move towards the hedgerow ready to add more problems to the head of the armoured column. Fortunately they run out of activations before firing. The British quickly despatched a Panzerfaust and its platoon that had snuck up behind the road hedgerow. |
 |
| More British infantry pour into the woods ready to assault Valkenswaard. These include platoons from the flanking battalion and 'C' company of the Irish Guards who, tired of the traffic jam, promptly deployed from their trucks to make their way on foot. |
 |
| Drastic action will need to be called for soon if the column is to make any progress. The Airlink fails to get through to call in air support which is sorely needed. The two trucks that had been transporting 'C' company can be seen in the middle of the photo where they were ordered to the side of the road in order to debus. |
Turn 11
The RAF Airlink managed to get through and call in an airstrike. As the Typhoons approached Valkenswaard they came under heavy AA fire. So much so they were driven off!
With the British infantry on both flanks making little progress all attention was on the armoured column seemingly stuck at the entrance to Valkenswaard.
 |
| Seeing the threat from the 2 Jagdpanzers, the Irish Guards armoured battalion commander swung his own Sherman off the road through the hedgerow to engage the 2 German AFV's. He took with him the M10 Achilles with its powerful 17pdr and the last of 'A' squadron's Shermans. Using Opportunity Fire both Jagdpanzers opened up on the HQ Sherman and M10 suppressing both. The lone Sherman still in a position to fire was mortified to see its shell bounce off the German armour. |
 |
| With time now of the essence, 'B' squadron surged into Valkenswaard. The lead Sherman ran straight into trouble. A Jagdpanzer hidden between two buildings opened fire on its flank, and then..... |
 |
| Another Jagdpanzer with a 75mm AT gun opened up sending shells in its direction. Incredibly it survived the onslaught - just! It was suppressed though but still alive. |
 |
| The Irish guards support company along with 3 platoons from the eastern flanking battalion provided covering fire as 'C' company of the Irish Guards dashed to the cover of a hedgerow bordering the first of the buildings in Valkenswaard. With the German occupants suppressed they were ready to make an assault the next turn. |
Turn 12
 |
| The western flanking battalion now made meaningful progress. 'D' company successfully overran the MG42 position in the woods allowing them to now threaten the flank of the Germans in this sector of the battlefield. |
 |
| 'D' company of the Irish Guards, having abandoned their stranded trucks, quickly made their way to the wood's edge close to Valkenswaard. They were spotted by Fallschirmjagers who immediately opened fire suppressing one platoon. The Germans though became increasingly concerned that they were in danger of being overwhelmed and began to fall back. |
 |
| A Fallschirmjager platoon equipped with a Panzerfaust moved up to the hedgerow supporting the 2 Jagdpanzers, as had the Wespe. In the subsequent exchange of fire, one of the Jagdpanzers found itself targeted not just by the Sherman ahead of him, but several positioned on the road. This proved too much and it brewed up. |
 |
| The luck of the lead Sherman did not hold out with more 75mm shells heading in its direction finally destroyed it. |
 |
| The Shermans had some success though driving off the Jagdpanzer hidden between the two buildings. SS Battalion Segler now began to fall back having held up the advance of the eastern flanking battalion. |
 |
| Preceded by concentrated fire on the building in the photo which succeeded in suppressing the occupants, 'C' company of the Irish Guards made its assault. Despite inflicting severe casualties the Guards failed to break in and duly fell back. With more activations though, supporting units continued to fire on the building. Already severely depleted, the defending Fallschirmjager platoon was finally destroyed. |
Turn 13
 |
| The Germans to the west of Valkenswaard began to pull back giving the green light to the British flanking battalion to quickly cover the open ground. Unfortunately for the Germans, the retreating mortar crew were caught by 'D' company in the woods to the right who opened fire from the wood's edge. The mortar crew stood no chance being cut down to a man. |
 |
| With British armour now surging across the hedgerow filling the narrow space between the woods and the village, a Sherman was caught by the Panzerfaust and promptly brewed up. Fire from the surviving Jagdpanzer and Wespe suppressed two more. |
 |
| With the exception of an MG42 that had occupied the trench (middle of photo) the survivors took up a new position behind the fence line. The MG42 fired repeatedly at 'D' company in the woods to the right suppressing a platoon. |
 |
| Another view of the British armour at the entrance to Valkenswaard. With time running short, caution was thrown to the wind as all available units were thrown into the fray regardless of the dangers from hidden Panzerfausts. |
 |
| 'B' squadron of Shermans stormed into the gap left by the retreating Jagdpanzer. All 4 tanks poured fire into the exposed Jagdpanzer destroying it. The SS battalion Segler were caught falling back by the eastern flanking force (bottom of photo) who targeted the platoon crossing the field. With all fire concentrated on the lone platoon it was enough to finish it off. |
 |
| A lone Jagdpanzer attempts to intercept the British Shermans. In the middle of the photo, Segler himself attempts to marshal the remains of his small battalion. |
Turn 14
 |
| The remnants of the western flanking battalion are joined by 'D' company of the Irish Guards. More importantly a PIAT equipped platoons receives 3 activations! It targets the Wespe but requires all 3 rounds of shooting to finish it off. The Shermans and M10 collectively target the surviving Jagdpanzer and between them destroy it. The Panzerfaust is the target of an Irish Guards platoon and a Sherman which is sufficient to eliminate this threat. |
 |
| With all German units targeting the head of the British column now eliminated, a lone Sherman (the only one with sufficient activations!) bursts through the hedgerow with guns blazing at the MG42 ensconced in the trench. It fails to do much damage but does rattle a few teeth! |
 |
| 'B' squadron of Shermans now swing towards the lone Jagdpanzer but have insufficient activations to do anything more. Just out of the shot at the bottom of the photo another SS platoon is destroyed before it can find cover. |
 |
| 'C' company of the Irish Guards lose a platoon to fire from adjacent buildings. The surviving platoons storm the building to the left and overrun the Fallschirmjager battalion HQ. This is the aftermath as they prepare to move further into Valkenswaard. |
 |
| The scene back along the main road. 2 Vickers machine gun teams have just alighted from 2 carriers in the middle of the photo. A towed 17pdr is still stranded in the heavy traffic. |
 |
| The end finally arrives for the Germans. The substantial losses this turn pushes them considerably past their breakpoint. A roll of double '1' on the command dice is all that can save them but it is not to be. The Germans begin pulling back evacuating Valkenswaard. |
 |
| Final view of the column with transports littering the roadside where their passengers rapidly alighted. |
 |
| An overview at the end of the game. |
A British victory having captured Valkenswaard by turn 15. It was though very close and even in turn 12 it was looking bleak. The British lost 30 units to the German 31, many of the latter Germans in the final couple of turns.
The one turn where the Typhoons successfully made their attack demonstrated how deadly they could be. Any troops caught out in the open stood little chance. For much of the game though the Airlink FAC was caught in the traffic and not in a position to call in an air strike. When it did, command failures and effective AA fire saved many Germans.
Being confined to the road proved incredibly frustrating for the British. It did not take much from the Germans to cause difficulty in moving the column towards its objective. This chimes with my reading of the operation with XXX Corps struggling and failing to advance as quickly as planned.


Jon, this was a very enjoyable battle spectacle. I cannot imagine the effort put into this presentation to deliver such a fine result. Bravo!
ReplyDeleteMany thanks for that Jonathan, much appreciated.
DeleteFantastic Jon! A great AAR and wonderful table.
ReplyDeleteCheers, Richard P
Many thanks Richard, and as with Jonathan, much appreciated.
DeleteJon, wonderfully cinematic, thanks for doing all the work to share.
ReplyDeleteMany thanks Norm.
DeleteThanks for sharing! Fine looking set up and well written report.
ReplyDeleteMany thanks Chris.
DeleteSuperb and may I suggest a career in writing AAR as I'd happily read what you publish.
ReplyDeleteMany thanks Ricky. Really chuffed that you think my AAR are worthy of publishing but that may be a step too far for me, lol.
DeleteIncredible work. I'm really looking forward to a chat on the podcast in the new year.
ReplyDeleteMany thanks Sean. I too am looking forward to participating on your podcast in the new year and sorry I could not make it this week.
DeleteAll the best
Jon
That is a superb looking Jon, as always, with stuning 'photos and a great AAR describing how the game played out. Who needs magazines when you have stuff like this! You really did get the feel of how difficult it must have been for the British to attack up this exposed road against tenacious German defense. Keep up the good work:)
ReplyDeleteMany thanks Steve. I was not sure how enjoyable this would be to play out with the British armour stuck on the road but in the end worked well. It counter-balanced nicely the disparity in numbers.
DeleteThat was half a hour well spent reading your AAR. Such actions may seem boring , but having equipment like Sherdozers give the player the opportunity to pan how and where to employ them. We must meet up next year.
ReplyDeleteDefinitely the Dozer adds to the issues to be considered in resolving the inevitable traffic jam.
DeleteThis is magnificent. It is like watching A Bridge Too Far in miniature, only better as we get more detail and an insightful commentary. You have captured the crazy traffic jam of hell's highway so well.
ReplyDeleteRegards, James
Many thanks James.
DeleteHow is the back after all that leaning over and imaging.
ReplyDeleteStay safe and well
Peter L
Lol. An aging back at that!
DeleteBest wishes to you Peter.
What a superb looking table and game! As for the work to chronicle it - many hours, as I know all too well! Much appreciated!
ReplyDeleteReally nice Jon - Am enjoying reading through - and the visuals are marvellous! Thank you so much for posting about this in such detail ...
ReplyDeleteA couple of quick questions about the OOB in the first instance if I may -
(1) Does each company of the Irish Guards have an HQ Unit? You have noted "Use cpy base" - what does this mean please - in conjunction with initial query?
(2) You have some vehicles listed alongside HQ/CO units ....How do you play these please? Just that such units seem to have no function in rules as far as I can see (given these units movement rules)?
Many thanks again - Adam
Many thanks for you kind comments Adam. In answer to your Q's:
Delete(1) Yes. Of the 3 platoon bases in each company, 1 is assigned as containing the company HQ. The battalion HQ acts as the CO. So if the company fails to activate the Battalion HQ can attempt to do so but on a -1 on the CV. If the battalion HQ fails to activate then the Brigade/overall CinC may attempt to activate a group within that battalion also on a -1CV. Hope that makes sense!
(2) If the HQ/CO are represented by a fighting AFV then it moves and fights as any other unit which also means it can be knocked out in the same way. For those with vehicles attached such as the Kubelwagen, I should have deleted the stats as this is purely for reference making it easier to identify the HQ/CO on the tabletop.
If there is anything else you need clarifying please feel free to ask. I tend to be a little fluid with all the rules I use - one of the benefits of playing solo!
Kind regards
Jon
Thank you Jon - Very interesting.
DeleteRegarding question (1) ...So instead of having a separate HQ unit for each company ... the HQ is integrated into one of the Infantry Platoons - Understood. So instead of having an HQ of CA 3; Hits 4; Save 6....the HQ unit is CA4; Hits 6; No Save? Is this unit then treated as a normal Infantry unit for moving and firing please?
Ref (2) - Got it now regarding the Kubelwagons, Personnel Car etc - Thank you
Understand on the fluid rules - Was trying to work out how in Turn 1, the Germans were targeting a UK HQ unit....plus that it withstood 5 hits! Cheers
Ref (1) you have it right. Essentially any HQ that is represented and fights as a platoon or vehicle/AFV base has the stats of that base. There are optional rules which takes into account a choice of using HQ's in this way but I have kept it simple with regard to company HQ's. They activate at the same time as the company and not at the conclusion of the turn.
DeleteKind regards
Jon