With the break over and several real life issues sorted on my return, it is now back to Waterloo:-
6.00pm - 7.00pm

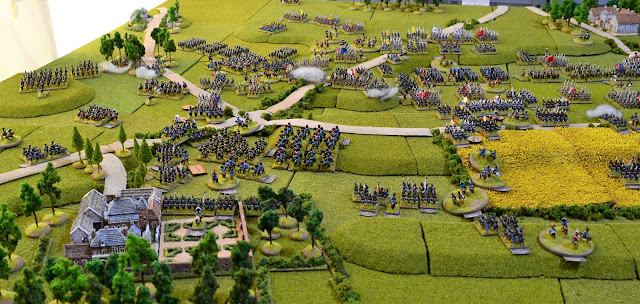
A significant feature at this stage of the game was the arrival of more Prussians. Here the entire 4th Corps has now arrived. The French have begun falling back to prevent themselves being outflanked.
Continued ...


The first Prussian units advance on Plancenoit.

The Prussians had the initiative this turn and the 2nd Silesia Landwehr cavalry charged the 2nd Lancers. The latter faltered in the face of the charge and the 2nd Silesia charged home. Despite being outnumbered the conscripts excelled themselves in the melee causing the 2nd Lancers to rout. The elated 2nd Silesia rolled a 'pursue' in the Pursuit Test. However, the French Brigade of Colbert broke in the brigade morale test. This translated the 2nd Lancers rout into a dispersal. With nothing to pursue the 2nd Silesia would now launch an uncontrolled charge.

The Prussians continue to advance towards the centre of the French right flank. Both French and Prussian artillery batteries give good accounts of themselves inflicting casualties on each other. Most notable was the French 20th Division battery (far middle left) who killed 6 of Watzdorf's 8th Hussars with canister.

2 battalions of Loebell's 18th Infantry emerge from the wood (middle of photo) and charge the French 1/5th Line and 2/11th Line of Bellair's brigade. Both French battalions fire effective musket volleys into the Prussian columns. The 1/18th Line halts in the face of French musketry. The 2/18th Line loses 4 casualties to the fire of the 1/5th Line and falters.

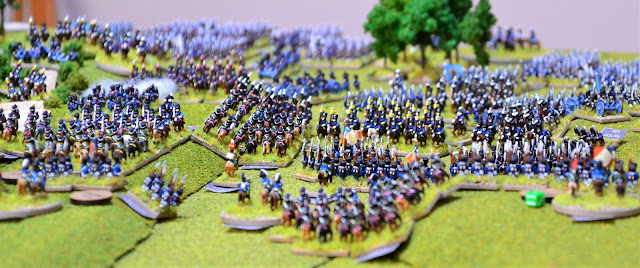
View across the Prussian front.

The Prussian 4th Corps.

As the Prussians prepare to assault Smohain -

The Prussian 2nd Corps arrives with Tippleskirch's Brigade to the fore.

Ney leans across to Napoleon, "Does this remind you of somewhere?".

The French 1st Cavalry Division horse artillery battery unlimbers and fires a round of canister at the 18th Hussars scything down 4 of their number.
To the right Trip's 3rd Dutch Carabiniers has charged the 6th Cuirassiers who counter-charged. The Cuirassiers defeated the Dutch causing them to retreat with 3 casualties. The French cavalry suffered 2 casualties and their horses were blown.

To the right of the 3rd Carabiniers, Trip lead a charge by the 1st Dutch Carabiniers against the 9th Cuirassiers who were unformed with blown horses. Trip at last experienced success as the Cuirassiers routed before contact was made.

This overview of the allied left shows the extent of the charge by the Scot Greys (middle right). They charged the 2/25th Line who retreated prior to contact. Next in line was the 1/25th who also retreated. The Scots Greys continued their charge towards the 14th Cavalry Division horse artillery battery who quickly limbered up and evaded the British cavalry. The Scots Greys had reached the limit of their charge range having cleared a substantial part of the allied ridge in this area.

The 1/32nd Line of Kempt's Brigade charged the unformed 1/4th Chasseurs of the Middle Guard. The Middle Guard battalion struggled in the face of the determined charge of the British column and in the end routed having suffered 3 casualties to the 1/32nd one.
Kempt's Brigade excelled themselves with the 1/95th Rifles throwing a double 6 volley in the face of a charge by the 2/4th Chasseurs of the Middle Guard. They lost 3 casualties and faltered.

In the middle of the photo, Kielmansegge's Grubenhagen Light battalion charged the 2/61st Line of Husson's Brigade. The Hanoverians made light work of the French battalion forcing them to retreat and inflicting 5 casualties for the loss of 1. They also maintained good order. Together with further advances by Ompteda this part of the ridge was looking a good deal healthier for the allies.

The 2/69th (South Lincolnshire) and 2/73rd (Perthshire) Line of C. Halkett's Brigade now faced the daunting task of dealing with a charge by 2 French Middle Guard Grenadier columns. The 1/3rd Grenadiers charged the 2/69th and the 2/3rd Grenadiers the 2/73rd. The two British battalions had proved to be a solid feature of the allied line seeing off a number of attacks.
They had just reformed having spent a good deal of time unformed. They both proved again to be steady and reliable inflicting 3 casualties on each of the Middle Guard columns. This was enough and both faltered.

There was a real danger to the flank of the 73rd with the desperate charge of the 1st Life Guards lead by Somerset into the Grenadiers a Cheval who had counter-charged. The Life Guards were hopelessly outnumbered not helped when the French rolled a double 6. This lead to complete destruction of the 1st Life Guards with Somerset luckily escaping injury. Fortunately for the allies the Grenadiers' horses were blown.

At the western end of the allied ridge the Empress' Dragoons charged the batteries of Smith and Mercer. Smith's battery routed but Mercer's stood their ground. The battery fired off a murderous round of canister killing 4 of the Dragoons but it was not enough. The Dragoons charged home putting Mercer's battery to the sword. With the Dragoons also suffering from blown horses the allies were very fortunate.

Ramsey's RHA battery (middle left) yet again excelled themselves rolling '11' when firing shot at effective range towards a column of French infantry. The French 2/2nd Line suffer 4 casualties as the salvo of shot travels through the column and the 3/1st Line immediately to their rear suffer 2. Every time I roll for Ramsey now I wait with baited breath for the inevitable result! The dice Gods really do exist!!
To the right of Ramsey is the British 3rd Battalion of 14th (Buckinghamshire) Foot. They were in line formation and charged by 1/1st and 2/1st Line of Soye's Brigade. Wellington kept this battalion out of harm's way during the actual battle as it was a training battalion. Essentially a battalion of teenagers! So how would they fare in their first contact? Well not bad actually. They fired a steady volley inflicting 2 casualties on the 2/1st and one on the 1/1st. This causes the 2/1st to retreat and the 1/1st Line to falter. So far so good. A jubilant battalion commander and no temper tantrums from his trainees!

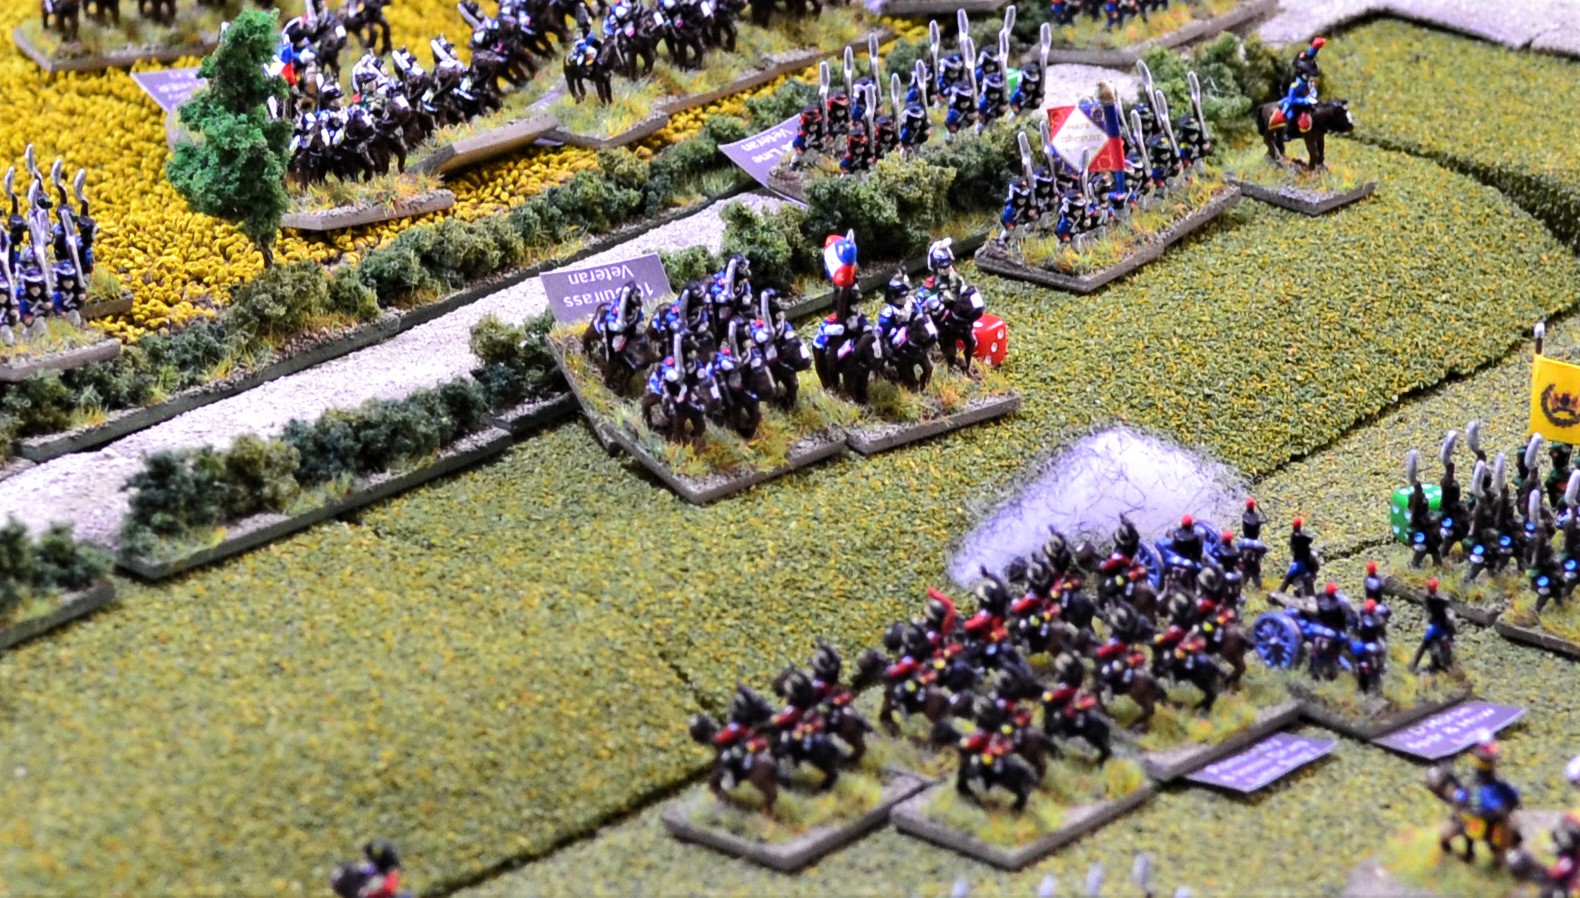
To the left in the photo the melee continues between the 1st KGL Light Dragoons lead by Dornberg and the 3rd Cuirassiers who is close to losing 50% casualties. If the KGL win that will be the demise of the Cuirassiers. Once again the heavier cavalry overcome the light causing the KGL to retreat. The KGL lose 3 to the Cuirassiers 2 with the latter suffering from blown horses. The Cuirassiers are now beyond their dispersal point but so far are ok having won the melee.
To the right Dornberg's 23rd Light Dragoons have charged the 2nd Cuirassiers who have counter-charged lead by Donop. Even with superior mounts it is all too apparent how difficult it is for light cavalry to beat heavy, especially Cuirassiers. The Light Dragoons lose and have to retreat with 3 casualties. The Cuirassiers lose 2 and receive a superb discipline result in the pursuit test.

On the far right of the allied right, H. Halkett's Hanoverian Brigade forms column and begins to withdraw having done their job of holding their sector. They have left one battalion in the woods to fire on any unsuspecting cavalry nearby. The Brunswick Cavalry moves to the gap created by Halkett to threaten the French left.


Two views of the western end of the battlefield.

The French defensive positions across their right flank.

The Guard 12pdr batteries relocate to counter the Prussians.
In the test to rally phase, the French lose the 2/72nd Line from Campy's Brigade and the 2nd Lancers from Colbert's Brigade.
The allies lose Bylandt's 27th Dutch Jaegers, Smith's RHA battery, and the 8th Belgian Hussars together with Ghigny.
We have now reached a critical point for Wellington's army. They have just reached the Army Break Point test stage. Normally each unit lost from now on would initiate a test. However, as this is a particularly large battle I decided it would be for every 3 units. As the losses mount the chances of breaking increases.
The way this works is as follows:
2D6 are rolled as soon as 3 more units are lost. A '13' result is a fail. Then for every additional 3 units lost 1 is added to the die roll.
Wellington looks longingly for Blucher!

 With messengers arriving informing Blucher of the precarious position of Wellington he orders all Prussian units to attack attack attack! The 4th Corps will concentrate on driving west and south west to Plancenoit. The 2nd Corps will drive towards the allied centre in an effort to divert pressure away from Wellington. When the 1st Corps arrives it will join the 2nd Corps with the same aim.
The Prussians respond to their beloved Blucher and hammer the French line.
 Creilsheim orders the Fusilier battalion of the 15th Infantry to charge the 1/5th Light of Bony's Brigade (middle of photo). The 1/5th Light are already unformed and falter in the face of the charge. The Prussians fail to take advantage of their charge and a stalemate ensues. The melee will continue for another turn.
Sydow (lower middle of photo) leads the 1st Silesia Landwehr cavalry on a charge against the French 5th Cavalry Division's horse artillery battery. The battery had already suffered significant casualties and the sight of the Prussian cavalry charging towards them was enough. They dispersed. Sydow continued his charge towards the 2/5th Light of Bony's Brigade. The French passed a formation test and managed to form a square. On seeing this and with no other targets within range he called a halt to the charge.
 Watzdorf lead the 8th Hussars in a charge against the 4th Chasseurs (middle of photo). The 4th Chassuers failed to counter-charge and received the 8th Hussars at the halt. The Prussian Hussars turned over the Chasseurs forcing them to retreat with 4 casualties. The Hussars suffered from 2 losses with blown horses.
Immediately following Watzdorf was the 1st Neumark Landwehr cavalry of Sydow's Brigade. It charged the 9th Chasseurs who counter-charged (bottom middle). It was a fairly even melee with the Chasseurs narrowly winning. The Landwehr were pushed back and the Chasseurs received a 'Superb discipline' result in the pursuit test. Both sides lost 2 casualties.
The 3/4th Silesia Landwehr of Massows Regiment attacked the French 20th Division foot battery (bottom right). The battery stood their ground and fired a round of canister at the Landwehr killing 3 of them. The Landwehr charge faltered.
 The most dramatic Prussian attack was that of the 1/18th Infantry (upper middle of photo). It emerged from the wood and charged the 2/11th Line of Bellair's Brigade. It promptly routed disordering the 2/84th Line of Thevenet's Brigade to it's rear. This now became the target of the 1/18th. The 2/84th also routed. As the triumphant 1/18th continued carving it's way through the French defensive line the 3/13th Light of Schmitz's Brigade (one of only two battalions left in Donzelot's Division) was in the face of their surge. Again the Prussians passed their test to charge home and the 3/13th Light became the third French battalion to rout. The Prussians were now at the limit of their charge range mightily satisfied with themselves.
In the Brigade Morale Tests generated as a result of the routing units, Bellair's Brigade faltered which translated the 2/11th Line rout into a dispersal.
Also emerging from the wood was Lettow leading the Fusilier battalion of the 10th Infantry. They charged the 1/84th Line of Thevenet's Brigade who fired off a volley at close range. The Fusiliers lost 2 casualties but succeeded in charging home. This time the French stood their ground with fixed bayonets and received the charge. The Fusiliers ploughed through the French line causing them to rout with 6 casualties. The Fusiliers became unformed with 2 casualties.

 Thile, with his 3 battalions of the 3rd Silesian Landwehr, attack Smohain. Initially the 1st and 2nd battalions charged the French 1/11th Line of Bellair's Brigade. They were too close to the French when the charge was initiated which did not allow them enough time to fire off a volley. The 1/11th decided it was not going to hang around and routed. Both Landwehr battalions continued to towards the buildings of Smohain and in doing so came under fire from the occupants. The 1st battalion continued it's charge attacking the building to the left in the photo. The second battalion failed to charge home and halted in it's current position (bottom middle). The 3rd battalion (middle right of photo behind trees) succeeded in attacking the building to the right.
The 1/3rd Silesian Landwehr were pushed back from their charge by the defending 3/11th Line. The 3rd battalion attacking from the north were more successful. They turfed out the 2/5th Line with the loss of 5 casualties. The Landwehr were now in control of part of Smohain having lost 1.

 With the French driven off, the Nassau battalion garrisoning Frischermont marched out to rejoin Saxe-Weimar.


 To the right of Mitchell's Brigade, the 2nd KGL Light Dragoons of Dornberg's Brigade charged the unformed 3rd Cuirassiers who was about to retire with blown horses (middle of photo).
The KGL cavalry were again excelling themselves:
 This took the 3rd Cuirassiers past their dispersal point and they routed from the field. Blancard, being the nearest General, was killed. The KGL would conduct an uncontrolled charge in the next turn.


The Prussians respond to their beloved Blucher and hammer the French line.

Sydow (lower middle of photo) leads the 1st Silesia Landwehr cavalry on a charge against the French 5th Cavalry Division's horse artillery battery. The battery had already suffered significant casualties and the sight of the Prussian cavalry charging towards them was enough. They dispersed. Sydow continued his charge towards the 2/5th Light of Bony's Brigade. The French passed a formation test and managed to form a square. On seeing this and with no other targets within range he called a halt to the charge.

Immediately following Watzdorf was the 1st Neumark Landwehr cavalry of Sydow's Brigade. It charged the 9th Chasseurs who counter-charged (bottom middle). It was a fairly even melee with the Chasseurs narrowly winning. The Landwehr were pushed back and the Chasseurs received a 'Superb discipline' result in the pursuit test. Both sides lost 2 casualties.
The 3/4th Silesia Landwehr of Massows Regiment attacked the French 20th Division foot battery (bottom right). The battery stood their ground and fired a round of canister at the Landwehr killing 3 of them. The Landwehr charge faltered.

In the Brigade Morale Tests generated as a result of the routing units, Bellair's Brigade faltered which translated the 2/11th Line rout into a dispersal.
Also emerging from the wood was Lettow leading the Fusilier battalion of the 10th Infantry. They charged the 1/84th Line of Thevenet's Brigade who fired off a volley at close range. The Fusiliers lost 2 casualties but succeeded in charging home. This time the French stood their ground with fixed bayonets and received the charge. The Fusiliers ploughed through the French line causing them to rout with 6 casualties. The Fusiliers became unformed with 2 casualties.

The Prussian Brigade of Tippleskirch of the 2nd Corps advances as fast as it is able towards the allied left flank.

The 1/3rd Silesian Landwehr were pushed back from their charge by the defending 3/11th Line. The 3rd battalion attacking from the north were more successful. They turfed out the 2/5th Line with the loss of 5 casualties. The Landwehr were now in control of part of Smohain having lost 1.


Another view of the advance of the Prussian 2nd Corps.

Given the precarious position of the allied army, Wellington had issued orders to all units, especially those of least experience, not to do anything rash and where possible keep out of harms way. These orders had clearly not got through to Colonel Best who charged a French horse artillery battery with the Osterode Landwehr (bottom right). The artillery battery is hidden behind the smoke to the right of the wood. The artillery fired canister at the advancing column killing 3 of their number. This caused them to rout. Their was also a Risk to General. In this instance Best panicked at the hail of canister flying around his ears and fled the field! He would be court martialed and shot the next day! For those following my campaign, Col Best is proving to be an outstanding commander!
The rash action by Best proved very costly with the Osterode failing to rally and fleeing the field. Best's Brigade broke in the subsequent Brigade test.
The rash action by Best proved very costly with the Osterode failing to rally and fleeing the field. Best's Brigade broke in the subsequent Brigade test.
To the right of this action, Vivian leads a charge by the elite 1st KGL Hussars against Bruno and the 7th Hussars who counter-charge. The KGL again proved to be great troops as they cause the 7th Hussars to rout inflicting 5 casualties for the loss of only 1. They also receive a Superb Discipline result. Bruno tested for Brigade morale which failed with a 'Broken' result. This meant that the 7th Hussars dispersed signalling the demise of Bruno's Brigade.
Partially out of view to the right of the photo is Vandeleur and the last of his Brigade, the 12th Light Dragoons. He saw an opportunity of charging the 6th Cuirassiers who were unformed with blown horses. Unfortunately the significant casualties already suffered by the Light Dragoons counted against them when testing to charge home and they faltered. This allowed the Cuirassiers to retire to reform unmolested.

Trip leading the 1st Dutch Caribiniers charged the flank of a deployed battery of Guard horse artillery. The battery quickly limbered up and evaded the charge. They now saw an opportunity of destroying a French infantry battalion, the 1/21st Line of Noquez' Brigade. Ths infantry succeeded in passing their formation test and formed square. The Dutch subsequently faltered before charging home.

The 6th Inniskilling Dragoons (lower middle) charged the 2/45th Line who was faltering. This was an ideal opportunity to destroy a French battalion but like the Light Dragoons of Vandeleur, they had suffered significant casualties earlier and faltered before charging home. In the movement phase the French battalion reformed into square.

Action at the crossroads! The French once again attempted to break through Kempt's and Ompteda's Brigades. 2 melees occurred to the right of the crossroads.
In the first the veteran French 2/55th Line of Charlet's Brigade charged the 1/79th Highlanders. Being an elite battalion it was able to counter-charge which it did. The 2/55th got the better of the Highlanders pushing then back but becoming unformed in the process.
The second melee was almost a carbon copy of the first with the veteran 1/61st Line of Husson's Brigade charging the elite 1st KGL Light battalion. The latter also successfully counter-charged with both melees occurring side-by-side. Another defeat for an elite battalion as the KGL were forced to retreat losing 3 casualties. The 1/61st maintained good order losing 1 casualty.

Kielmansegge's Grubenhagen Light Battalion did not wait for the French charge. They charged the nearest French battalion, the 1/72nd Line of Campy's Brigade. They successfully charged home. The Hanoverians won the melee causing the 1/72nd to retreat losing 4 casualties. The Grubenhagen had become unformed and lost 2.

Ramsey's Battery was faced with the French 2/2nd Line who had formed a line and was advancing them. After outstandingly accurate fire throughout the day would the battery continue? Well, pretty much. A '9' was rolled which inflicted 2 casualties on the 2/2nd. Of more interest was the single bounce-through casualty suffered by the 3/1st Line immediately to their rear. This took them to the 50% dispersal point. They finally left the field during the morale phase.
The teenagers of the 3/14th Line to the right of Ramsey in the photo, would be challenged again. Mitchell was desperately attempting to replace them in the front line by his two more experienced battalions but with repeated attacks on the 3/14th there had not been the opportunity to do so. The 1/23rd Line in column formation had been moved up alongside their right flank to give their thin line protection from the roaming French cavalry. The 3/2nd Line of Soye's Brigade charged towards the 3/14th in column formation. Their volley was rather more ragged the second time around with less time to load. They nevertheless managed to inflict a casualty on the French column which was enough. It too faltered in their charge. The teens looked on in amazement at the two French columns in front of them unformed and full of fear.

The KGL cavalry were again excelling themselves:


Donop rolled an 'Attack' result in the command and control phase. He clearly fancied his chances with the 2nd Cuirassiers. He charged the 2nd Division KGL Horse Artillery battery. The battery now had a choice to make. Being a horse battery it could evade and should be able to put enough distance between them. On the other hand it could fire a round of canister at a unit that had already suffered casualties. In addition there was a Hanoverian battalion in the wood that would be able to fire on the Cuirassiers as it charged in. A decision was made. It will stand and risk losing another valuable unit in the allied roster.
As the Cuirassiers charged in with Donop in the lead, the first to fire was the Quanckenbrook Landwehr battalion. The conscript Hanoverians missed! They had rolled a double '3'. Not enough but there was a risk to the General. The battery fired. A double '3'!! Only one casualty was inflicted on the Cuirassiers. Donop received a light wound on the Risk to General test so at least they would lose the bonus of a General attached in the test to charge home. The Cuirassiers rolled..... and failed! They had faltered. The KGL battery had gambled and won. They would get a chance to fire another round of canister into them as they recovered from faltering, and of course the Quanckenbrook would get a chance to redeem themselves.

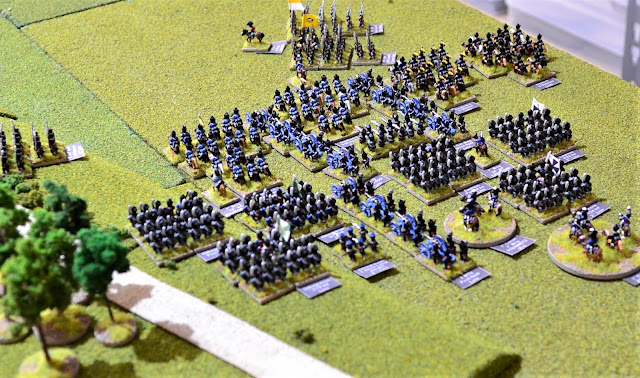
An overview of the allied right at this stage.
Some views of the Prussian advance and the ground they have gained from the French:


In response to the Prussian surge, Napoleon now deployed the last of his reserves, the Old Guard, towards the French right flank. He planned to create a new defensive position in line with Plancenoit which would consist of the Old Guard, the Guard artillery, 2nd Lancers, and as many artillery batteries as possible from the Grand Battery. It would form a position to rally on for the 6th Corps and the remnants of the 2 x 1st Corps Divisions.
In the morale phase, Vincke's Hanoverian Brigade broke. Of particular concern to Wellington was the failure to rally the Horse Guards and 1st KGL Light Dragoons of Dornberg's Brigade both of whom dispersed. The losses this turn took the allies past the Army Break Test. If they rolled '11' or '12' they would break. A '7' was rolled so ok for now!
All was not well with the French left. The dispersal of the 3rd Cuirassiers generated several morale tests including Brigade tests. Donop conducted a Brigade Morale test and failed. As the 2nd Cuirassiers had suffered more than 35% casualties they dispersed. Blancard's Brigade consisting of the 1st and 2nd Carabiniers dispersed in their entirety following individual unit and Brigade tests. Virtually the whole of the 12th Cavalry Division had now been destroyed apart from a battery of artillery.
 This was the situation with the French left flank at the end of the turn. A significant difference from earlier when they appeared unassailable. Now only two regiments of light cavalry of Pire's Division remained on the left flank.


 The Prussians won the initiative this turn and von Sydow used that advantage to good effect. Most of the cavalry in this photo belongs to his brigade. In the middle left of the photo, two of Sydow's cavalry units, the 2nd Pomerania Landwehr and 1st Silesia Landwehr conducted charges.
In closer detail:
 To the left the 2nd Pomerania charged the unformed 1/5th Light accompanied by their Brigade commander, Bony. The French battalion were promptly ridden down without loss.
To the right the 1st Silesia charged the 9th Chasseurs who counter-charged lead by Domerget. The Prussians were defeated and forced to retreat losing 3 casualties. The Chasseurs lost 2 with horses blown.
 To the right of Sydow the 2 squadrons of the 3rd Silesia Landwehr cavalry rashly charged the 12th Chasseurs which placed them in the firing line of a French artillery battery. The artillery was unable to fire canister due to the close proximity of another French battery but firing shot was enough causing 2 casualties. This halted the charge but the Chasseurs had already declared an intention to counter-charge. In the subsequent test to charge home the Chasseurs retreated! Not their most glorious moment.
 In the centre of the Prussian line, Lettow lead the Fusilier battalion of the 10th Infantry in a charge on the 1/27th Line of Thevenet's Brigade (middle of photo). The French battalion faltered as the Prussians struck home. The Prussians comprehensively won the melee forcing the French to retreat with the loss of 6. The 10th Infantry lost 2 and maintained good order.
In the morale phase, Vincke's Hanoverian Brigade broke. Of particular concern to Wellington was the failure to rally the Horse Guards and 1st KGL Light Dragoons of Dornberg's Brigade both of whom dispersed. The losses this turn took the allies past the Army Break Test. If they rolled '11' or '12' they would break. A '7' was rolled so ok for now!
All was not well with the French left. The dispersal of the 3rd Cuirassiers generated several morale tests including Brigade tests. Donop conducted a Brigade Morale test and failed. As the 2nd Cuirassiers had suffered more than 35% casualties they dispersed. Blancard's Brigade consisting of the 1st and 2nd Carabiniers dispersed in their entirety following individual unit and Brigade tests. Virtually the whole of the 12th Cavalry Division had now been destroyed apart from a battery of artillery.

6.30pm

The Prussians continued to advance purposefully and here Sohr's Cavalry Brigade (middle right) arrives to join other 2nd Corps units.

Ziethen with 1st Corps units arrives along the Ohain Road with instructions to link with Wellington's left flank.

Units of the 14th Brigade advance towards Plancenoit with, in the foreground, the 3 x 12pdr batteries of the 4th Corps.


As the 4th Corps advances, several units become involved in a traffic jam! This is frustrating for the Prussians as the French 6th Corps is there for the taking!

The Prussian 2/15th Infantry battalion (middle of photo) charged the 1/10th Line of Bony's Brigade (middle left) who retreated prior to contact. The Prussian battalion continued the charge, the new target being the 2/10th Line (upper middle) who also retreated. The photo shows the situation at the conclusion of the charges.

The 2nd round of melee between the Prussian Fusiliers of the 15th Infantry lead by Creilsheim and the French 1/5th Light Infantry, who had been joined by Bony, resulted in a narrow French victory. The Prussians were pushed back with 2 casualties and Creilsheim received a light wound. The French lost 3 and became unformed.

The Prussian 1/18th Infantry (middle of photo) charged initially the 6pdr foot battery of the 2nd Division which had been situated on the road. The battery fired off a devastating round of canister scything down 6 of the Prussians. The Prussians shrugged off the losses and continued with the charge dispersing the French battery.
The Prussian charge continued into the French 2/51st Line of Aulard's Brigade (contacted in photo). They comfortably defeated the French battalion inflicting 5 casualties for the loss of 1. The French would retreat in the next compulsory phase but the Prussians had become unformed.
The failure of the 2/18th Infantry to charge home (off to the right of the photo) retreating instead, left the 1st battalion dangerously exposed.

Thile leading the 2nd and 3rd battalions of the 3rd Silesian Landwehr attacked the last occupied building of Smohain defended by the 3/11th Line of Bellair's Brigade. The heavily outnumbered French were overwhelmed by the Landwehr losing 9 to the Prussians 1. This was enough to disperse the French battalion. Smohain was now in Prussian hands.


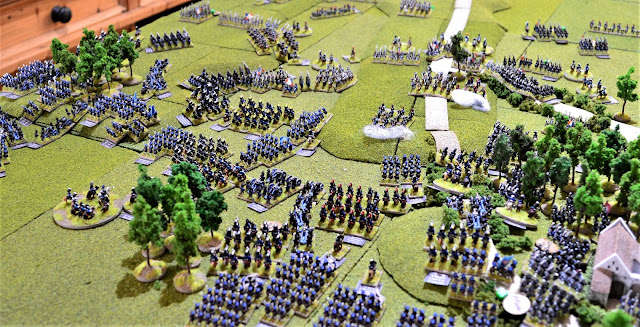
Two views showing the extent of the Prussian advance against the French 6th Corps. The 6th Corps were struggling to hold a cohesive line in the face of aggressive attacks by Prussian units. The Prussian 14th Brigade begins its advance directly on Plancenoit (middle top of photo).

Vivian, leading the 1st KGL Hussars (middle) charged the French 1st Cavalry Division horse artillery battery that had been on the Ohain road and causing casualties. The battery limbered up and evaded contact leaving the KGL Hussars occupying their position. This directly threatened Pegot's Brigade who had been preparing for the arrival of the Prussians. They formed square to protect themselves against the Hussars.

Further along the ridge, the French 4th Lancers saw and ideal opportunity to destroy the 1st Dutch Carabiniers lead by Trip. Not only were the Dutch faltering but they would be outflanked. Gobrecht lead the 4th Lancers as they ploughed into the flank of the Dutch confident of success. The Dutch however, had other ideas. The Lancers rolled a double '1'! The Dutch succeeded in pushing the Lancers back losing 3 casualties to the Dutch 1. Trip received a light wound and the Carabiniers had blown horses.

The tide finally turned for Kempt's Brigade that had steadfastly held the east side of the crossroads for much of the afternoon. Two battalions of the Middle Guard charged the 1/32nd Line and the 1/95th Rifles both routing before contact could be made. This had implications for the battalions nearby who would have to take morale tests due to these routing units. Some of these were conscript Dutch militia. The Middle Guard had now captured Kempt's position.

To the west of the crossroads the French 1/61st Line of Husson's Brigade charged the 8th KGL Line who fired ineffectively. The 1/27th Line of Lambert's brigade gave supporting fire. Being in column formation only the front 12 figures could fire. A double '6' was thrown which was enough to stop the charge faltering the French battalion. Husson, who was nearby, suffered a light wound and would have to retire for medical attention.

The Hanoverian Grubenhagen Light Battalion was exposed in front of Lambert's Brigade when it was charged by the French 7th Dragoons. It failed a formation test to form square and as the Dragoons thundered towards them they broke into a retreat. Having lost their cohesion they were at the mercy of the French cavalry who subsequently put them to the sword. Having destroyed the Hanoverians the Dragoons would launch into and uncontrolled charge in the next turn.

Further west along the ridge, the 1/3rd Chasseurs of the Middle Guard charged between the two faltering battalions of Grenadiers towards the 2/73rd Line of C Halkett's Brigade (middle of photo). The British battalion fired an effective volley at what was now a massed column. A total of 5 casualties were inflicted, 2 of which were on the 1/3rd Chasseurs. It was enough to halt their charge. The 2/69th Line, to the left of the 73rd, fired a steady volley into the 1/3rd Grenadiers inflicting a further 3 casualties.
To the right of the 73rd, the 2/3rd Chasseurs of the Middle Guard charged the 2/1st Foot Guards accompanied by Maitland. The British Guards had been in square formation but managed to reform into column in time to receive the charge. The Foot Guards stood firm and defeated the Chasseurs inflicting 6 casualties for the loss of 2. The Chasseurs were forced to retreat and the Foot Guards maintained good order.

Ramsey's battery (lower middle left) fired on the Empress' Dragoons and once again proved very accurate (a '10' was rolled). As it was long range only one casualty was inflicted.
Mitchell's teenagers in the 3/14th Line were itching to be allowed to charge but were instructed to do as they were told and stand still! They methodically went through the reload procedure and fired yet another effective volley on the faltering 2/3rd Line inflicting 3 more casualties. Clearly they were learning on the job!
To their right, the veterans of the 1/23rd Line gave the trainees a masterclass on how to conduct a disciplined charge in column. They initially charged the 1/1st Line who routed in response. They continued their charge towards the 1/2nd Line who retreated. They had not finished yet and within charge range was the 2/1st Line who also routed. The 1/23rd Line came to a halt having swept away most of Soye's front line (middle right).

Further out on the right Hubert (who rolled an 'Attack' result in the C&C phase) ordered the 1st Chasseurs to attack the 2nd KGL Light Dragoons who had gone into an uncontrolled charge following the previous turn's melee. This meant that the KGL Dragoons were unformed in the melee. This was a high risk strategy by Hubert as the Chasseurs were just one away from their dispersal point. Fortunately for them they won the melee.. just! The 2nd KGL Dragoons were pushed back for the loss of 1. The Chasseurs however, lost 2 and were now unformed.

On the Allied far right flank Arentschild lead the 3rd KGL Hussars in a charge towards Vathiez and the 6th Lancers. The latter retreated in response. The KGL Hussars now angled their charge towards a horse artillery battery who evaded contact. Arentschild came to a halt on the high ground looking towards the French far left (upper right in photo).
There was a great deal at stake in the morale phase with many morale tests required on both sides. For Wellington it was a worrying time as the loss of one more unit would trigger another Army Break test. Miraculously none dispersed!
For the French it was rather more damaging. They were paying the price for most units being worn down through casualty loss and therefore making them more brittle. Soye's Brigade on the left flank was the worst affected. 2 battalions dispersed leading to a Brigade test. The result of that was a broken brigade leading to the loss of another battalion.
Elsewhere on the French right flank, the 6th Corps lost the 1st and 2nd battalions of the 84th Line, and the 2/5th Line from Bellair's Brigade which subsequently suffered a Broken brigade morale test result.
The French were now faced with two crumbling flanks. On the left, Guyot's Heavy cavalry of the Guard were diverted to stabilise the left flank and thus taking some pressure of the Allied right. On the right flank it was becoming increasingly clear that the 6th Corps would have to disengage as much as possible to a second defensive line linking in with Plancenoit.
The only hope for Napoleon now was to rout Wellington's forces as a matter of urgency in order to free up troops to counter the Prussians.


The next turn saw the first shots fired from Plancenoit as the Guard artillery battery opened up on the advancing Prussian columns.

In closer detail:

To the right the 1st Silesia charged the 9th Chasseurs who counter-charged lead by Domerget. The Prussians were defeated and forced to retreat losing 3 casualties. The Chasseurs lost 2 with horses blown.


2 views across to Lettow's melee.

Brue's Brigade prepares for the Prussian attack on Papelotte.

French spirits were raised by the charge of the 11th Chasseurs lead by Merlin (far lower left - photo taken after conclusion of charge). They initially charged the column of the 2/15th Infantry who retreated before contact could be made. Schwerin with the 1st Uhlans were next in line. They were unable to manoeuvre enough to counter-charge and also retreated which took them through a battalion of infantry and a battery of artillery unforming them both. The 11th Chasseurs charge completed having swept away the foremost Prussian units in that area.

A closeup of the 11th Chasseurs (middle left) at the conclusion of their charge.

Units of the Prussian 2nd Corps make good progress towards Papelotte.


The French 2nd defensive line begins to take shape in what is hoped will be sufficient to stop the Prussian advance.

On the allied left, Vivian with the 1st KGL Hussars were charged by 2 squadrons of the Chasseurs of the Guard. They successfully counter-charged. In quality terms they were evenly matched but the French appeared that much fresher. The front ranks of the Hussars gradually gave way as the Chasseurs hacked their way through. The KGL had already lost a 1/3 of their number prior to this melee and exhaustion was setting in. As casualties mounted the KGL Hussars finally broke and dispersed from the field. They had lost 5 taking their losses past the 50% dispersal point with the Chasseurs losing 2. The superb training and experience of the Chasseurs counted in their pursuit test and they received a superb discipline result.
In a moment of madness, the 10th Cuirassiers crossed the hedgerows along the Ohain Road preparing to charge the Union Brigade which took them within canister range of a deployed Dutch half battery. The Dutch did not disappoint raking the Cuirassiers with canister and inflicting 3 casualties which took them beyond their dispersal point. In a subsequent test they melted away from the field!

To the east of the crossroads the Middle Guard were causing havoc with the defending Kempt's and Detmer's Dutch/Belgian Brigade.
In the centre of the photo, the 1/4th Grenadiers of the Middle Guard had charged the faltering 1/28th Line of Kempt's Brigade which promptly routed unforming a Dutch/Belgian battalion to the rear.
To the left of the 1/4th, the 2/4th Chasseurs of the Middle Guard charged the 2nd Dutch Line who faltered prior to contact. The Dutch were routed in the melee losing 3 casualties. The Chasseurs lost 2 and were unformed.
On the higher ground in the upper middle of the photo, the 1/55th Line of Charlet's Brigade charged Sinclair's Foot artillery battery. The artillery poured in a round of canister scything down many of the French column. Indeed the 5 casualties they sustained took the hapless French battalion past the dispersal point and they fled the field.

At the top middle of the photo is the 1/27th Line of Lambert's Brigade. The veteran British battalion had charged the faltering 1/61st Line of Husson's Brigade who routed. The 1/27th continued towards the 2/55th Line of Charlet's Brigade (top left of photo). The latter fired a volley on the advancing British battalion inflicting 1 casualty. It was enough and the 1/27th duly faltered.
The effect of several battalions routing and retreating in close proximity had consequences in the morale phase. Several units faltered or retreated but more importantly several dispersed. These included the 1/28th Line and 1/95th Rifles of Kempt's Brigade, and the 6th Dutch Militia from Detmer's. Kempt's Brigade faltered in the subsequent Brigade morale test.

The allied forces to the east of the crossroads were now looking increasingly threadbare with several of their best battalions having gone.
 To the west of the crossroads the front line British battalions prepared for the onslaught. On the left the French 7th Dragoons launched themselves into an uncontrolled charge towards 2 British columns and an artillery battery. To the right, 4 French columns, 3 of them Middle Guard, charged towards 2 British battalions in line.
 The French 7th Dragoons, having destroyed the Grubenhagen Light battalion, now commenced an uncontrolled charge towards the nearest units (middle of photo). The targets consisted of the 1/40th Line (left) and 1/4th Line both of Lambert's Brigade. Between them were the 2 guns of Beane's RHA battery. Rather than evade, Beane took the risk of firing a salvo of canister at the charging cavalry in the hope that it would halt the charge especially when combined with musketry from the 2 battalions. Unfortunately between them all only 2 hits were scored. The Dragoons tested to charge home and succeeded.
In response to the charge, Beane's battery routed and the 1/4th Line had faltered. The 1/40th had stood firm however and had been joined by Lambert. The unformed 7th Dragoons thundered down the ridge into both battalions. The British new that if they retreated or routed they would be slaughtered. The lack of cohesion among the French counted against them and they failed to break the columns. They were forced to retreat with the loss of 6. The British lost a total of 3 between both battalions who were now unformed.
 Further west along the ridge, 4 French battalions in column formation charged towards the 2/69th Line and 2/73rd Line battalions of C Halkett's Brigade. Both battalions fired into the massed columns but their overheating muskets were clearly less effective with only 1 casualty inflicted for each French battalion. All 4 battalions succeeded in charging home.
On the left the 1/3rd Grenadiers and the 2/108th Line of Campy's Brigade charged the 2/69th whose morale collapsed and they routed. They were unable to put enough distance between them and the Grenadiers ploughed into the panicked mass. The 2/69th were subsequently destroyed.
The 2/73rd Line held their ground as the 2/3rd Grenadiers and 1/3rd Chasseurs of the Middle Guard impacted their thin line. The 73rd were no match against the two Guard columns and were forced to retreat losing 7 casualties to 1 each on the French.
 Bull's and Ramsey's batteries continued to pour fire on anything in range that presented themselves. Ramsey for once rolled poorly but still managed to inflict another casualty on the Empress' Dragoons.
 The 11th Cuirassiers charged the 1/23rd Line of Mitchell's Brigade (middle of photo) who found themselves exposed having advanced so far in their previous charge. The British battalion attempted to form square but failed their formation test and would therefore have to hope that their column would be enough to repel the Cuirassiers. They just succeeded beating the Cuirassiers score by '1'. The Cuirassiers were pushed back with the loss of 3 to the 1 lost by the 1/23rd.
 Out on the far right of the allied line, Arentschild was determined to turn the French left flank. He lead a charge of the 3rd KGL Hussars towards the unformed 6th Lancers. They lost 2 to a round of canister from a horse battery deployed on the high ground (middle right of photo) but succeeded in charging home. The 6th Lancers rolled a double '1' and when all modifications were included they dispersed having already lost more than 35% of their number.
The KGL Hussars continued towards a limbered horse artillery battery (far left) who evaded contact.
 The situation at the end of the 3rd KGL Hussars' charge demonstrating the parlous state of the French left flank. The Brunswick cavalry now make an appearance (middle right) bringing more pressure to bear.
An overview of the battlefield at the end of the turn. It is now 7.00pm:


Wellington now faced a problem. With more units eliminated another Army Break test was triggered.
To clarify the break test procedure. At the start of the game, a figure is calculated for each force which becomes the Army Break test trigger. For the French it is 72, the allies 51 and the Prussians 31. Guard units count double. Normally for each unit lost beyond the trigger point 1 is added to a dice roll. In my house rules I have determined that for large battles of over 40 units each side 2 units = 1 to be added. However, I have decided to add a third criteria, very large battles of more than 80 units a side 3 units = 1 to be added. Clearly Waterloo falls into the latter category.
With the additional losses this turn, the Allies have now lost the equivalent of 62 units. This is 11 units beyond their break test trigger which equals 3 to be added to a dice roll.
Wellington rolls 2D6 and if the combined total = 13 or more the army breaks. And the result..... double '1'. He can breathe a sigh of relief... for now!
Napoleon though has every reason to be concerned. The past hour has seen a large number of losses taking his total up to 62. The Imperial Guard remains the only large formation still in a good fighting condition. The allied army must be broken soon or it will be in no fit state to repel the Prussians.


In response to the charge, Beane's battery routed and the 1/4th Line had faltered. The 1/40th had stood firm however and had been joined by Lambert. The unformed 7th Dragoons thundered down the ridge into both battalions. The British new that if they retreated or routed they would be slaughtered. The lack of cohesion among the French counted against them and they failed to break the columns. They were forced to retreat with the loss of 6. The British lost a total of 3 between both battalions who were now unformed.

On the left the 1/3rd Grenadiers and the 2/108th Line of Campy's Brigade charged the 2/69th whose morale collapsed and they routed. They were unable to put enough distance between them and the Grenadiers ploughed into the panicked mass. The 2/69th were subsequently destroyed.
The 2/73rd Line held their ground as the 2/3rd Grenadiers and 1/3rd Chasseurs of the Middle Guard impacted their thin line. The 73rd were no match against the two Guard columns and were forced to retreat losing 7 casualties to 1 each on the French.


The KGL Hussars continued towards a limbered horse artillery battery (far left) who evaded contact.

An overview of the battlefield at the end of the turn. It is now 7.00pm:


Wellington now faced a problem. With more units eliminated another Army Break test was triggered.
To clarify the break test procedure. At the start of the game, a figure is calculated for each force which becomes the Army Break test trigger. For the French it is 72, the allies 51 and the Prussians 31. Guard units count double. Normally for each unit lost beyond the trigger point 1 is added to a dice roll. In my house rules I have determined that for large battles of over 40 units each side 2 units = 1 to be added. However, I have decided to add a third criteria, very large battles of more than 80 units a side 3 units = 1 to be added. Clearly Waterloo falls into the latter category.
With the additional losses this turn, the Allies have now lost the equivalent of 62 units. This is 11 units beyond their break test trigger which equals 3 to be added to a dice roll.
Wellington rolls 2D6 and if the combined total = 13 or more the army breaks. And the result..... double '1'. He can breathe a sigh of relief... for now!
Napoleon though has every reason to be concerned. The past hour has seen a large number of losses taking his total up to 62. The Imperial Guard remains the only large formation still in a good fighting condition. The allied army must be broken soon or it will be in no fit state to repel the Prussians.
Absolutely nail biting stuff Jon, I'm riveted. It appears thus far Wellington is doing the reverse of Ramsey, low and high as required, I just love the vagaries of the dice ! It must be truly amazing as you role them. I love the window snow scene, Russia and 1812 again, Ney (nay) lol. It's truly on a thread and that mass of Prussians looks soooo intimidating not to mention vicious, prisoners were not being taken. Words fail me at this juncture....amazing, awesome, outstanding.
ReplyDeleteReally appreciate your positive comments Karl and pleased that you are enjoying the write-up. You are right, it is so close now I wait with baited breath for the die roll results.
DeleteRiveting is, indeed, an apt term for your battle account. Great stuff with lots of drama and terrific photos. Wellington rolls snake eyes on an Army Break Test? The French will need a bit of luck to counter that class of shrugging off adversity!
ReplyDeleteWhat does one casualty equate to in human terms? I read about units taking three casualties, two casualties, etc. but I do not have the proper context to assess unit durability.
Very enjoyable!
Thanks again Jonathan. The figure ratio is 1:20. 5 or 6 figures is a fair old chunk out of a unit. You can well imagine being in a 500 man battalion when over 100 get cut down in a matter of seconds you might well think you have something better to do with your day!
DeleteIn terms of proportion of a unit I could have included the strength at the time the casualties were sustained but I may have wrongly assumed that the photos would give some idea of each unit's size. If you think Jonathan that including something like the strength of the unit would help let me know although the battle is approaching its conclusion. Might be something I could take into account in future AAR.
Jon, knowing that the figure ratio is 1:20 is good enough for me. Thanks again for a splendid BatRep.
DeleteOh Boy, we've missed you, Jon. More superb stuff, although it seems the dice luck has returned to the Allies and Napoleon just can't break Wellington in time. Just like the real thing!!!!
ReplyDeleteMany thanks for your comments BobH.
DeleteJon, great narrative and photographs - a ton of work, thanks. As I was getting up to the halfway point of the account, I was convinced that the battle wold be decided in this hour, the casualties have been horrendous. The Prussian corner of the table looks amazing with such a concentration of troops and one can imagine that being a genuine distraction and morale deflating spectacle for a French player.
ReplyDeleteThe Scots Greys clearing the ridge was a fine moment, in contrast to that action by the 10th Cuirassiers at the hedge that led to their destruction.
I will be interested to read your thoughts at the end of all of this on changing the break level tests from going from 1 unit lost to every 3rd unit lost, to see how well you thought that worked and to see what would have happened had you stuck with the rule as is or moved it to every 2 units. If Wellington had failed the break test, do you think looking at the overall situation that that would have been a reasonable or deserved outcome?
Thanks again Norm for your comments. As you mentioned, I will in the conclusion analyse how the game went, lessons learnt etc. It became apparent as the game progressed that 2 units per point for the army break test would have been harsh given the sheer number of units involved. I will see how the game ends but the 3 units per point I feel is probably a better reflection of the numbers involved. The allies are only 1 more unit away from having to conduct another break test when 4 will be added to the die roll!
DeleteWell what a return and welcome back. I fear both the Allies and the French will break at the same time.
ReplyDeleteA clear demonstration of how much the Prussians are needed.
Thanks Graham. Yes it has crossed my mind as to what happens if both break! Will have to work that one out if it happens.
DeleteWhilst undertaking my very least favorite thing in the world, gardening, specifically the first cut of the season,...long, tiresome and tedious, I pondered where the armies stand now and what's likely to happen in the next turn. Great remedy to relieve the monotony and tedium lol. So if Wellington breaks, will you call it there and then as a French victory or might you be tempted to do the following ! Wellington breaks so French victory, but L'Empereur's forces are in no fit state to pursue. Indeed, even if they could I assume they would not given the steadily building Prussian forces on their flank. Blucher is fairly well committed at this stage and, notwithstanding the Dukes retirement from the field, it may prove difficult for Marshal Vorwarts to extricate his forces at this stage. Have you considered continuing the battle, turning to meet the Prussians and fighting them to a conclusion......Grouchy is out there somewhere and no doubt Blucher is keenly aware of this. Just musing on possibilities...........
ReplyDeleteI have given it some thought Karl about what I will do with the Prussians should the Allies break. It will probably be a case of deciding at the time taking into account the state of the French forces and also bearing in mind that there are not many turns left until sunset. I have has yet made no firm decision and of course the French could still break first!
DeleteJon, "French break first !" perish the thought. Excellent so, I shall be very interested to see how it ultimately shapes up. What time is sunset ?
ReplyDeleteIt will be 9.00pm. So 8 more turns.
DeleteExcellent, many thanks.....fate will decide it, I believe, long before then.
ReplyDeleteAxesome pictures, what a pleasure to look at such a beautiful table!
ReplyDeleteThanks for your comment Phil. Much appreciated.
DeleteOnce again excellent pictures and a superb narrative. It is clear that regardless of the final outcome, it will have been "a near run thing!"
ReplyDeleteThanks again for your comments Peter. Yes it certainly is close.
Deletegreat stuff from another Solo Nap gamer from East Devon
ReplyDeleteMany thanks Jeff.
Delete