Wednesday 19 December 2018

Review of 2018

With 2018 coming to a close it is time to review my wargaming over this past year. 

I will away from 20th December so all wargaming will cease for a couple of weeks with normal service resuming on my return on 6th January.

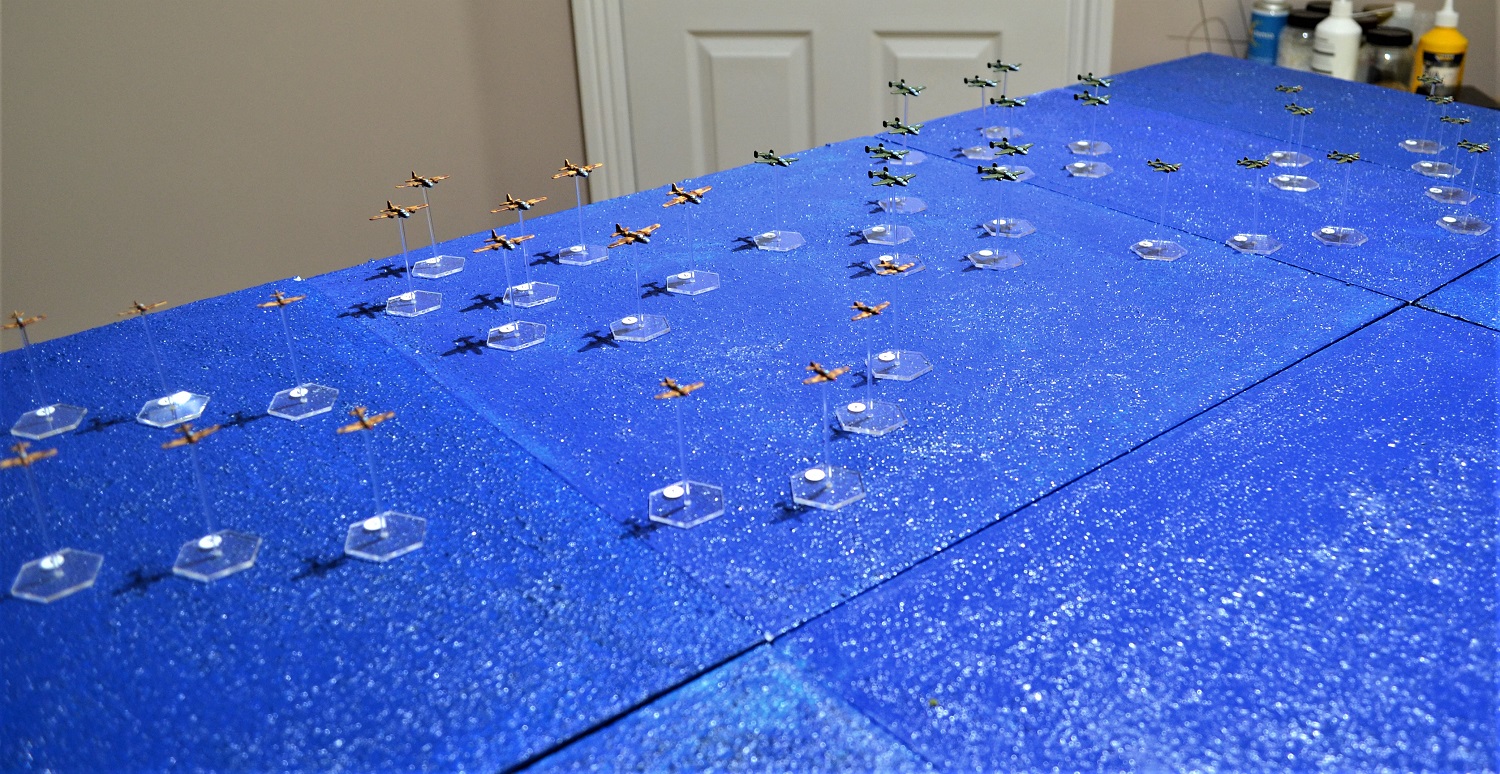
In looking back at my 2018 plans, it is best described as indiscipline on my part! It started well then went completely astray when I painted a 1/1200 scale warship purely as a break from painting figures, only to find myself being sucked into naval wargaming! It did provide an excuse for restarting Operation Nostalgia which included air wargaming. A first for me!

In looking back over the past year I will refer back to my original plans and examine what has been achieved and what has not. Under each of the three headings, 'Battles', 'Campaigns' and 'Painting', I will add what I have completed but not planned for originally.

This is the first full year of my blog and I have to say it is useful in keeping your mind focused on the various projects. Normally I meander through all manner of stuff including part starting projects that often barely get off the ground. A bad idea if you want to avoid amassing unused lead piles!

On to the review. The text in Italics is taken directly from my original 'Plans 2018' posting -


Tuesday 18 December 2018

On the Workbench: 10mm AWI British Artillery & Hessian Jagers

The final units have been painted for 2018 consisting of Pendraken 10mm AWI British Artillery and Hessian Jagers:


British artillery consisting of a battery of 3 x 6pdr battalion guns and a battery of 3 x 6pdr guns. In the White Plains scenario one of these batteries will have to masquerade as 12pdrs.

Continued-

Saturday 15 December 2018

ACW 6mm: The Battle of Kernstown

This was a battle I fought solo a couple of years ago and is just about the last one to add that is relevant to current projects that was played prior to the creation of the blog. It will not be as detailed as my current games as I am having to recall what happened based on brief notes and photos.

This scenario is taken from the 'Guns at Gettysburg Scenarios 4. Stonewall. The Battles of General T.J. Jackson, CSA'. Scenario 2:

BACKGROUND
In the spring of 1862, General Banks commanding the Union troops in the Shenandoah Valley wished to remove the threat of Confederate troops in the lower valley before General McClellan began the Union advance on Richmond. To this end he sent General Shields against Jackson's Confederates near Winchester.

After holding his first (and avowed last) council of war, Jackson withdrew his forces from Winchester. Shields followed and reported that the Rebels had retreated to Strasburg. Banks then began to divert his command to confront Johnston.

Ashby, who commanded Jackson's cavalry, then advanced towards Winchester and encountered the Federal outposts near Kernstown where General Shields was wounded and retired to his HQ at Winchester. Ashby reported that no more than 4 regiments defended Winchester, and Jackson moved to attack. Shields was convinced that the Confederates were no nearer than Strasburg and suggested that Kimball, who now commanded Shields' division move to attack. Kimball was not convinced. Ashby along with 4 companies of infantry skirmishers and Chew's horse artillery had put up a bold front during the morning. He deployed his own brigade with 3 batteries on Pritchard's Hill and then sent for reinforcements as Jackson's main force came up. 

Continued -

Thursday 13 December 2018

On the Workbench: 10mm AWI British Light Dragoons and Generals

The latest unit to be completed for the AWI White Plains game is the British 16th Light Dragoons. 10mm figures by Pendraken:


Only 8 of the 12 painted will be required for the battle.

Continued-

Saturday 8 December 2018

On the Workbench: 10mm George Washington and American Artillery

A few more to add to the collection of Pendraken 10mm AWI:


George Washington and staff. In reality he will double up as a divisional commander in other scenarios. Having acquired the figure from Pendraken I just had to include him.

Continued:

Thursday 6 December 2018

Nap Campaign: Casualty Recovery

One of the questions on the comments section of the Battle of Erfurt posting involved how I calculated casualty recovery.  I attach details below. The chart is taken from Sam Mustafa's Grande Armee rules and I have added factors to cover the campaign. 

Casualties represent injured, detached or deserters returning to their units.

To clarify:
Decisive victory is where the loser routs from the field.
Where the losing side withdraws from the field in good order leaving the ground to the victor, this is classed as a minor victory. Therefore -1 for the loser but no modification for the victor.
Troop grading is taken from the General de Brigade rules.

If anybody wishes to use this themselves please feel free to do so.

Wednesday 5 December 2018

Nap Campaign: The Battle of Erfurt (Prussia)

As it has been a while since I played my Nap campaign, a reminder of the events that lead up to this battle can be found in the preceding post - Map Moves 21st to 22nd March.

The situation in this sector of the campaign. Blucher with the main Prussian Army is green 1 and 3. Napoleon is blue 1 and 3. This battle however takes place to the north east. The Prussian 14th Brigade (green 7) is en-route to reinforce Blucher when it is intercepted by Vandamme's 3rd French Corps (blue 9).

The Prussian Brigade commander, Ryssel, orders his men roused at first light ready to march to the Prussian capital. As dawn breaks French troops appear en-masse to the east and south east intent on intercepting them. Ryssel realises that Blucher risks being surrounded in the capital and sends a messenger to alert him on events unfolding on his north eastern flank. He intends to hold the French for as long as possible to allow Blucher to fall back (if that is what he decides to do!).

Vandamme at the head of the French 3rd Corps observes the Prussian troops deploying across his line of advance. To ensure Blucher remains trapped inside his capital he is determined to deal with this lesser Prussian force and quick order.

Continued -

Monday 3 December 2018

On The Workbench: AWI 10mm Hessian Knyphausen Fusiliers

Another Hessian unit was completed today for the forthcoming 'White Plains' battle to be played in 10mm:


The Knyphausen Fusilier Regiment. Figures by Pendraken.

Wednesday 28 November 2018

On The Workbench: 10mm AWI Hessian Rall Grenadier Regiment

Another unit completed this week is a battalion of Hessian Rall Grenadiers in 10mm -


This is a complete pack of 30 figures supplied by Pendraken. Unlike my 6mm they are mounted on 20mm x 20mm mdf bases from Warbases. A couple have been based on single 10mm x 10mm bases which allows for extra flexibility in the orbats.

More 10mm AWI are currently working their way through the production line, all for the White Plains scenario which will be played in due course.

Saturday 24 November 2018

Labels and Battlefield Clutter

Over the years I have sought to reduce as much as possible anything on the tabletop that may detract from the figures. I have gravitated towards using orbats for recording casualties, morale status and details of units as a compromise which has gone some way in reducing battlefield clutter. This does of course mean that records have to be kept which some would find laborious. They have been used so many times over recent years that I have found it has now become second-nature and very useful for cross-referencing in campaigns. The style of orbats I use can be found throughout my After Action Reports. 

I saw a thread recently on TMP discussing the labelling of figures which has generated this post. I try to make the labels as unobtrusive as possible using a white font on black background. They are limited to being 15mm wide matching the width of my 6mm figures bases. The TMP thread got me thinking again about how I can reduce their impact. The idea behind my labels is to provide enough information about each unit to reduce the need to continually refer to the orbats. 

Here are the labels prepared for the next battle in my Napoleonic campaign, the Battle of Erfurt:

I have used this format for the last 4 or 5 years and it is probably overdue for a review. Ideally I hoped to reduce by roughly 50% the amount of label showing at the rear of the figure base. I reckon I could lose some information on the label without causing confusion or increasing unnecessarily the need to refer to the orbat. It was then just a case of defining a way of displaying what I needed in one line on each label. I have come up with this:

  
The width is maintained at 15mm for each label. Some of the command bases could not be condensed to a single line without omitting detail I felt I would need, although I may revisit this after the next game. As can be seen in the unit labels, they start with the first 2 or 3 letters of their Brigade commander, the unit and finally their status e.g. Line, Veteran etc.

I shall also trial a green background (for the Prussians in this case) as it may blend in better with the green terrain tiles.

I shall be playing Erfurt in the next few days with an AAR posted to the blog when I shall assess how these new look labels performed in action.

Wednesday 21 November 2018

On the Workbench: 10mm AWI & 6mm WW2

In preparation for the 'White Plains' game I have completed more of the excellent Pendraken 10mm AWI American figures:


Delaware Continentals

Continued -

Friday 16 November 2018

The 2nd Battle of Oporto

For details regarding the scenario, orbats etc. see 'The 2nd Battle of Oporto - An Introduction'. https://grymauch.blogspot.com/2018/11/2nd-battle-of-oporto-introduction.html A note about the figures: You will notice many of the British in particular are in later war uniforms. Over time I will be painting more units specifically for the Peninsular but I decided life was too short to paint a whole load more when I already had a significant number, albeit for Waterloo. Not too obvious in 6mm though.


Foy's Brigade deployed within the eastern half of Oporto. (Western half - off table)

Continued -

Monday 12 November 2018

On the Workbench: New figures, paint brushes and scenery items


With Oporto underway I looked ahead at future battles to be fought. AWI 'White Plains' looked inviting in 10mm. So out came the unpainted figures and an order went in to Pendraken to ensure I had enough to cover the battle.

Delaware Continental Regt along with skirmish militia and Pennsylvania Rifles are prepared for priming.

And the Pendraken order arrived in double quick time! Mostly German infantry with some artillery and British light dragoons. These really are superb figures and could easily be mistaken for 28mm when viewed close up. The downside is that there is no question of a quick paint job which would do them a disservice. 

Continued -

Wednesday 7 November 2018

2nd Battle of Oporto - An introduction

The next battle in my Peninsular War project is the 2nd Battle of Oporto, or the crossing of the Douro, 12th May 1809. 

I have several books that include the battle but do not cover it in any great detail. After hunting around the internet I stumbled across JJ's Wargames blog who had created a scenario for this battle. It seemed ideal and only needed a little tweaking for the different scale and rule system. The full scenario can be found here -
http://jjwargames.blogspot.com/2018/01/over-hills-play-test-oporto.html

Once again I am going to highlight the versatility of 6mm, especially when space is at a premium. JJ's original scenario, which included a representation of the Douro that I intend to replicate, was played out on a 9' x 5' table. My game will be on a 4'6" x 3' table!

I will again be using a modified version of General de Brigade rules. For this game skirmishing will be introduced. It will be done in an abstract way without actually deploying skirmish figures, a very fiddly proposition in this scale. I will be using the GdB mechanism with a touch of Grande Armee by Sam Mustafa and some of my own tweaks.

Briefly: I will be allocating an SK (skirmisher) value to each unit which collectively forms a Brigade skirmish screen when not acting independently. This will be based on GdB's system of 1D6 for 6 first rate skirmishers, 1D6 for 8 second rate and 1D6 for 4 chosen men of the 95th Rifles. So a French infantry battalion of 36 figures will have one light company of 6 = SK1 or 1D6. A British line battalion of 30 will have one light company of 3 = SK1/2 and so on. 

It will be assumed skirmishers are thrown out ahead of an advance to screen the main body of troops. When in range dice are rolled as per GdB with a '6' scoring a hit. When the main body moves within 6cms of the enemy the skirmishers are automatically recalled. They cannot be deployed if enemy cavalry are within 9cms of the parent or target unit. 

There is more detail to it than this but gives you an idea of how it is going to, hopefully, work. This particular battle should be a decent test bed not being too large that it could get bogged down.

Continued -

Sunday 4 November 2018

On the Workbench: Preparation for Oporto

One of the benefits of being a 'wargame butterfly' is that hopping between projects keeps everything fresh. Or at least that's my theory! 

So with Operation Nostalgia on hold for now, my attention is drawn back to the Napoleonic projects. Most notably the Peninsular War. Next on my list of historical actions to fight is Oporto. 

I had the good fortune to visit Oporto earlier this year but unfortunately did not have time to visit the Seminary. It was a brief shore run from a cruise ship but nevertheless gave me an idea of the topography of the area.

Taken from the north side of the Douro. The circular building in the top middle of the photo is the monastery Serra do Pilar from where Wellington observed the French forces in Oporto. The Anglo-Portuguese army were positioned at the rear of the high ground out of view from the French. It would have been roughly in the area of the iron bridge that British troops crossed to assault Oporto later in the battle. 

I originally envisaged using my coastal cliff sections to represent the steep sides of the Douro but on seeing this (and looking at Google maps) felt they would be too dramatic for 6mm figures.

Continued -

Friday 2 November 2018

The Battle of the River Plate

To conclude the current round of WW2 Air and Naval Warfare, a nice simple sea battle beckoned. The Battle of the River Plate was always on the 'to do' list so I decided now would be a good time to tick this one off.

The ships used are 1/3000 scale from Navwar and General Quarters 3 rules used. The first sighting of Graf Spee was at a little over 20,000 yards, which at 1cm = 100 yards was just a little longer than the 6' (180cm) table I had planned to use. One turn of movement at a little over cruising speed would have brought them within my 18,000 yard limitation.

I therefore started the game on move 2 and gave the main batteries of Graf Spee one turn of fire before starting the game proper.

So this was the situation just prior to the salvo from Graf Spee. I decided to start the game using something approaching the tactics within the actual battle which seemed the most logical move to make. On the right the Ajax (left) and Achilles break away from Exeter to split Graf Spee's fire.  

Continued -

Wednesday 31 October 2018

On the Workbench: Last of the ships and N.Africa bases upgrade

The final 1/3000 scale ships have been completed bringing to a conclusion the current naval painting project. All Navwar unless otherwise stated.

First up, 3 ships for the forthcoming Battle of River Plate game:


 Graf Spee

Continued -

Monday 29 October 2018

Operation Nostalgia: Map Moves Day 3 Move 2 - Move 3

With the air phase of Day 3, Move 2 complete, all naval elements were moved:

The US landing fleet (red 2) approach its target beach at the north end of Karpathos (north red beach on map). The 8th Army landing fleet (red 1) closes in on its target at the north end of Rhodes (north east red beach on map). 

Several Axis flotillas have returned to port for refuelling. The U-Boats (blue 3 & 4, the latter submerged) attempt to close in on the US fleet.

Continued -

Friday 26 October 2018

Operation Nostalgia: Axis bombing raid on US landing fleet & Swordfish locate a U-Boat

As the allied fleet transporting US landing forces destined for Karpathos steams towards that island, a formation of aircraft is picked up on radar heading in their direction. The sole remaining Seafire performing a CAP piloted by a Junior Ace Squadron Leader, is vectored towards the formation which is a mere 10,000 yards away.

The Axis forces consist of 9 x JU88 medium bombers escorted by 6 x Italian Folgore fighters. 

Allied Transport Fleet.

Overview at the start with the lone Seafire in the centre on his way to intercept the enemy bogeys.

Continued - 

Thursday 18 October 2018

On The Workbench: 1/3000 ships

This week saw the completion of more 1/3000 vessels for Op Nostalgia. All are Navwar.


The Troop Transport Prince David. Unfortunately this ship was sunk in my campaign but will always be useful for the future.

Continued -

Wednesday 17 October 2018

Warplan 5/5 For Sale on Ebay

For those following my Napoleonic Campaign, you will be aware that I am using a map campaign system produced in the 1970's and long out of print.

What appears to be the full system is now on sale on ebay 
https://www.ebay.co.uk/itm/113313068771?ul_noapp=true

Currently £19.95 with zero bids. I heartily recommend it if you enjoy campaigns but I suspect it will sell for more than that.

Update - 18/10/18

Gonsalvo kindly pointed out in the comments section that this does not appear to be the full set. I have had a fresh look at the ebay sale and clearly I should have looked more closely! The original set included 3 sets of cards, 3 books and a host of other stuff including pads for recording various aspects of the campaign and counters. 30 x double sided cards makes up one set. It may be worth asking the seller if you are interested to ensure that the 51 cards being sold includes one full set.

For my campaign I only use the cards and the book which contains all the info you need. I created my own system for recording casualties etc. on my laptop so did not need the additional stuff.


Tuesday 16 October 2018

Operation Nostalgia: Allied Air Raid on Cattavia

Hoping to replicate their success on the Maritza airfield raid, a combined allied bomber formation escorted by fighters set out from Cyprus to bomb the other Rhodes airfield at Cattavia.

In total, 12 Mitchell and 7 Boston bombers are escorted by 10 Hurricanes and 9 P38 Lightning fighters.


P38 fighters with Mitchell bombers in the background

Closeup of Mitchell bombers.
Continued -

Saturday 13 October 2018

On The Workbench: 1/3000 and 1/1200 ships

With my attention now firmly focused on completing the naval elements for the Op Nostalgia campaign, several more ships have been completed:


The last (for now anyway) 1/1200 ship. My namesake HMS Bleasdale, a Type 3 Hunt class destroyer. She actually spent most of her time in the channel and was involved in a number of minor actions in addition to supporting the Dieppe and D'Day landings.

Continued -

Monday 8 October 2018

Operation Nostalgia: Map Moves Day 2 Move 6 - Day 3 Move 2

Fine weather continued into nightfall for the final move of Day 2. With no intelligence gained this turn and no aircraft in the air it was straightforward ship movement.

Axis forces continued their random movement on patrol with the allied main fleet to steaming towards their destination.

A note about the counter blue '1'. This is the Kormoran which in the campaign was purely to be a troop transport rather than the famous Armed Merchant Cruiser. However, I have had second thoughts and it will be that AMC. I apologise to the purists as this is of course totally unhistorical, but having acquired it together with all the other AMC's in a pack from Navwar, felt it would add a little more spice to the campaign. I have reduced it's troop carrying capacity to that of a cruiser and it will now roam the map looking for victims. 

The first move of Day 3, another night move, saw the fine weather continue and the Axis forces gained intelligence about red '2'. The allied force having split in two with '1' heading for Rhodes and '2' Karpathos. The only Axis naval units that can pose a realistic threat to the allied fleets are the 2 U-boats, blue '3' and '4'. They make for the location of the fleet sighting and other units close the gap should any opportunity arise for them to intervene with any stragglers etc.

Continued -

Saturday 6 October 2018

On the Workbench: JU52's and final batch of ships.

Helping my elderly parents move home over the last few days has slowed my wargaming activity to a crawl! I did however, manage to complete the final aircraft for Op Nostaglia:


JU52's now complete the Op Nostalgia aircraft project. As with the other aircraft they are 1/600 by Tumbling Dice.  

Continued -

Monday 1 October 2018

Operation Nostalgia: Axis Air Raid on Main Allied Fleet.

Scale = 1/600 Aircraft; 1/3000 ships
Manufacturers = A/c Tumbling Dice; Ships Navwar & Davco
Rules = Bag The Hun 2 for Air to Air; General Quarters 3 for Air to Ship
Table Size = 6' x 3'9"
Terrain = Sea boards by Purbeck Terrain (no longer trading)

Having been spotted by an Arado Floatplane, the main allied invasion fleet is the target for an Axis air attack.

Axis air units were scrambled with 8 x ME110 fighters and 9 x HE111 torpedo bombers out of Samos rendezvousing with 8 x Italian Folgore fighters and 6 x SM79 torpedo bombers out of Kos before heading out in the direction of the allied ships.

The Axis air formations were picked up on ship's radars at 15,000 yards (150cm) leaving little time to get aircraft airborne from the carrier HMS Avenger. 4 Seafires from blue section were already in the air forming a CAP. 8 Seafires on the deck of the Avenger scrambled to get airborne.

Before I detail the AAR a few words about the rules. Bag the Hun is used for purely the air to air phase with GQ3 for the air to ship. You will have seen from the previous action involving the Cyprus fleet that this neatly split into two different parts with the air to air phase concluded before the bombing attack. This action will not be so convenient due to the close proximity of the fleet.

I had considered just using BTH as it caters for ship action. However, I felt it was all a little too generic for the purposes of my campaign. The ship's AA capability is based on the type of ship rather than what it was actually equipped with historically.

I have therefore created a basic hybrid of the two to allow the ships to respond as per GQ3 but BTH continues with the air to air section. A very brief overview:

2 x BTH moves = 1 x GQ3 air phase (3 air phases = 1 GQ3 move)
A chart was created showing the GQ3 altitude levels in comparison with those of BTH (14 levels in GQ3 v 6 in BTH). Fortunately level 3 in GQ3 is the same as level 3 in BTH which happens to be the maximum height for close range AA fire. Long range being level 4+.

The tricky part commences when the bombers begin their torpedo attack runs. Any Seafires attempting to shoot them down would have broken off by now to prevent them from flying into the barrage of AA fire. So GQ3 now kicks in for the bombers covering the torpedo attack.

Continued -

Thursday 27 September 2018

On the Workbench: HMS Warspite, Italian Destroyers, Torpedo boats and Floatplanes.

This past week has been rather busy with real life intruding on my hobby! The latest battle in the Operation Nostalgia campaign is now underway and will be reported on in due course. With the end in sight for my WW2 1/600 aircraft painting project I discovered I did not have the particular green I needed for the camo on the JU52's. There has been a delay of a few days until new supplies were delivered but I took the opportunity of painting a few more 1/3000 scale ships in the downtime.

A couple of planes were completed however -

2 Supermarine Walrus Floatplanes were completed. Strictly speaking they were not needed in the campaign, but it does now give me the option to field them as 'snoopers' when launched from cruisers.

Continued -

Friday 21 September 2018

On The Workbench: Fighters, Bombers and Transports

A big push on painting 1/600 WW2 aircraft brings the current painting project near the end with just Ju52's and a couple of Walrus Floatplanes left to complete.

The state of my increasingly messy workbench a couple of days ago before some of those planes were finished. Also in sight are various 1/3000 and 1/1200 ships that I have begun prepping ready for painting as soon as the aircraft are finished. The intention being to complete all the ships required for Operation Nostalgia.

Continued -