Showing posts with label Napoleonic. Show all posts

Sunday, 7 September 2025

Nap Campaign: Battle of Tremleurr. 18th April 1808. - Introduction


A reminder of the situation leading up to this battle. This is the night of the 17th April and will only broadly reflect where the troops will be positioned the following morning within their respective part of the battlefield.

The numbers shown have changed slightly due to the change to Black Powder rules. Red 4 is Blantyre's Brigade along with the 2nd KGL Light Dragoons who will march to the sound of the guns during the morning of the 18th.


Continued -

Monday, 1 September 2025

Nap Campaign: Map Moves 14th - 17th April 1808

I could not believe it when I checked, but it is 2 years since I played a game from this campaign. It is long overdue for some attention and I have now completed map moves leading up to 3 more battles. As in previous posts, the maps have been split into sections. The first being the whole campaign map followed by each of the 3 current theatres of operations.

14th April

15th April
Continued -

Sunday, 1 June 2025

Busaco 27th September 1810: Turns 17 - Conclusion


The situation at the end of turn 16.

JUNOT'S ASSAULT
Turn 17

Junot's Corps begins to climb the ridge and several charges were made. 

I should add here for those not familiar with the rules, each average brigade commander can order up to 2 battalion charges (an exceptional commander 3, poor 1). It is possible to add further charges on battalion initiative. They must roll a 5 or 6 on a D6 dice.

Volleys of musketry opened up across the entire ridge. The allies took the decision not to wait to see the "whites of their eyes" but blaze away intending to inflict the maximum damage on the slow moving columns.

Continued -

Saturday, 24 May 2025

Busaco 27th September 1810: Turns 9 - 16

JUNOT'S ASSAULT

Turn 9

Massena decides it is now time to commit Junot's Corps to the assault. As much of the allied army remains out of view on the reverse slope, a dice roll determined where Junot commits his assault. The result was the northern end of the ridge to the right of Ney. All orders are passed successfully and the Corps begins its move.
Turn 10

As Junot's Corps closes the gap they begin to come under fire from 2 allied batteries on the ridge.
Turn 11

Junot's mass of skirmishers begin to engage with their opposite numbers with neither side coming out on top. 

Continued -

Thursday, 1 May 2025

Busaco 27th September 1810: Turns 1 - 8

NEY'S ASSAULT

 Turn 1

Ney's advance begins with Marchand's Division ascending 'The Spur' and Loison's heading towards Sula. A swarm of Voltigeurs engage primarily the rifles of the 60th and 95th regiments along with Cacadores deployed as skirmishers. Both sides take early losses but an early stroke of luck lands with the British when a double '6' is rolled upon Lawson's 6pdr foot battery (far lower right) engaging in counter-battery fire with a newly deployed French foot battery (just below the advancing columns).

The French lose one of its 4 guns and will have to withdraw.

Mermet's Division is in a supporting role as the entire corps advances towards the ridge. At the bottom of the photo, Junot's Corps is held in reserve.

Continued -

Sunday, 20 April 2025

Busaco 27th September 1810 - Introduction

The next game in my Peninsular War project is Busaco. Napoleon ordered Massena to drive the British from Portugal and during his move south he met Wellington positioned on the 9 mile long ridge at Busaco. It was Wellington's aim to delay the French advance long enough for the defensive Lines of Torres Vedras to be completed to the north of Lisbon.

My game represents the area where the main action occurred. That is the central and northern end of the ridge.

Table Size: 6'9" x 4'6"
Figures: Baccus 6mm
Rules: General de Brigade


Continued -

Monday, 2 December 2024

On the Workbench: Busaco - French Allies

 Another project completed and ready to play is the Peninsular War Battle of Busaco. 

Originally I intended to include the entire battlefield but after a re-appraisal I thought 'why' when all the action was confined to no more than 2/3 of it. Concentrating on the main action has reduced the number of Portuguese in particular that need to be painted so saving a little time.

With the Anglo/Portuguese forces completed it just left several battalions of French allies:

I apologise for the quality of the photos, which includes the other posts of this batch of "On the Workbench". I do not have the luxury of lighting from all angles and have to rely on a strip of 5 adjustable lights mounted on a strip on the ceiling of the garage. I made some adjustments including with the camera and it was only when I had transferred the photos to the screen that I realised all had not gone to plan! 

On to the details of what has been painted:

Legion du Midi.

Continued -

Sunday, 29 October 2023

Nap Campaign: Battle of Presscot, 14th April 1808: Turns 13 - Conclusion


The situation at the end of turn 12.

Turns 13 - 16

British Left

Vallin's cavalry brigade has been moved forward to strengthen Toussaint's infantry brigade ready to counter the advance of the British 5th Division.

Continued -

Tuesday, 10 October 2023

Nap Campaign: Battle of Presscot, 14th April 1808: Turns 9 - 12


For ease of reference, this is the situation at the end of turn 8.

Turns 9 - 12

British Left

Kempt launches the 32nd Line at the French 1/9th Light hoping for more success than the failed attack of the 28th. A ragged volley from the French battalion failed to halt the charge and the British battalion succeeded in pushing them back.

Continued - 

Tuesday, 26 September 2023

Nap Campaign: Battle of Presscot, 14th April 1808: Turns 1 - 8


The objectives for each allied Division.

Turns 1 - 4


Turn 1 saw the opening exchange of artillery fire and deployment of skirmishers. A With the allies outnumbered by artillery pieces, Wellington took no time to order the advance across the whole line. This is an overview after the opening moves in turn 2.

A reminder of how I play skirmishers. They are played in the abstract with each unit's and brigade skirmish values marked on the roster. This indicates how many dice rolls are made with a '6' to hit. Where possible they are rolled in pairs to allow for double '6' results. The only representation on the tabletop of skirmishers are those light battalions that deploy into skirmish formations when the normal skirmish rules apply.

Continued - 

Monday, 18 September 2023

Nap Campaign: Battle of Presscot, 14th April 1808 - Introduction

You will be able to find the strategic background to this battle in the last "Map Moves" posting which is located under the "Napoleonic Campaign Map Moves" label on the right.

This is the first incursion into French territory by allied forces. Wellington is in overall command with his 800 British/KGL force together with 426 Portuguese. His right flank is occupied by 1,106 Spanish. 

Attempting to repel the allies is the French 'Army of the South' commanded by Marshall Soult. The right (blue 4) is centred around the 6th Corps and on the left the 4th Corps.

Continued -

Tuesday, 17 January 2023

Nap Campaign: Map Moves 3rd - 13th April 1808

There follows a lull in the fighting as all 3 French thrusts are held. The French had enjoyed a significant amount of success until these simultaneous setbacks. Had any one of them achieved victory freeing up resources for the other two, the allies may well have been facing defeat in the campaign. Victory is not assured for the allies yet though with the French switching to defence.

I will begin with the strategic maps giving an overview before zooming in one each theatre for more detail. I have not included every day's movements to avoid being swamped in maps, but it should be sufficient to indicate what has happened. 

3rd April
Continued -

Monday, 14 November 2022

Nap Campaign: Battle of Holbrook 3rd April 1808 - Turns 25 to Conclusion

 Turn 25

Squares are formed as the great mass of Guard cavalry swarm over the river. The lancers temporarily halt to form up. The only allied cavalry in a position to intercept them is a lone troop of Brunswick lancers (lower middle left).

The view from behind the allied lines. One square is caught between the cavalry and an approaching Young Guard battalion column. They open fire on both but fail to make much of an impact. The green micro-dice indicate which units will need to test morale the next turn as a result of a dispersing 33rd Line and an artillery battery. 

Continued -

Sunday, 6 November 2022

Nap Campaign: Battle of Holbrook 3rd April 1808 - Turns 19 to 24

 Turn 19

Dornberg lead his light cavalry brigade on a desperate charge against the Cuirassiers while they were still unformed. The French advantage of heavy cavalry was cancelled out by their inability to counter charge together with the superior mounts of the British and KGL cavalry.

On the left of the photo the elite 1st KGL Light Dragoons lead by Dornberg charged the veteran 4th Cuirassiers. The latter rolled a double '6' but fortunately for the KGL troopers they also rolled high reducing their defeat to a push back. Dornberg received a light wound and the Cuirassiers would pursue the next turn.

To the right the British 23rd Light Dragoons charged the 1st Cuirassiers lead by Dubois. The had more success pushing back the Cuirassiers. 

Another attempt on the bridge was made by Villiers' Brigade, this time with the 2/11th Light battalion leading the charge against the 2/1st Foot Guards. The French took fire from nearby Hanoverian battalions but only suffered 1 casualty and successfully charged home against the Guards. They were narrowly defeated again and are pushed back.
Continued -

Friday, 28 October 2022

Nap Campaign: Battle of Holbrook 3rd April 1808 - Turns 13 to 18

 Turn 13

On the allied left flank, their artillery firing canister into Piat's brigade were taking a heavy toll.

On the French left, the 3/13th Light battalion of Schmitz' brigade were blown away by a British battery losing 6 casualties to canister fire plus 1 from a blast of musketry. Having lost over 50% of their number they failed their subsequent morale test and fled the field. The fence line to the right of the tree has now been swept clean of French infantry.

The rest of Schmitz' brigade, now joined by Aulard's battalions (middle right), had the better of the firefight with the Bremen Hanoverian battalion suffering particularly badly forcing it to retreat.

Continued -

Tuesday, 18 October 2022

Nap Campaign: Battle of Holbrook 3rd April 1808 - Turns 1 to 12

 Turns 1 - 4

The preliminary bombardment begins. The French have formed most of their artillery into 3 grand batteries.


By the 2nd turn the French artillery were getting the better of the artillery exchange. In the lower left of the photo the 2/30th Line suffer heavy casualties from the central grand battery and retreat in disorder. General C Halkett rode over to rally them but failed!

Continued -

Friday, 7 October 2022

Nap Campaign: Battle of Holbrook 3rd April 1808 - Introduction

Back from the hols (and a bout of Covid!) and now back to the real stuff. The next battle in the Napoleonic Campaign involves a French v Allied force with Grouchy seeking to capture Holland and expel the British.

A reminder of the strategic situation:

The battle is located at the top of the map with Blue 7 representing Grouchy's command. Red 3 are the British contingent of the allied force with General Hill in overall command. Grouchy is attempting to push through to capture the port of Gorizia.

Beneath Red N4 is the port of Gorizia and the primary location for the disembarkation of British reinforcements. 

Black 1 is Buttlar's Brunswick brigade responding to the Duke of Brunswick's call for reinforcements.

Yellow 4 is Col Best's Hanoverian Brigade who are now hurrying to join the allied army,

Blue 6 is D'Erlon with two divisions of infantry and one cavalry division who had been detached to eliminate a Dutch threat their flank. They are now moving to rejoin Grouchy.

Continued -

Tuesday, 16 August 2022

Nap Campaign: Battle of Sanlucar 3rd April 1808

The village of Sanlucar is located to the north of the action in 15A1. Grey 3 is the Spanish 2nd Division lead by Iglesias. He took it upon himself to ignore orders to withdraw towards Spain should the French approach and believed he will gain glory by defeating any French advance. Blue 2 is Lobau with an infantry and a cavalry division from the 6th Corps. It is his job to neuter any flanking threat to the main French force.
Continued -

Monday, 1 August 2022

Nap Campaign: Map Moves 2nd April 1808


An overview at the end of the day on 2nd April. While Napoleon and Blucher were slugging it out other forces were on the move. As before I will cover each theatre in more detail below.
Continued -

Thursday, 28 July 2022

Nap Campaign: Battle of Grazzbenn 2nd April 1808: Conclusion

We leave Grazzbenn with Napoleon and his battered force withdrawing under cover of darkness. This was his first defeat of the campaign, and aside from setbacks in the south, the French had enjoyed almost universal success. 

Although the French withdrew in good order I awarded the Prussians a decisive victory which impacts returning casualties. The French were resoundingly defeated with almost universal underperformance in stark contrast to the Prussian cavalry in particular who occasionally excelled themselves.

I will detail casualties shortly but first will highlight the performance of one individual unit. The Prussian 6th Uhlans. They had arrived as part of von Ziethen's 1st Corps reinforcements in Lutzow II's 2nd Cavalry Brigade. It was turn 27 when they first made their presence felt. Having negotiated their way through the great mass of advancing Prussian columns they were joined by Lutzow who lead a charge on an unprepared French infantry battalion still in line formation. 

Having almost wiped out that battalion they routed or forced to retreat 3 more infantry battalions in quick succession adding to the mayhem among the 2nd Corps as the panicked troops piled into the various tightly packed units in an attempt to escape. Their attention was then drawn to the approaching French cavalry of Pire's Division. Lutzow lead the 6th Uhlans in immediate charges against that division successfully causing 3 of the 4 French cavalry regiments to flee the field. The last Chasseur regiment also fled but successfully rallied later. This removed any possibility of the French holding the line or counter-attacking in any meaningful way. 

The total cost to the 6th Uhlans? Just 3 of their initial 13 figures, one of which returned post battle. This is one of the most outstanding performances of any unit in the campaign so far. They did not fail a single morale check. Normally when any unit goes above and beyond they are awarded an upgrade in their quality. In this particular instance I have for the first time given a unit a double upgrade taking it from line to elite! Lutzow will also be upgraded to excellent from average.

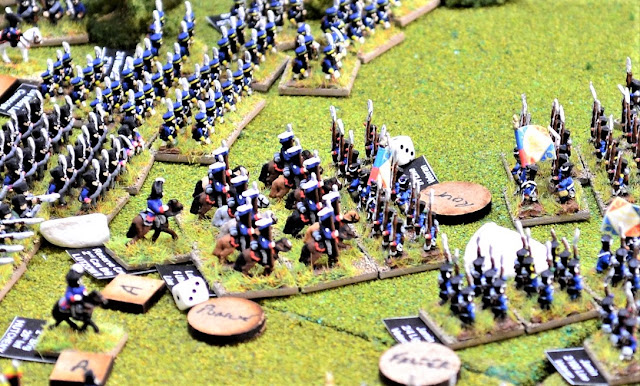
The 6th Uhlans at the start of their rampage.
Continued -