Please Note: This will be the last update before I go on holiday. I will be back on 2nd April raring to go! As it stands, I plan for this AAR to be in 10 parts plus a conclusion. The only proviso being that if one side or the other does not collapse before then!
On with Part 7:
5.00pm - 6.00pm
The next turn generated a considerable amount of drama around the allied ridge to the west of the crossroads. I will therefore start with the Prussians and then work our way around the battlefield from the allied left.

Watzdorf's cavalry arrives at the rear of the 15th Brigade. Landwehr from the 15th Brigade advance towards woods west of Frischermont.
Continued ...
Continued ...

Prussians continue to arrive (middle top) including lead elements of Sydow's Cavalry Brigade.


The French 6th Corps have moved Subervie and Domon's cavalry into reserve.

Prussian Fusiliers of the 18th Infantry regiment form line.

They are subjected to a salvo from the 19th Division foot artillery just out of canister range inflicting one casualty.

View across to the French 3rd Lancers (middle right) and to the allied left flank.

View across allied left flank.

Colonel Best sees an opportunity of destroying the only French infantry battalion in this sector. The 2/8th Line with Pegot (middle of photo) were unformed and was flanked by the Hanover Osterode battalion. Best leading the Osterode charged the 2/8th Line who routed in response. The rout move took the French battalion into contact with the 1st KGL Hussars which meant dispersal. Pegot rode off to find what was left of his brigade.

Three cavalry melees took place on the allied left. Beginning with the melee nearest the camera.
Bruno with the French 7th Hussars received an 'Attack' result in the command and control phase. He was compelled to charge with any of his units within charge range. In this instance it was his 7th Hussars with himself in the lead who charged Vivian with the 1st KGL Hussars (charging from right to left in photo). Vivian successfully counter-charged and both entered melee. Vivian won the melee with the 7th Hussars being pushed back. The 1st KGL horses were blown.
The middle of the 3 melees involved the 10th Hussars and the 2 smaller squadrons of the French Chasseurs of the Guard. The 10th Hussars were unformed having defeated the 2 larger squadrons of Chasseurs of the Guard after a heroic charge scattering two French infantry battalions. It was now an opportunity for the Chasseurs to gain revenge for their defeated comrades. As they charged towards the 10th Hussars the latter broke and routed. They were unable to put enough distance between them and were caught by the Chasseurs. This meant destruction for the 10th Hussars.
In the top melee Vandeleur with the 12th Light Dragoons charged the 9th Cuirassiers who counter-charged. The British cavalry rolled a double '1' and comprehensively lost the melee with the remnants of the 12th Light Dragoons routing. There was a silver lining for the Light Dragoons. A double thrown meant a 'Risk to General' test (if General in melee any double thrown means a risk test). Vial, who had already been wounded, was captured. His Brigade would now be lead by a Regimental Colonel, equivalent to a poor General.
The destruction of the 10th Hussars caused two of Trip's 3 heavy cavalry regiments to falter (right of photo). He would now have to spend a turn rallying his brigade before he could meaningfully engage the French on this flank.

Overview of Allied left flank towards crossroads. In the middle left of the photo you will see a French battery firing on a Dutch square. This was the 8th Dutch Militia. They lost 4 casualties to canister fire but held their ground in the morale test.

On the allied ridge west of the crossroads, the 10th Cuirassiers charged the 8th Belgian Hussars of Ghigny's Cavalry Brigade. The 8th Hussars routed before contact was made. The 10th Cuirassiers adjusted it's charge towards the 4th Dutch Light Dragoons of the same brigade (middle of photo). The Cuirassiers won the melee forcing the Light Dragoons to retreat. Due to the large size of the Dutch regiment they inflicted 4 casualties in return for losing 4. Ghigny's Brigade had now been expelled from the ridge!

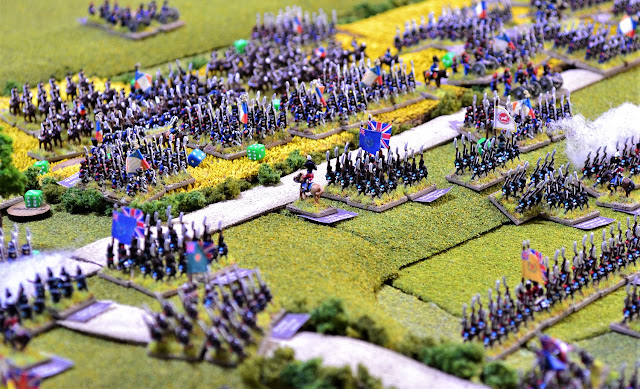
Turning attention now towards events on the allied ridge at the crossroads and across to the western end of the ridge. Numerous attacks were launched across this sector of the battlefield.
Starting at the crossroads. Charlet ordered the 1/55th Line to charge the 1/95th Rifles (bottom left of photo near tree). The 95th delivered an effective volley at the French battalion causing them to falter. Next to the 95th, the French 2/55th Line charged the 1st KGL Light Infantry (blue regimental flag to right of 95th in photo). The 1st KGL also delivered a powerful volley of musketry causing 4 casualties. It did not stop the 2/55th who charged home. The impact of the column broke the thin German line who suffered 4 casualties inflicting 2 in return. The 1st KGL would have to retreat in the next turn and the 2/55th maintained good order.

The 2/54th charged the 5th KGL Line (bottom left smoke) who caused 3 casualties to the French and as a result they retreated. In the morale phase the French battalion failed to rally and dispersed.
Immediately to their right, the 2/3rd Line charged the Hanoverian Luneberg Light Battalion (middle lower left with white flag). They lost 1 casualty prior to charging home. The Lunebergers faltered in the face of the charge.

The dice result in the subesquent melee. The flank companies of the 5th KGL Line and the Bremen Field Battalion were also contacted. As there was no substantial contact with neighbouring battalions I did not roll for them in their own right. I merely added the two bases to the Luneberg numbers as participating in the melee and would count for inflicting casualties. The 2/3rd Line routed the Luneberg Light. The French lost 2 and inflicted 7 casualties of which the Luneberg lost 5 and the neighbouring battalions 1 each. Kielmansegge escaped injury unlike one of his staff!
Worryingly for Wellington, this rout lead to several morale checks. The Bremen Field battalion faltered as did the Jaeger detachment to the rear of the Luneberg.

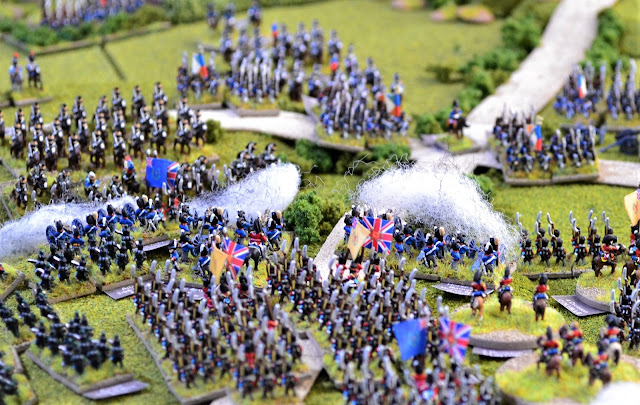
Further along the line, the 2nd and 3rd battalions of the 93rd Line infantry charged Wellington's own 33rd Foot. They were clearly on top form today delivering a shattering volley. 2 casualties were inflicted on the 2nd battalion and 3 on the 3rd. Both battalions faltered and Gauthier received a light wound for which he would have to retire 12cms to seek medical attention. The subsequent test to charge home resulted in the 2nd battalion retreating and the 3rd routing! To the right in the photo you will see the gap created by the Guards being pushed back. Had the 33rd given way there would have been a significant space for the French to fill.
Both French battalions failed to rally in the morale phase and dispersed.
In the bottom right of the photo you will see the 1/4th Light who was seeking to exploit the gap that it had created. It again charged the 3/1st Guards who thinned their ranks with a volley of musketry. Unfortunately for the 1/4th Light those casualties took them past the 50% dispersal point and their morale test confirmed that is precisely what happened to them. Just as the 3rd battalion was celebrating it's firepower, events taking place with the 2nd battalion was a cause for concern.

In the photo the 2/1st Foot Guards has been charged by the 2/4th Light and the 2/100th Line. The Guards gave ground under the impact and the determination of the French to force the issue won them the melee, but only just. The Guards were pushed back with 4 casualties inflicting 3 on the French. Critically, 2 of these were on the 2/4th Light which took them past the dispersal point. As they won the melee they were ok for now.


The 8th Cuirassiers, on seeing the square of the 1st KGL Line break apart, immediately charged them. The KGL battalion retreated in the face of the charge and passed through the column of the 2nd KGL Line to their rear unforming them. The jubilant 8th Cuirassiers continued their charge towards the 2nd KGL, and fire from the neighbouring squares was insufficient to stop them.
Being unformed, the 2nd KGL had no chance. They managed to kill 2 Cuirassiers before being slaughtered. Fortunately for the allies, the Cuirassiers would have to retire next turn with blown horses. The 1st KGL failed to rally in the morale phase and dispersed.

Overview of Allied right at this stage in the game.
In the morale phase Saxe-Weimar's 2/2nd Nassau failed to rally and dispersed. This had been on the extreme left flank of the allies.
Some general views at the end of this turn:


Here Soye's Division is reassembling having captured Hougoumont and is preparing to join the assault on the allied right (just in front of Hougoumont in photo).
For the next turn Wellington had to deal with a further 3 breaches in his line west of the crossroads. He was very fortunate that Kielmansegge's brigade held but he is fully aware that any collapse in morale within a handful of inexperienced troops could rapidly escalate to other green units.

In the next turn the situation along the ridge west of the crossroads significantly deteriorated for Wellington. The green micro dice signify morale checks that have to be made in the morale phase as a result of routing fellow units.
Starting from the left. The 2/55th Line charged the 8th KGL Line (with the green micro dice in photo). They faltered having received fire from the KGL.
To the right of the 2/55th in the photo is the 1/3rd Line of Hussons Brigade. It initially charged the 5th KGL Line who fired a very poor volley and then promptly routed as the 1/3rd Line charged home. In the process of routing they interpenetrated the 2nd KGL Light to their rear unforming them. The 1/3rd Line continued its charge towards the 2nd KGL Light who retreated in the face of the charge. The 1/3rd Line had not finished yet! It angled it's attack slightly charging Kielmansegge's Jaeger detachment. That unit also retreated avoiding contact. The 1/3rd Line had reached the limit of it's charge and was now in the position as shown in the photo. Total chaos now reigned among the allied battalions in this sector.
Looking along the ridge to around the middle of the photo is the small battalion column of the 3/108th Line. This battalion had charged the British 2/30th Line. The allied line was suffering from exceptionally poor musketry dice and this was no exception. A roll of double '1' was thrown and no casualties were inflicted by the British. The 3/108th continued its charge and another horrendous roll by the 2/30th lead to them routing.
Next along the ridge is the 33rd Line with C.Halkett attached (the white with red cross regimental flag in the photo).

A closer view. The 1/93rd and 1/100th Line battalions charged the 33rd. The Yorkshiremen stood their ground and received the charge of both battalions. This time it was all too much for them. Two French columns hitting each end of their line broke them and they retreated losing 7 casualties and inflicting two in return.

A view of the melee from the French perspective.

The breakthrough to the west of the crossroads.

Moving along to the western edge of the ridge, the two Guards battalions of Maitland's Brigade had reformed into standard lines and were moving back onto the ridge (middle left). Artillery sited on the high ground were proving effective, especially Ramsey's battery who continued its accurate and telling fire (to the right of the photo). Mercer's battery was also getting its range and started to make an impact (middle of the 3 batteries).

The KGL Horse Artillery set out to prove it could be as equally effective as the RHA. Here the KGL battery of the 2nd Division rolled a double '6' inflicting 2 casualties on the 1st Carabiniers, caused them to falter and Blancard suffered a light wound. He would have to retire to see the medic.

Dornberg leads the allied cavalry back into the fray against the French left flank.

Overview of the French left.

Overview of the main French attacks against the allied right.

Moving east along the ridge, Kempt's brigade holds the line to the east of the crossroads. The 1/95th and 1/32nd Foot successfully repel attacks by two French columns. A bigger challenge awaits as 3 battalions of the Middle Guard approach their position.

The 10th Cuirassiers pursued the retreating 4th Dutch Light Dragoons (bottom right of photo) who had passed through an already unformed 8th Belgian Hussars. The Cuirassiers collided with the Hussars and a melee between them ensued. The 8th Belgian Hussars exceeded themselves (a double '6' was thrown). In a display of absolute determination they successfully fought off the Cuirassiers pushing them back. The French lost 3 casualties to the Belgians 1. This may well prove to be an important check on the French advance. For the risk to General a double '6' was thrown. Grenier being the nearest General, was wounded and thrown from his horse. He grits his teeth, remounts and bellows obscenities towards the Belgians. He was cheered by the nearby 2/29th Line who were mightily impressed.

To the east of the 10th Cuirassiers were sited several squares of Bylandt's Brigade. The French 2/29th Line charged the square of the 27th Dutch Jaeger (melee middle right). The Jaeger faltered as the 2/29th charged home. The French column collapsed the disordered square and forced the Jaeger to retreat. The 2/29th had become unformed but due to particularly impressive leadership by Grenier he successfully reformed them immediately.
Fanine had rolled an 'Attack' result in his command and control test. This means he has unilaterally decided to attack anything within reach. In this case he was with the 5th Cuirassiers and the square of the 7th Belgian Line was the closest unit to their front. They thundered down onto the Belgians shrugging off fire from an adjacent square. The 7th Belgian Line faltered in the face of such an imposing charge which was not a particularly good idea. As their officers and NCO's desperately tried to reform the square the Cuirassiers ploughed in. The inevitable occurred and they were utterly destroyed. The Cuirassiers would launch themselves into an uncontrolled charge next turn.

A view from the French position of the melees taking place in this sector of the battlefield.

The British 18th Hussars took the opportunity to charge the unformed two smaller squadrons of the Guard Chasseurs. The Hussars proved victorious forcing the Chasseurs to retreat and inflicting 3 casualties for the loss of 2. The Hussars maintained the British cavalry reputation for uncontrolled pursuits and would indeed be chasing the Chasseurs in the next turn.

A view looking west along the allied position.

Turning our attention to the Prussians. The whole of Sydow's cavalry brigade has now arrived.


As Sydow's cavalry arrive, the Prussians are bedevilled by 'Hold' results in their command and control phase. This delays much of their assaults. Several French batteries take advantage and pour canister into some of the lead battalions.

Creilsheim leads his brigade towards the French line with the 2/15th Infantry successfully charging the 1/10th Line. The first contact for the Prussians proved decisive in their favour. The 2/15th rammed through the 1/10th Line forcing them to retreat. They inflicted 6 casualties on the French for the loss of 3. They also maintained good discipline remaining formed after the melee.
Numerous allied units had to conduct morale tests, either to rally from rout or retreat, or for being in close proximity to those who were routing. 2 of Vincke's Battalions, the Hildesheim and Hameln, failed to rally and dispersed. Vincke's Brigade now broke as a result.
The 4th Dutch Light Dragoons did not follow the heroic example set by the Belgian Hussars of their brigade and routed from the field. Ghigny's Brigade now faltered. Also in the same area of the battlefield, Bylandt's Brigade faltered.
The biggest concern for Wellington was the events around the ridge to the west of the crossroads. Numerous morale checks had to be made and at one stage it looked as though the whole frontline was going to break. This could have proved to be the end for the allies. Fortunately it held but only just with several battalions unformed or faltering. Two battalions had dispersed, the 5th KGL Line of Ompteda's Brigade, and the Hanoverian Luneberg Light Battalion from Kielmansegge's Brigade.
The situation was still very precarious with several French battalions now commanding the ridge.
The Prussians continued to arrive with most of the 4th Corps now pressing against the French 6th Corps.


Numerous allied units had to conduct morale tests, either to rally from rout or retreat, or for being in close proximity to those who were routing. 2 of Vincke's Battalions, the Hildesheim and Hameln, failed to rally and dispersed. Vincke's Brigade now broke as a result.
The 4th Dutch Light Dragoons did not follow the heroic example set by the Belgian Hussars of their brigade and routed from the field. Ghigny's Brigade now faltered. Also in the same area of the battlefield, Bylandt's Brigade faltered.
The biggest concern for Wellington was the events around the ridge to the west of the crossroads. Numerous morale checks had to be made and at one stage it looked as though the whole frontline was going to break. This could have proved to be the end for the allies. Fortunately it held but only just with several battalions unformed or faltering. Two battalions had dispersed, the 5th KGL Line of Ompteda's Brigade, and the Hanoverian Luneberg Light Battalion from Kielmansegge's Brigade.
The situation was still very precarious with several French battalions now commanding the ridge.
5.30pm


Blucher's arrival.

Massow's lead Landwehr battalions (middle of photo) came up against canister fire from French batteries positioned nearby. The 3/4th Silesia Landwehr (column nearest to the wood) suffered particularly badly when a double 6 was thrown for a 3 cannon battery sited next to the wood. A total of 7 casualties were inflicted on the Landwehr and Losthin received a light wound.

On the allied left flank Gardiner once again fired a salvo of canister at the stationary 3rd Lancers (they were out of the command radius of their brigade commander which makes them harder to activate). This proved devastating to the 3rd Lancers who promptly dispersed.

Now was Trip's chance for glory. He lead the 2nd Belgian Carabiniers towards the 9th Cuirassiers building up to a canter. At about the halfway mark Trip raised his sword and ordered the charge. They promptly faltered! Ah well. Maybe next time.

Moving towards the allied centre, the Dutch 8th Militia who were in square with the 7th Dutch Militia were receiving punishing rounds of canister from the Guard Horse Artillery battery that had deployed nearby. On this occasion they suffered particularly badly losing 7 of their number. They still held though.

The 5th Cuirassiers lead by Fanine had gone into an uncontrolled charge towards the 5th Dutch Militia who quickly retreated. This was then followed by the 27th Dutch Jaeger who wisely followed the Militia. The Cuirassiers continued their charge into the unformed 8th Belgian Hussars who had blown horses. The Hussars really had little chance as the Cuirassiers carved them up. The Hussars were forced to retreat and the Cuirassiers at last had blown horses! They had inflicted 6 casualties on the Hussars for the loss of 2. As they began to pull back to reform they noticed that somebody was missing. Fanine had been captured! Leading the charge he found himself so far into the Hussar ranks he had become isolated. The brigade would now be lead by a regimental Colonel.

The situation continued to deteriorate for the allies at the crossroads. The 1/4th Chasseurs of the Middle Guard charged the British 1/32nd Line who retreated leaving the French column on the ridge.


After the intensity of the fight along the allied ridge west of the crossroads in the previous turn, it was now a little quieter as units reformed and reorganised themselves. There were some opportunities though for the French to keep up the pressure. Here the 1/3rd Line of Husson's Brigade charges the Hanoverian York Field battalion. After a brief melee the York battalion retreats losing 4 casualties leaving the 1/3rd Line unformed having lost 2.

An overview of the allied right shows a number of allied battalions, mainly British and KGL, forming lines to increase firepower on the oncoming French columns.

Zooming in now on C Halkett's Brigade (the two British battalions firing in middle of photo, 2/69th Line to the left and 2/73rd Line to the right), they were the target of 2 French battalions. Both British battalions were still unformed as they had been repeatedly attacked preventing them from having the time to reform.
The 3/108th Line of Campy's Brigade charged the 2/69th. The British battalion fired a ragged volley which still proved effective killing 3 of the French. This was enough and the 3/108th suffered a 'retreat' result in the test to charge home.
The 1/100th Line of Jamin's Brigade charged the 2/73rd Line. The latter inflicted 2 casualties on the French column causing them to falter. The line had held!
At the top right of the photo is the 3/1 Foot Guards of Maitland's brigade. It had been recklessly charged by 2 weak French columns, the 3/100th Line and the 2/4th Light both of Jamin's Brigade. The volley from the Guards inflicted 3 casualties on the 3/100th Line who routed, and 2 on the 2/4th Light who dispersed having lost more than 50% of it's number. There was a slight problem for the Guards though. They were looking across clear ground to the Grenadiers 'a Cheval!

At the western end of the allied ridge, 3 British horse artillery batteries had been sited on high ground overlooking the ridge.
They are left to right, Smith's, Mercer's and Ramsey's batteries. Ramsey, who has maintained a consistently high die roll did it again:

The French 2/1st Line of Soye's Brigade were the unlucky target who lost 4 of their number (the column squarely in Ramsey's sights in the previous photo).

In front of Ramsey's battery 2 melees occurred.
Middle left in photo the 3/1st Line charged the 3rd KGL Line of Du Platt's Brigade. The 3rd KGL had been in square and hurriedly attempted to form a column. They became unformed in the process and faltered in the face of the charge. They gave a good account of themselves in the melee but were pushed back by the 3/1st Line who became unformed.
Middle right in the photo, the 1/1st Line charge the British 51st Light of Mitchell's Brigade who formed the southern and eastern faces of a square with the 1/23rd Line. The French battalion pushed back the 51st but became unformed in the process.

Further out on the allied right flank, the KGL horse artillery battery of the 2nd Division seemed intent on matching Ramsey for it's devastating accuracy. They fired on the 3rd Cuirassiers rolling a '10' and inflicting 4 casualties.

Overview of the allied left.

The situation at the end of the turn on the French left.
During the morale phase, 2 French battalions failed to rally and dispersed. The 3/108th Line of Campy's Brigade and the 3/100th of Jamin's. Jamin's Brigade is currently being commanded by a Regimental Colonel contributing to the fact that the Brigade suffered a 'Broken' result in the Brigade morale test.
The following turn saw most of the Prussian 4th Corps now deployed against the French 6th Corps:
 Several attempts were made by the Prussians to break the French line, but all were repulsed by effective fire from both infantry and artillery.


The following turn saw most of the Prussian 4th Corps now deployed against the French 6th Corps:


Two Silesian Landwehr battalions were particularly badly hit with the 1/4th Silesia routing.

The Prussians advancing through the wood west of Frischermont made steady progress.

The Prussian advance on Smohain continued with the Fusiliers of the 18th Infantry charging the French 19th Division foot artillery battery. The gunners put up a strong fight but succumbed to the Prussians in the end with the total destruction of the battery.

Durutte's entire 4th Division was now deployed in and around Papelotte.

On the extreme left of the allied line, Vincke and Saxe-Weimar continued to recover their battalions. In the background Best's Hanoverian Brigade formed squares

The 9th Cuirassiers charged the Belgian 2nd Carabiniers who had previously faltered in their charge. Trip encouraged the Carabiniers with his presence and they stood to receive the Cuirassiers charge. Despite their faltering state the Belgians gave a good account of themselves before being pushed back. Each side lost 2 casualties and the Cuirassiers received a 'horses blown' result in their pursuit test.
To the rear of the 9th Cuirassiers, the 6th Cuirassiers had charged the exposed flank of the unformed British 18th Hussars. The latter dispersed in response.

Another salvo of canister into the square of the 8th Dutch Militia proved too much for the conscripts. They had lost over 50% of their number to the devastating barrages of canister and routed from the field.

Ponsonby lead the Scots Greys into a charge on the unformed 5th Cuirassiers who had blown horses. The weariness of the Scots Greys was all too apparent as they halted mid charge allowing the Cuirassiers to retire unmolested. A disappointing chance for the allies to damage one of the Cuirassiers regiments that had caused so much grief in this sector of the allied line.

An overview of the allied left by the end of this turn.

At the crossroads, Kempt's Brigade were seeking to regain control of the ridge. The 1/28th Line (middle of photo) charged the 1/4th Chasseurs of the Middle Guard. The latter counter-charged and in the ensuing close fought melee, the 28th were pushed back losing 3 casualties leaving the Chasseurs unformed having lost 2.
To the right of this melee, the 1/95th Rifles were still holding the crossroads. They were charged by the 2/4th Chasseurs of the Middle Guard. The 95th held their ground and fired a steady volley into the advancing Guard column inflicting 3 casualties. This was enough to halt the Chasseurs.

To the west of the crossroads the allies had been in a precarious position with Ompteda's KGL Brigade facing annihilation at one stage. Ompteda had other ideas! In a succession of aggressive charges by the 1st and 2nd Light KGL battalions (blue regimental flags in the photo) lead by Ompteda they had thrown the French attack into disarray.
Starting with the 1st KGL Light, they charged the French 2/55th Line who retreated in the face of the charge. The 2nd KGL Light charged the 1/3rd Line who routed! It did not stop there as the 2nd KGL, with bayonets fixed, angled their attack towards the 2/3rd Line. This rapid turnaround in their fortunes was not lost on the 2/3rd who also routed before contact could be made. Even worse for the French, the 1/3rd Line were so shaken by the KGL they failed to rally and dispersed from the field!
As can be seen in the photo, the 2 KGL battalions had cleared the allied ridge of French infantry in this area.
The action to the extreme middle right in the photo involved Kielmansegge's Bremen Field Battalion. They had been charged by the 2/72nd Line of Campy's Brigade. In response they delivered a highly effective volley of musketry killing 4 of the French column. The result being the attack faltered.

Adjacent to the Bremen Field Battalion the 2 battalions of C. Halkett's Brigade (green regimental flags in photo) finally had some respite and managed to reform their lines.

A worrying time for the 3/1st Foot Guards as the Grenadiers a Cheval launched a charge towards them. They failed their formation test to form a square and had to put their faith in a good steady volley to halt them. Uncharacteristically for the Guards, the volley was utterly woeful (a total of 3 thrown). The Grenadiers thundered home utterly annihilating the Guards battalion.
To the right of the Guards, the unformed 4th KGL Line of Du Platt's Brigade faced the same fate. They were charged by the Empress' Dragoons. The 4th KGL were not going down without a fight though throwing a double 6 in melee. It came within 1 of saving them but it was not to be as they were hacked to pieces. They took 3 of the Dragoons with them.

Ramsey and Mercer's batteries continue to pour salvos into advancing French columns with the former still proving to be accurate with their fire although not quite so devastating this time.
To the right of Ramsey, the 1/23rd Line who had formed two sides of a square with the 51st Light, retreated in the face of charges by two French columns.

On the allied right flank, Dornberg charged the 3rd Cuirassiers with the 1st KGL Light Dragoons and the British 23rd Light Dragoons. The latter halted it's charge leaving the 1st KGL lead by Dornberg to deal with the Cuirassiers who had counter-charged. The 1st KGL fought furiously countering the French heavy cavalry. The result was a draw and the melee would continue. The French were outnumbered though and lost 3 casualties to the KGL 2. This situation highlighted a problem with many of the French units who had been in action for some time. They were now almost at the dispersal point of 50% casualties. All the KGL had to do was defeat them in the next round of melee and it would be the demise of the 3rd Cuirassiers.
The overall situation at the end of the turn:

In the previous turn there was a real possibility of the allied right flank collapsing under multiple morale checks. They survived but it was a close call. Here fortunes are reversed with most of Bachelu's Division having to take morale checks. Fortunately for the French most survived with only the 1/3rd Line dispersing.

Overview of the allied right.

And the same flank from the French side. It is apparent here the gradual reduction of the allied right flank as it gradually gives way.

The view across the the ever expanding Prussian 4th Corps.

A closer view across the Prussian position.

The French defensive line against the Prussians.
It is now 6.00pm. Wellington's force is still precarious although it did narrowly escape a collapse in morale west of the crossroads. The French heavy cavalry working in tandem with their infantry and artillery is making life difficult for frontline infantry battalions. Caught between the need to form square against cavalry or line or column versus infantry inevitably leads to some units being caught out. The lack of good quality heavy cavalry to counter the French could lead to the demise of the allies before the Prussians can properly make their presence felt.
Aside from the Prussians, there is a glimmer of hope for the Allies. The French are running short of fresh troops with many battalions having suffered a number of casualties earlier in the day. The infantry and cavalry of the Guard are increasingly being used to try and break the allied resolve.
For the French time is running out. The cavalry on the left flank have suffered significant casualties and they have lost momentum against the allied light cavalry who are more numerous. It is hoped that a fresh drive by the Middle Guard supported by the Heavy Guard Cavalry and a Dragoon Brigade against the teetering Allied line to the west of the crossroads will cause the hoped for collapse.
The same problem is now arising on the French right. Much of the cavalry that had so much earlier success was now exhausted and suffering from casualty loss. The plan will be to renew the attack with the rallied Chasseurs of the Guard. The 6th Corps along with the remnants of Donzelot's 2nd Division and Durutte's 4th Division had formed a defensive line across the whole of the French right flank but it looked pitiful compared to the size of the Prussian forces now arriving.
Total units lost at 6.00pm: French = 39, Allies = 41, Prussians = 3
Epic!
ReplyDeleteDuring the reading, I felt the hour belonged to the French cavalry and hadn't noticed their casualties racking up. That Prussian corner of the table is looking increasingly threatening.
Enjoy your hols.
Thanks Norm. Other than the Imperial Guard, fresh troops are becoming rare on the French side. Not good news for morale checks!
DeleteEnjoy the hols, I still feel the allied thread is about to snap, question is can the Prussians make a real difference
ReplyDeleteThanks Graham. From the allied ridge at the crossroads those Prussians do seem a long way off!
DeleteOutstanding ! once again. Keeping us on the edge of our seats. Whilst hoping you have a wonderful holiday, awaiting your return..... with no little anticipation. A quick question John, you are using GdB rules with mods as detailed. Being inspired by you, I have been investigating and reading everything relevant. Why did you not use General d'Armee instead of GdB ? Same author, same period, but at a higher level, would it not have suited better.
ReplyDeleteMany thanks for your complimentary comments Karl, very much appreciated.
DeleteThe reason why I have stuck with GdB rather than use GdA is a very long story but I will be as brief as possible. Over many years, starting with DBA and DBM when they came out, I have played a good deal of rulesets that have been element based. Many of those described themselves as 'fast play'. All of them had their own merits but for me there was always something missing.
I started out in wargaming with Terry Wise's and Charles Grant's rules followed by WRG in the 1970's. Those original rules left an indelible print on my brain! In comparison most modern rules to me have the feel of boardgames with figures. In simple terms I prefer individual figure removal with a unit representing it's actual strength. So a unit of say 28 figures will be more capable of inflicting casualties on a unit of 20 whether that be shooting or melee. As those units shrink through attrition their capability falls likewise including morale. That is very apparent in my Waterloo.
I know that most modern rules replicate that in an abstract way. To me though moving a single base unit of for example 24 figures (which could represent anything), around a table that looks the same no matter what happens to it until it is suddenly whisked away as lost just does not have the same involved feel.
So when GdA came out I looked at it online, including the videos Dave Brown has done, with some interest. When it gets to the point of "no need for figure removal" that usually means "no need to try" for me. There is also reference to units being 'small', 'medium' and 'large'. Echoes of 'Black Powder' here which I dislike. I have not completely written off GdA as there are some aspects I find intriguing, particularly the ADC command system, but it is extremely unlikely I will ever replace GdB with it.
There is also the point that GdB for me gives me an extremely satisfying game that actually feels like a wargame (or if you like, old school wargame). The command and control mechanism is the only factor I was not keen on and it is that I have replaced. There is therefore little incentive to move to a different ruleset.
I know there will be many if not most other wargamers would disagree with me and the way I play certainly does not lend itself to a club night game (apart from the smaller actions) but we all have our preferences and styles of play and this is mine.
Perhaps a little longer explanation than I intended but hopefully gives you an idea of why I stuck with GdB.
Gorgeous battlefield photography! Adding the volley and cannonade smoke is a worthwhile touch and adds much to impart the atmosphere of battle. Your yellow fields really add punch to look of the battlefield.
ReplyDeleteAs for the battle, itself, the French heavy cavalry are applying their trade well. A few more well-timed charges from these lads and Nosey may be in trouble.
Great job!
Thanks again Jonathan for your comments. Yep the French cavalry are giving Wellington a humdinger of a headache!
DeleteAnother fantastic episode Jon. Enjoy that holiday; you've certainly earned it! The battle situation remains poised on a knife's edge and the French have really done much better than at first seemed possible, but I feel the high water mark has passed. The numbers are the problem. as the French run out of men. We shall see though......
ReplyDeleteMany thanks Bob. With the numbers thing, it really became apparent in later moves when I was launching charges with French columns and then on checking their roster finding most were suffering quite significant casualties making them increasingly brittle. It was almost a revelation finding one that was fresh. As you say it really is on a knife edge at present but Wellington does need Blucher to do his stuff quickly!
DeleteExcellent again, not sure I have ever previously seen so many Prussians! They do seem to be having a little trouble bringing their weight to bear effectively though.
ReplyDeleteNice to see the battle continue into the early evening. Quite often replays abstract the Prussians out by terminating the battle at 4, 5 or 6pm - if Wellington survives til then then the Allies win because the Prussians arrive. Must have a look at GdB rules - I do like the flavour they appear to give...though that may of course simply be a very good write up.
Enjoy your break
Andrew
Thanks Andrew. The Prussians suffered from two early problems. Poor command and control dice stalling the advance of some units and other units faltering under combined musket and canister fire. Good news for the French... so far!
DeleteI am biased in favour of GdB rules so of course I will say they are great. They are a little old school in style and are designed for smaller games than this. If you like fast play simple rules they are probably not for you but if you like a more involved game then you may well like them.
Your Waterloo continues to be an extraordinary treat, Jon. I can see some of the advantages of playing solo for documenting an action like this - you can take your time, and snap your pictures without unsightly clutter. I agree with the smoke adding something to the shots as well. As the rules In play use smoke as marker, we get a similarly nice diorama effect from it.
ReplyDeleteI suspect the French are one to two turns away from running out of gas.
Enjoy your Holiday!
Many thanks Peter. Yes the smoke markers have a dual role. Apart from it adds to the look of the game, for infantry it denotes they have just fired. If they fire two or more turns in succession they receive a negative modifier. Useful as a reminder who has just fired.
DeleteWelcome back Jon, I hope you enjoyed your break and that it was somewhere sunny and warm, you were missed. You definitely missed "nothing" here.
ReplyDeleteThanks Karl. Great holiday, some sun but Norway north of the Arctic circle did not provide much heat! It is spectacular though. I have every confidence that we will have a blisteringly hot summer here in the UK to make up for it!!
DeleteHaving got some real life stuff out of the way on my return I am now cracking on with Waterloo. All being well I should have Part 8 up later today.
Very much looking forward to Part 8 Jon. I, for one, will be bereft when Waterloo comes to its conclusion, it has become quite a part of the day. WWII is another of my favorite periods with Normandy and Narvik being out there in front, table and boardgames. I applaud your hardiness in going that far North so early in the year and glad you enjoyed it, I'm sure as you say that it's stunning. South of France is more my thing lol. I really hope you are right about the Summer here as it's been a lonnnnng cold Winter. Speaking of cold Winters, Russia and 1812 springs to mind lol. Cheers.
ReplyDeleteThanks Karl. I am still getting a hang of this blog milarky so once Waterloo is out of the way I will provide a more comprehensive run down of my collection and plans for the future. 1812 keeps hoving into view as a potential but sadly I do not think I will live long enough to do it justice!
DeleteHopefully you will complete 1812 and if it is as excellent as the present campaign many of us will live with this in our memories. Great work.
DeleteRegards
Peter
Many thanks Peter. Very pleased that you are enjoying the blog.
DeleteOnly seeing this now, apologies for delay in reply. As you referred to, despite my advancing years and considering myself reasonably computer literate, I truly struggle with this blog stuff. I've been posting comments since the day after you arrived back but couldn't manage to get them posted lol. I, for one, would love a greater insight into your collection and how you went about putting on this truly epic panorama for lesser mortals such as myself. I have aspired all my life to what you have done here tho sadly never realised it or indeed even came close, family, children, career etc etc. Retired now, but time as you say is not on our side, tho the 1809 campaign and Wagram, Russia 1812, Dresden and Leipzig still beckon nearly 40 years on ! The one major benefit of this blog stuff is its ability to make widely and openly available what you have done. I would consider you have done a most spectacular job, both in the graphic presentation and the gripping narrative. As a case in point, a long long time ago, Miniature Wargames, I believe, published a two page article on the Battle of Leipzig in 6mm fought over a weekend in the UK with, if I remember correctly, two pictures of the action. Look what you have achieved here ! I no longer have the magazine but somewhere on a hardrive here that article and those two pictures are stored, such was the impact of that undertaking at that time. Massive refights such as that were unheard of at that time except in places like the WHC and 6mm was for WWII only. So, from my perspective, your blog is outstanding and your ability without question. 461 pages, OOB's, pictures and text, saved to a hardrive, testify to it, purely for my personal pleasure and ongoing inspiration. As with the "Garde" lead and I will follow !
ReplyDelete461 pages! Crikey, I did not realise I had done so much. Your comments are really appreciated Karl. As I mentioned I will review my blog on completion of Waterloo to hopefully ensure readers have more info on my wargaming background, collections, plans etc. Starting a blog certainly adds something to my hobby and if others enjoy it then it is a major bonus.
Delete