Showing posts with label WW2 Naval Defend Malay Barrier. Show all posts

Friday, 13 March 2026

Defending the Malay Barrier: Campaign Conclusion


The final objectives chart. Japan just one short of victory in the time allowed.

Objectives translated onto the campaign map.

During the course of the campaign, Victory Points (VP's) were accumulated by each side which will affect the level of victory. I will deal with that next.

Continued -

Sunday, 8 March 2026

Defending the Malay Barrier: Turn 6, 1st - 15th March, 1942. Anglo/Dutch Sweep intercepts WAF Invasion Convoy

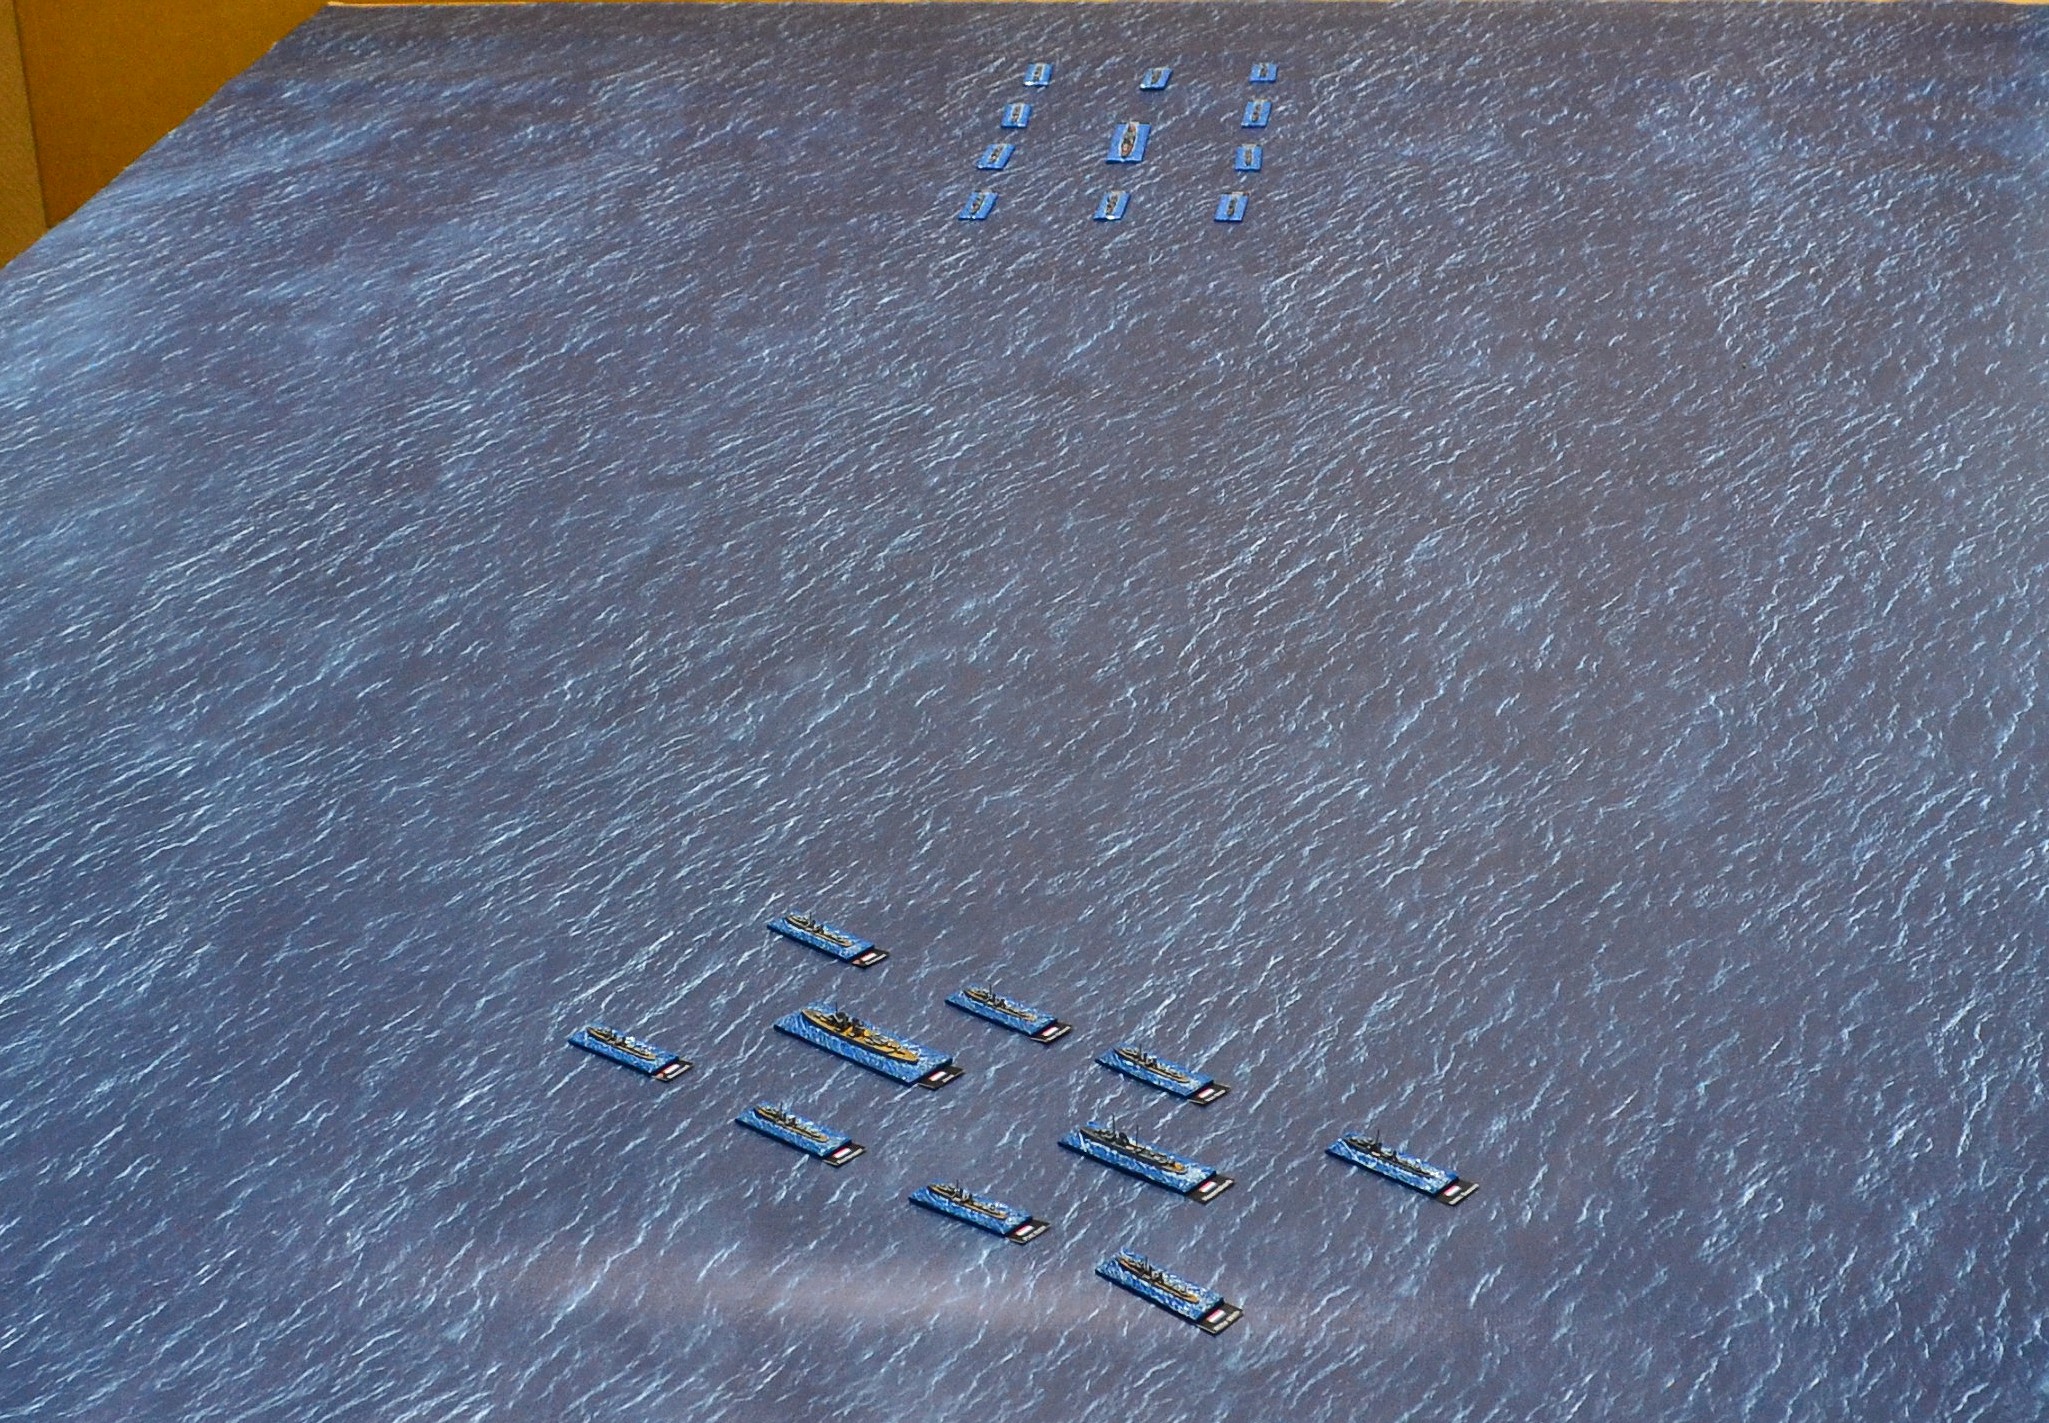
Doorman successfully intercepts the WAF Invasion Convoy heading for Batavia having evaded aircraft and sea patrols. The scene is set for the final surface action of the campaign. 

The weather is a force 5 'Fresh' with squalls. Visibility is a limited 19,000 yards.

The allied CenGroup consists of the Dutch light cruiser Von Heemskerck, destroyers Van Ghent, Piet Hein, Witte de With and Isaac Sweers. They are joined by the Royal Navy 'S' class destroyers, Stronghold, Tenedos and Thanet together with the Australian V&W class destroyer Vampire.

The Japanese escorts for the invasion convoy consists of the heavy cruiser Mogami, light cruiser Sendai, floatplane carriers Kamikawa Maru and Sanyo Maru, and Fubuki class destroyers Hatsuyuki, Fubuki, Shirayuki and Asagiri. 

The convoy transports consist of 2 x large, 8 x medium and 2 x small transports. The invasion is cancelled if they lose at least 4 transports.

Overview at the start with CenGroup in the foreground heading north west. The WAF convoy in the distance is heading due east. For the purpose of this game due north is to the right. A single rain squall is being pushed north by a 20 knot southerly wind.

Continued -

Wednesday, 18 February 2026

Defending the Malay Barrier: Turn 6, 1st - 15th March, 1942. Japanese Patrol intercepts US Sweep

 The rules used throughout the campaign is General Quarters 3 (GQ3).

The remnants of the Japanese Distant Cover Group newly transferred from the WAF, mount a patrol tasked with intercepting any allied forces attempting to attack one of the invasion convoys. Despite the poor weather, a Force 7 near gale with visibility limited to 19,000 yards, they spot the allied East Group steaming north.

The small Japanese force consisting of the heavy cruiser Atago and destroyers Oshio and Ikazuchi, move to intercept the allies.

East Group lead by the light cruisers USS Boise and HMNZS Leander escorted by 8 Clemson class destroyers, Stewart, Edwards, Alden, Whipple, John D Ford, Pope, Peary and Pilsbury, are steaming north when they spot enemy ships approaching from the north west.

The poor weather will adversely affect the accuracy of gunnery and torpedoes and speed is limited to 25 knots on both sides.

The first sighting of the enemy!

Continued -

Saturday, 14 February 2026

Defending the Malay Barrier: Turn 6, 1st - 15th March, 1942


The start of turn 6 with just a handful of objectives remaining for the Japanese.

The Java targets will be critical and being large convoys will need a good deal of escorts. The Japanese of course must still capture Timor and Bali.

Continued -

Sunday, 8 February 2026

Defending the Malay Barrier: Turn 5, 15th - 28th February, 1942


The situation at the start of turn 5. The most notable development being the fall of Singapore. 2 RN destroyers in drydock were destroyed with the remaining 4 having sailed to join the Dutch in Batavia. The objectives circled have been captured by the Japanese.

The Japanese must capture all objectives before the end of turn 6 to claim victory. The margin of that victory will be determined by the number of victory points (VP's) gained by each side. This will prove to be very tight indeed with the EAF in particular having no leeway for failure.

Continued -

Sunday, 6 April 2025

Defending the Malay Barrier: End of Turn 4, 1st - 14th February, 1942.


A summary of movements and actions at the end of turn 4.

The final possible actions at the end of the turn are the possibility of air attacks on crippled and disabled ships.

3 attacks are launched. WAF and EAF Land Based Air and a Carrier based attack from Ryojo.

Only the WAF are successful in locating their target, and not a particularly impressive one at that! The crippled Dutch destroyer Kortenaer escorted by another destroyer, Van Nes, are attacked by bombers. Aircraft availability proved to be poor with only 8 x Nell and 3 x Betty bombers available for the strike using medium bombs on a high level bombing run.

4 x bombers targeted the lead vessel, Van Nes, with 7 on the Kortenaer.
Continued - 

Sunday, 30 March 2025

Defending the Malay Barrier: Turn 4, 1st - 14th February, 1942. EastGroup intercepts Jintsu Convoy

Turning now to the final surface v surface action on turn 4, the US EastGroup reinforced by two New Zealand light cruisers successfully intercepts a very small Japanese invasion convoy heading for Banjermasin in Borneo. 

EastGroup had come through an air attack unscathed and now had a chance to interrupt Japanese invasion plans.
EastGroup consisted of 1 x heavy cruiser, 2 x light cruisers and 8 destroyers. The Jintsu convoy had 1 x elderly light cruiser and 4 destroyers escorting 1 x troop ship.

The Japanese convoy under the command of a veteran Admiral Tanaka on the flagship Jintsu.

EastGroup under the command of Admiral Glassford on the Boise.

Continued -

Monday, 17 March 2025

Defending the Malay Barrier: Turn 4, 1st - 14th February, 1942. EAF Japanese Patrol intercepts Australian Sweep

Turning now to the east, the Australian Darwin group escaped unscathed from a torpedo bomber attack and now make a dash for an invasion convoy heading for Kendari. Enroute they are intercepted by the Japanese EAF patrol.


This will be yet another night time engagement. The Australians are in line astern with the Australia leading heading due north. The Japanese patrol is approaching from the west at a distance of 15,000 yards (75cm) being the maximum visibility at present.

The weather is a very calm force 2 with clear skies. A new moon limits visibility.

Continued -

Monday, 3 March 2025

Defending the Malay Barrier: Turn 4, 1st - 14th February, 1942. Japanese Patrol intercepts Dutch Sweep

Focussing on the Dutch CenGroup, their flagship has pulled out due to damage sustained in a bombing attack. The flag has been transferred to the light cruiser Java and the group has continued north with the intention of disrupting a Japanese convoy headed for the Malay peninsular.

Before they have any chance of engaging the convoy, they in turn are intercepted by the Japanese Distant Cover Group under the command of Admiral Kondo in the heavy cruiser Atago. 

Nearest the camera are the Dutch consisting of 2 light cruisers and 8 destroyers sailing north west. At the top of the photo is the Atago group consisting of 1 heavy cruiser and 10 destroyers approaching from the north.

The action starts during the 0400 - 0800 watch and therefore during the dark hours at this stage. No ships have yet been spotted by either side. After 10 turns dawn will break.

Neither side has the benefit of radar.

Continued -

Monday, 17 February 2025

Defending the Malay Barrier: Turn 4, 1st - 14th February, 1942

A reminder of the situation at the end of turn 3. Japanese objectives captured are circled.
WAF has completed 2 tiers and the EAF 1.


Continued -

Tuesday, 11 February 2025

Defending the Malay Barrier: Turn 3, 16th - 31st January 1942


A reminder of the situation at the end of turn 2 with objectives captured by the Japanese circled.

For this turn it will be a priority for the Japanese to complete tier 2.

Continued -

Sunday, 2 February 2025

Defending the Malay Barrier: End of Turn 2, 1st - 15th January 1942

The final actions of campaign turn 2 are potential air attacks on crippled or disabled ships underway for repair.

The first phase is a carrier strike group from the Ryojo attempting and failing to locate the crippled Houston and its destroyer escort.

The final phase are the Land Based Aircraft attempts. The WAF fail to locate the crippled HMS Dragon in poor weather. The EAF however, are blessed with clear skies and good weather and do find HMAS Canberra escorted by HMAS Hobart.

I used the Campaign Air Ops in GQ3 rather than Tactical Air Ops to speed things along.  

The first attacking wave consisted of 9 flights of 'Nell' bombers. 4 targeted Hobart and 5 Canberra. Medium bombs were dropped keeping the aircraft out of short range AA fire. Neither Australian ship scored any hits using their long range AA armament only.

The Canberra was faced with a heart-stopping moment with a near miss. They only had one hull box left and the near miss reduced that to a half!


The second Japanese wave consisted of 7 flights of 'Betty' bombers. 2 targeted the Hobart and 5 Canberra. On this occasion the Australian AA fire proved far more accurate. Hobart damaged one bomber and Canberra shot one down. 

As the medium bombs rained down Canberra held its breath. Even a near miss would sink her. Fortune favoured the Australians with all bombs falling wide. This signalled the end of turn 2.

Continued -

Wednesday, 29 January 2025

Defending the Malay Barrier: Turn 2, 1st - 15th January 1942, Allied Forces intercept Japanese Convoys.

Two allied naval groups have succeeded in thwarting any Japanese attempts to prevent them intercepting convoys.

EASGROUP v JINTSU CONVOY

EastGroup (USN) having defeated the Nachi patrol now approach the Jintsu invasion convoy. The USN flag is transferred to the cruiser Boise who leads 7 Clemson class destroyers north. 3 of those destroyers have sustained hull damage limiting their speed to 30 knots. 

Success! The Japanese convoy is contacted by the American sweep. 8 merchant ships/transports escorted by the cruiser Jintsu and 2 Kagero class destroyers make up the convoy.


The USN Boise Steaming north leading the destroyers in line astern. It is now nighttime.

In the foreground, the Boise sights a Japanese ship heading directly towards them from the east at a distance of 20,000 yards (100cm).

Continued -

Friday, 19 April 2024

Defending the Malay Barrier: Turn 2, 1st - 15th January 1942, Japanese EAF Patrol v EasGroup (USN) Sweep

The second Japanese patrol was also successful intercepting the USN EasGroup which is the subject of the next game.

The heavy cruiser Nachi with 4 Shiratsuyu class destroyers are on a reciprocal course with the US sweep which it sights at a distance of 23,000 yards (115cm). The US force consists of the cruisers Houston and Boise escorted by 9 Clemson class 4-stacker destroyers.

An overview at the start.
Continued -

Wednesday, 17 April 2024

Defending the Malay Barrier: Turn 2, 1st - 15th January 1942, Japanese WAF Patrol v WesGroup Sweep

In this phase the Japanese have sent out two patrols with the intention of intervening any allied sweeps before they interfere with any invasion or supply convoys.

The first action sees WesGroup out of Singapore intercepted by the WAF patrol:

HMS Exeter continues its northerly route having lost HMS Dragon crippled by an air attack and now returning to Singapore. The remaining two 'D' class light cruisers and 7 destroyers plough through the force 7 sea state with reduced visibility.

Continued -

Wednesday, 3 April 2024

Defending the Malay Barrier: Turn 2, 1st - 15th January 1942, LBA Attacks

Two Japanese Land Based Air attacks were launched. One each from the Western Attack Force and the Eastern Attack Force.

Turning first to the WAF:

A force of Betty and Nell bombers, equipped with medium bombs and escorted by Zero fighters, successfully located the Royal Navy WestGroup who had been heading north to target the Malayan bound supply convoys.

The 4 British cruisers were in line astern lead by the Danae, followed by the flagship Exeter, Durban and Dragon. The cruisers were escorted by 7 destroyers.

9 flights of Nell bombers are in the first wave. One was damaged by AA fire with the remaining 8 dropping their payloads. 

Continued - 

Saturday, 16 March 2024

Defending the Malay Barrier: Turn 2, 1st - 15th January 1942


The Japanese Eastern Attack Force are now operating out of Davao allowing them to ramp up operations. The allies have yet to form ABDACOM and are operating individually.

In an attempt to disrupt the Japanese, the Royal Navy operate out of Singapore, the Dutch out of Batavia, the USN out of Surabaya, and the Australians from Darwin. The map shows the planned movements including Japanese supply convoys, invasion fleets and naval patrols.

The weather is good with clear skies and clear visibility. A carrier air strike from the Ryojo takes advantage of the good conditions successfully locating the Dutch to the west of Borneo. 

Cengroup under Admiral Doorman in his flagship, the De Ruyter, leads a sweep towards the north of Borneo sights aircraft approaching from the north east. The first action of turn 2 begins.

Continued - 

Monday, 4 March 2024

Defending the Malay Barrier: An update

Currently reading a book covering the naval aspects of the invasion of Norway in 1940 had inspired me to continue with my naval campaign. 

On reviewing my posts so far I noticed a glaring omission. They could really have benefitted from maps. 

Maps have now been added with the map supplied in the scenario book used as the base. Ship movements are my additions reflecting events within the campaign.

A couple of the maps are included here providing a brief summary of movements and actions so far.

Force Z sortie during turn 0.

Turn 1. The only contact occurred when a sweep conducted by the USN lead by the aging cruiser 'Marblehead' was intercepted by an IJN patrol. The end result was not pretty for the USN.
For more detail click on the appropriate label on the right.

I will shortly be posting details of turn 2 including maps!

In the meantime orders have been placed with Navwar and Davco. The painting table is now adorned with ships in the process of being painted.


Saturday, 20 May 2023

Defending the Malay Barrier: Turn 1, 16th - 31st December 1941, Hunt for the Convoy

Rear Admiral Arthur Palliser commanding the WESGROUP sweep breathes a sigh of relief having successfully evaded any Japanese patrols. It was now important to locate the Batu Kharu supply convoy to buy the allies time. His flagship, the heavy cruiser Exeter, with the light cruisers Dragon and Durban, the destroyers, Encounter, Jupiter, Scout and Tenedos, heads north straight into a force 8 gale. 

Visibility was heavily reduced and WESGROUP searched in vain. Unable to locate the convoy they head for home in Singapore.

Summary of all movements at the end of turn 1.

Several damaged Japanese ships are drydocked for repair bringing turn 1 to an end.

There will be a delay before I return to this campaign having switched to another era, the Roman invasion of Britain  which will be the subject of the next posting.

Thursday, 4 May 2023

Defending the Malay Barrier: Turn 1, 16th - 31st December 1941, 1st Contact

 IJN Western Attack Force (WAF) - Allied WESGROUP (RN)

Rear Admiral Arthur Palliser commands the WESGROUP sweep intending to intercept the Batu Kharu supply convoy. His flagship is the heavy cruiser Exeter, with the light cruisers Dragon and Durban, the destroyers, Encounter, Jupiter, Scout and Tenedos sailing out of Singapore. Intelligence has been received from a sub reporting a sighting of what is believed to be this convoy. It has been confirmed this intelligence has been deemed accurate and therefore increasing the possibility of interception.

The weather is a rough Force 7 and overcast reducing visibility. As the fleet heads north Japanese land-based aircraft sortie to intercept but failed to locate them.

The wind drops to a Force 5 and still cloudy. Palliser curses the weather improvement raising the prospect of his force being located by the Japanese Distant Cover Group patrol. He need not have worried. The veteran Vice Admiral Ozawa was demanding answers from his lookouts as to why they failed to spot the Royal Navy ships. It was now just a question of locating the supply convoy.

IJN Eastern Attack Force (EAF) - Allied EASGROUP (US)

Rear Admiral William Glassford in the aging light cruiser, Marblehead, prepares to lead out his similarly aging flotilla of destroyers. Each has to test to ascertain if any have mechanical problems. As they slip their moorings, the Paul Jones announces it has engine damage. It could continue but its speed would be reduced. Believing it would be more of a hindrance than an asset, it was decided it would remain alongside for repairs.

Heading out of Tarakan in Borneo, Glassford's force is now reduced to 4 Clemson class destroyers, the Stewart, Parrott, Barker and Bulmer. They hope to intercept one of the Philippines invasion convoys. The weather is a relatively calm force 4 and cloudy allowing for carrier born air operations. The IJN light carrier, Ryojo, launches its aircraft but they fail to make contact with the US group.

As the Marblehead and its escorts continue the wind speed drops to a Force 2 and the skies clear. Not exactly what Glassford was hoping for with a Japanese patrol lurking out there somewhere. Sure enough, the EAF Distant Cover Group made contact during daylight 0800 - 1200. 


Contact was made at a distance of 23,000 yards (115cm). Both forces steaming at 25 knots with the Marblehead heading north-west and the Japanese south-east. The Japanese are located 4 points off Marblehead's quarter. 
Continued -