My N.Africa campaign continues.
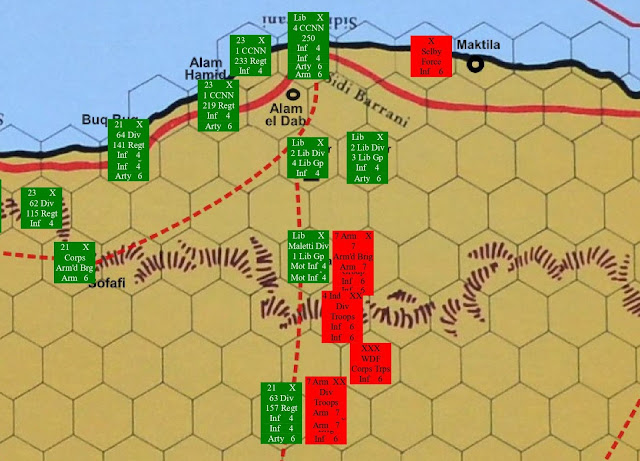
A reminder of the situation:
 |
It is now 11th December 1940 and the Italian advance has halted with most of their units settling down into fortified camps. |
The British counter-attack has begun and the setting for this action is in the south of the map. The 7th Armoured Division has begin its 'left hook' and comes into contact with the Italian 63rd Cirene Division south of Nibeiwa.
Continued -
I am departing from the Blitzkrieg Commander rules for this game having listened to a recent interview of Colin Rumford and Richard Marsh on the WSS podcast. It has rekindled my interest in Rapid Fire, or more precisely, the new Rapid Fire Reloaded rules.
I played the first version of Rapid Fire when they were published in 1994 and were my go-to set for the next 15 years or so using 15mm figures. These updated rules look interesting so I will see how they work with 6mm figures and if viable for the future.
Distances are changed to cms from inches. I have continued with BKC figure and vehicle ratios which provide for larger formations than RFR which I feel works better in 6mm. So a typical infantry company will be 12 figures rather than the average 8 in RFR. Vehicle ratios in BKC are 1: 3 or 4 and 1:5 in RFR. Therefore slightly more tanks etc.
The game will be played on a 6' x 3'9" table. In this game the Italians have set up camp around a small settlement and a nearby oasis. They have yet to fully fortify it with only basic scrapes and berms dug.
Orders of Battle
British
(Air Superiority)
7th Armoured Division
Division CO and accompanying OP.
Divisional Troops:
11th Hussars Armoured Car Regt
Regt HQ - Morris light recce car
1st Squadron - 1 x Morris A9, 1 x Rolls Royce, 1x Universal Carrier
2 squadrons each - 1 x Morris A9, 2 x Rolls Royce
3rd RHA
CO with 15cwt truck
2 x 2pdr Portees
106th RHA
CO with 15cwt truck
3 x 40mm AA guns and tows
4th Armoured Brigade
HQ - 1 x A13 tanks
HQ squadron - 1 x MkVIB tank
7th Hussars
HQ - 1 x MkVIB
A Squadron - 1 x A9 tank, 1 x MkVIB
B and C Squadrons - 2 x MkVIB each
2nd RTR
HQ - 1 x A13 tank, 1 x A9CS tank
A Squadron - 3 x A13
B Squadron (3rd Hussars) - 3 x MhVIB
C Squadron - 3 x A10 tanks
6th RTR
HQ - 1 x MkVIB
A - C Squadrons - 1 x A9, 1 x MkVIB each
11th Indian Infantry Brigade
HQ - CO with truck
AT coy - 1 x AT platoon with carrier
2nd Queens Own Cameron Highlanders
Bn HQ with truck
A - D Coys - each 12 figures with integrated AT rifles
Transport - 8 x trucks
Support Coy - 1 x MMG, 1 x 3" Mortar & 2 x carriers
1/6th Rajputana Rifles
Bn HQ with truck
A - D Coys - each 12 figures with integrated AT rifles
Transport - 8 x trucks
Support Coy - 1 x MMG, 1 x 3" Mortar & 2 x carriers
4/7th Rajput Infantry Battalion
Bn HQ with truck
A - D Coys - each 12 figures with integrated AT rifles
Transport - 8 x trucks
Support Coy - 1 x MMG, 1 x 3" Mortar & 2 x carriers
Italian
21st Corps - 63rd Cirene Infantry Division (part)
Division HQ
CO with truck and radio truck
1st Libyan AT coy - 2 x 47L32 AT guns and tows
Bersaglieri m/c coy - 9 x motor cyles, 1 x m/c MMG
157th Infantry Regt
HQ
CO with car
Infantry gun battery - 1 x 65L17 IG with tow
Mortar coy - 3 x 81mm mortars
3 x Infantry battalions each:
HQ CO
3 x infantry companies each - 12 figures. 1 coy with AT rifle
Weapons coy - 2 x MMG, 1 x 45mm mortar
45th Artillery Regt (part)
Regt CO with car
2 x light AA batteries each - 2 x 20mm AA guns with tows
Howitzer battalion
HQ CO and OP with trucks
3 x batteries each - 1 x 100mm howitzer and tow
Light Gun battalion
HQ and truck
3 x batteries each - 1 x 75mm field gun and tow
 |
| The Italian unfinished camp. 2 infantry battalions are guarding the perimeter, split east and west, with the 3rd battalion in reserve in and around the centre. |
 |
| The reserve battalion location with the dug in 100mm guns. |
 |
| The Bersaglieri motor cycle company enjoy a ride in the sun. The Italian divisional CO is located within the settlement. |
 |
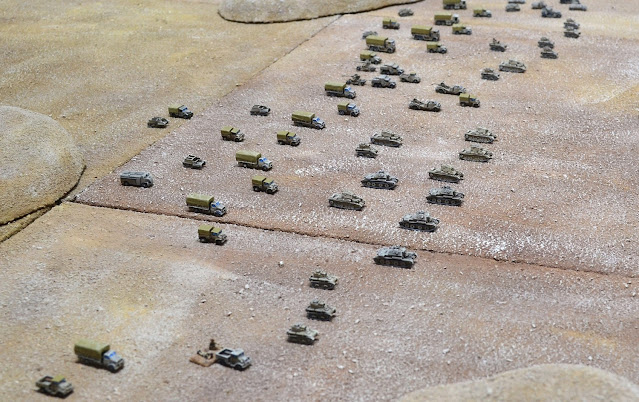
| Approaching from the east, the 7th Armoured Division spreads out across the desert. |
 |
| The British infantry debus as the Italians begin to open fire. |
 |
| First blood to the Italians. A 75mm field gun (lower middle of photo) scores a hit on a A10 tank which brews up. The Italian OP relays targets to the 100mm batteries who fail to hit anything. |
 |
| The 11th Hussars armoured car regiment are tasked with screening the British flanks. Here they engage the Italian right flank as the 1/6th Rajputana Rifles make their approach. |
 |
| In the centre another tank is damaged but in return the 75mm field gun is destroyed from concentrated fire. |
 |
| On the opposite flank the 11th Hussars engage the Italian left screening the 4/7th Rajput infantry battalion. |
 |
| Lack of cover leaves the Highlanders in the centre of the atack vulnerable. Their only protection is to seek cover from the advancing armour are go prone. |
 |
| An overview as the British close in on the Italian defenders. |
 |
| The Highlanders suffer heavy losses on their approach towards the centre of Italian defences but pour lethal fire into the defenders either killing them or forcing them back from their positions. |
 |
| It is now obvious to the Italians that there is no threat to their eastern perimeter and therefore, the battalion holding the position has been ordered to reinforce the west. |
 |
| The Italians hastily form another defensive line but their only protection is lying prone. |
 |
| The end finally arrives for the Italians as both infantry battalions fail their tests and surrender. |
 |
| The final scene as the remaining Italian units know that it is futile to continue and surrender to the British. |
Rapid Fire Reloaded really was as claimed, simple. I found myself after a few moves rarely having to refer to any chart and was able to purely concentrate on the action. That is undoubtedly a positive with these rules allowing the game to flow. The price of that simplicity though is units, armour etc. trends towards the generic. Yes there are allowances for armour and troop quality just fewer.
Overall, a good fun ruleset especially if you like the full fat Rapid Fire rules but unlikely it will displace my preference of BKC.
I shall be suspending this campaign for now due to available time.


Great looking game and interesting report Jon.
ReplyDeleteMany thanks Ben
DeleteExcellent looking game Jon. I am very interested in your play of the RFR rules with the 6mm and larger unit sizes. I use RF / RFR for 20mm games and have traditionally used another set of rules for 6mm. I assume you treated a physical (on the table) tank as 1 tank in the RFR rules and the same for the infantry so fired with 12 figs in a company instead of typical 8? Thanks Richard
ReplyDeleteThat's correct Richard. If I use RFR again I may simply go with the RF orbats i.e. 8 figs to a company etc.
DeleteThe photo "Approaching from the east, the 7th Armoured Division spreads out across the desert" looks great. I was also interested in your views on RFR, given they're so cheap I think i will have to get a copy to explore for myself.
ReplyDeleteThey are well worth a look Rob. They remind me a little of my earliest days of wargaming using rules by Terry Wise.
DeleteWhat a great game there Jon, with 6mm really showing why it's so perfect for big games and especially the Western Desert. Lovely AAR too and the Italian artillery seemed to play there part well as they did historically, dying with their guns IIRC. I've pondered getting RFR, but I'm so comfortable with BKCII that it just ticks all the boxes for me.
ReplyDeleteMany thanks Steve. I have had a fresh look at BKCII and will in all probability give it an outing in my next WW2 game.
DeleteLooks great, very much something I would like to have a go at myself. For this scale of game, why do you prefer BKC (as against RF, Spearhead, Command Decision etc.)? This is a very beginner's question, I don't have much familiarity with this size of battle.
ReplyDeleteIt is very much down to personal taste. There is nothing wrong with the rules you mention but for 6mm in particular, BKC works very well (it was designed for 10mm but any scale can be used). I would recommend searching Youtube for reviews and walkthroughs of various rulesets to ascertain what appeals.
Delete