With Operation Compass underway, the first Italian camp to be attacked was Nibeiwa on 9th December 1940.
At 0300 hours, the 4th/7th Rajput Regiment commenced a feint attack on the strong eastern defences of the Italian position, the opening move in the operation. I will play the main attack made later.
The British had discovered that the camp at Nibeiwa had all its defences facing east and in aerial recon photos there were vehicle tracks clearly visible showing a gap in the minefield to the west. This will be exploited by the 7th RTR supported by the 2nd Bn Rifle Brigade.
Simultaneously, an attack by the 1st Royal Fusiliers on the opposite side of the camp.
The Battle of Nibeiwa
9th December 1940
British v Italian
Scale = 6mm (GHQ, CinC and Heroics & Ros)
Table Size = 4'6" x 3'9"
Rules = Blitzkrieg Commander 2
ORBATS:
British
Royal Fusiliers
1 x CO (8) with Dorchester ACV
A Company
1 x HQ (8) & truck
9 x regular infantry (one with anti-tank rifle) with carriers and trucks
B Company
1 x HQ(8) & Truck
9 x regular infantry (one with anti-tank rifle) with carriers and trucks
Bn Support
1 x 3" mortar & carrier
1 x Vickers MG & carrier
Kiwi Transport Drivers
2 x veteran infantry
Artillery Support (off table)
1 x FAO (7)
3 x 25pdr Field Guns
7th Royal Tank Regt
1 x HQ (8) Matilda Tank
5 x Matilda tanks
Bren Carrier Command (2nd Rifle Brigade)
A Company
1 x HQ (8) & truck
9 x Veteran infantry (one with anti-tank rifle) with carriers and trucks
B Company
1 x HQ(8) & Truck
9 x Veteran infantry (one with anti-tank rifle) with carriers and trucks
Italian
North Command
1 x CO (8) Camp Commander
Company of Infantry in command of CO
9 x Conscript Infantry (one regular unit with anti tank rifle)
1 x Breda MG
1 x 37mm anti-tank gun
Company of Infantry
1 x HQ (7)
9 x Conscript Infantry (one regular unit with anti tank rifle)
1 x Breda MG
1 x 37mm anti-tank gun
Artillery Support Unit with tows
2 x 75mm guns
Reserve Light Tank Company
5 x L33 light tanks
East Command
Company of Infantry
1 x HQ (7)
9 x Conscript Infantry (one regular unit with anti tank rifle)
1 x Breda MG
1 x 37mm anti-tank gun
Company of Infantry
1 x HQ (7)
9 x Conscript Infantry
1 x Breda MG
1 x 65mm IG Portee
Reserve Medium Tank Company
5 x M13/40 medium tanks.
Continued -


2 views of the camp at Nibeiwa. The Italians were resting following the initial attack by the 4th/7th Rajput Regt.

The Italian tanks were parked up and unoccupied at the start of the game. Here the L33's.

And the M13/40's.


More troops of the North Command, some at rest and others mounting a lookout.

The tent lines of the Eastern Command with its commander.

Two 75mm artillery guns are sighted across the expanse of land to the south which include several wadis.

More troops of the Eastern Command at rest.

A stone wall runs around the camp perimeter which is manned at various points. Having seen off the earlier attack, the Italians are confident that their multi-layered defences will hold off any further attempts on their position.


2 companies of the 1st Royal Fusiliers transported by the 4th New Zealand reserve Motor Transport Company who have orders to get them as close to the camp as possible, move across the desert to their deployment points.
The story goes that when they reached their drop off location, the Kiwi drivers grabbed their rifles and with a yell of "come on you Pommy bastards" charged the Italians. In this scenario they will be represented by 2 stands of infantry and although rated as veteran, they will receive the Elite factor for close assault.
Turn 1:
 The British FAO quickly makes his way onto high ground and calls for smoke from the off-table battery of 25pdrs to screen the advance of the Royal Fusiliers.


 2 of the 4 Italian companies fail to activate. Here the Eastern Command designated to hold the south east of the perimeter is more successful. They rush to take up their positions behind the stone wall. The 65mm Infantry gun portee positions itself ready to open fire as soon as the smoke clears.
 A Northern Command company tasked with defending the south wall also activates. They rush to the south wall looking out across an empty landscape expecting to see British troops appear any minute!


 The Italians are completely taken by surprise as the 7th RTR barrels (slowly) along the north access road to the camp. They are immediately followed by the 2 companies of Rifle Brigade. The Matildas waste no time in attacking the closest Italian units. Here one engages an Italian infantry section in a close assault completely destroying it.


 The 2 companies of Royal Fusiliers with the berserker Kiwi sections in the lead, advance to the wire ready to cross and engage the Italians.


 The order is given to charge, and the Royal Fusiliers stumble through the wire and launch themselves at the defenders.
 At the sparsely defended northern section the Royal Fusiliers break through destroying the defending Italians.


Turn 1:


The Fusiliers quickly advance as the smoke rounds land on target.

The 3" mortar takes advantage of the cover and deploys in sand dunes.

As the smoke rounds land the Italians begin to respond.


The Camp Commander failed to activate his own company who mill about wondering what on earth is going on.
Turn 2:

Turn 2 begins with another smoke barrage called in by the British FAO.

Taking advantage of the smoke screen the Royal Fusiliers debus.

The barrage was not quite on target leaving part of Royal Fusiliers A company exposed. Only 2 Italian sections were available to fire in their initiative turn which made little impact.


Two Matildas head towards the L33 park close assaulting a defending Italian section, and again destroys it.

B company of the Rifle Brigade charge towards the camp centre and debus. The Italian conscripts are unable to launch close assaults in their initiative phase and merely fire ineffectively.

The Italian turn does not begin well with several command failures. Here one of the Eastern Command companies suffers a command blunder and as a result, several sections head towards the direction of the 7th RTR leaving the camp perimeter sparsely guarded.
Turn 3:


The Italians opportunity fire suppressing a couple of sections.

At least one of the Italian companies managed to more or less get into position to defend the wall.


The rest of the Royal Fusiliers sector is a disaster with them comprehensively repulsed losing many casualties as the Italians tenaciously defended the wall. Only one section defeated the Italians but they were unable to consolidate their advantage due to the close proximity of other enemy units.
During their initiative phase the Matildas open fire on the L33 park destroying one of their tanks. The Italian tank crews were not in their tanks at the start of the game and only now were firing up their armour to try and take on the heavily armoured British tanks.
To the middle right of the photo, the company of Rifle Brigade engaged in very bloody close assaults destroying many Italian infantry sections but not without loss themselves.
 It is now the Italian turn. With the tank crews safely firing up their L33's, they make a dash for it. The 2 Matildas use opportunity fire to take out one as they exit their camp.

 The M13/40's roar out of their camp overrunning a section of Rifle Brigade troops. They take up position ready to take on the Matildas!
 The North command company tasked with defending the perimeter turn about and take up position by whatever over they can find. In this case the reverse side of their dugouts.

 B company of the Royal Fusiliers desperately attempts to hold onto its position until reinforcements arrive. One section comes under intense fire from 3 Italian sections and is suppressed.
Turn 4:
 The company of Matildas are determined to take out the Italian armour but having got themselves into a good position they fail their command test!

 To reinforce the breach in the Italian line, 3 bren carriers drive their way through the wire fence opening a gap through which the rest of B company rush towards their hard pressed mates.
 While several sections of A company of the Royal Fusiliers give covering fire, 3 sections rush to an undefended section of the perimeter wall.

 The company of Matildas are in for a shock when one of their number comes under intense fire from 3 M13/40's and a 37mm anti-tank gun, the latter firing two shots being activated twice. With shells raining down on it they finally breach the tough armour and destroy a lead Matilda.


 2 bren carriers from A company of Fusiliers breach the wire fence. To the right the 3 infantry sections begin their assault. They successfully destroy an Italian section but one British section rashly charges a Breda machine gun position and gets mown down in the process!


 The surviving 2 L33's join the perimeter company who again fire at the British section in the building but not so effective this time. They are still suppressed though.
 An overview of the M13/40's as they pour two rounds of fire each into another Matilda which brews up in the process!


The other 3 safely make it out but find themselves in the thick of it.


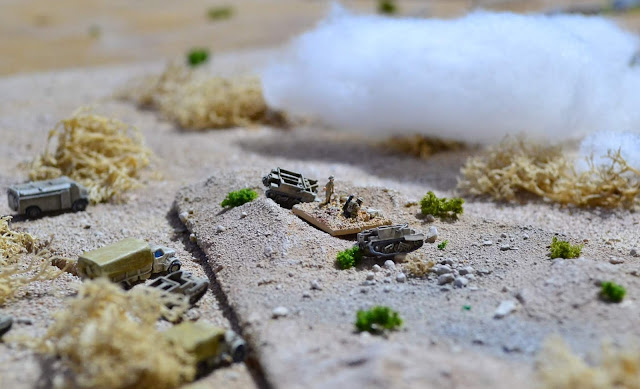
An Italian section equipped with an anti-tank rifle (middle distance slightly out of focus) opens up on the lead Bren gun carrier successfully suppressing it.

Turn 4:


A company of the Rifle Brigade debus but achieve little else.


A closer view.


Having received fire from a Rifle Brigade section in a stone building, most of the Italian northern perimeter company let fly at them with everything they had got. The hapless rifles survive, but only just. They received 5 hits and were suppressed. One more and they would have been destroyed.
Turn 5:

The Matildas exact partial revenge, firing into the side of the retreating L33's, one is destroyed and another receives a hit.


'B' company crosses the wall and prepares to hit a suppressed Italian section in the flank.

Only to fail the command roll!

2 Matildas open fire on a sole M13/40 and manage to suppress it with 2 hits. Their 2pdr guns are proving to be less than inspiring!


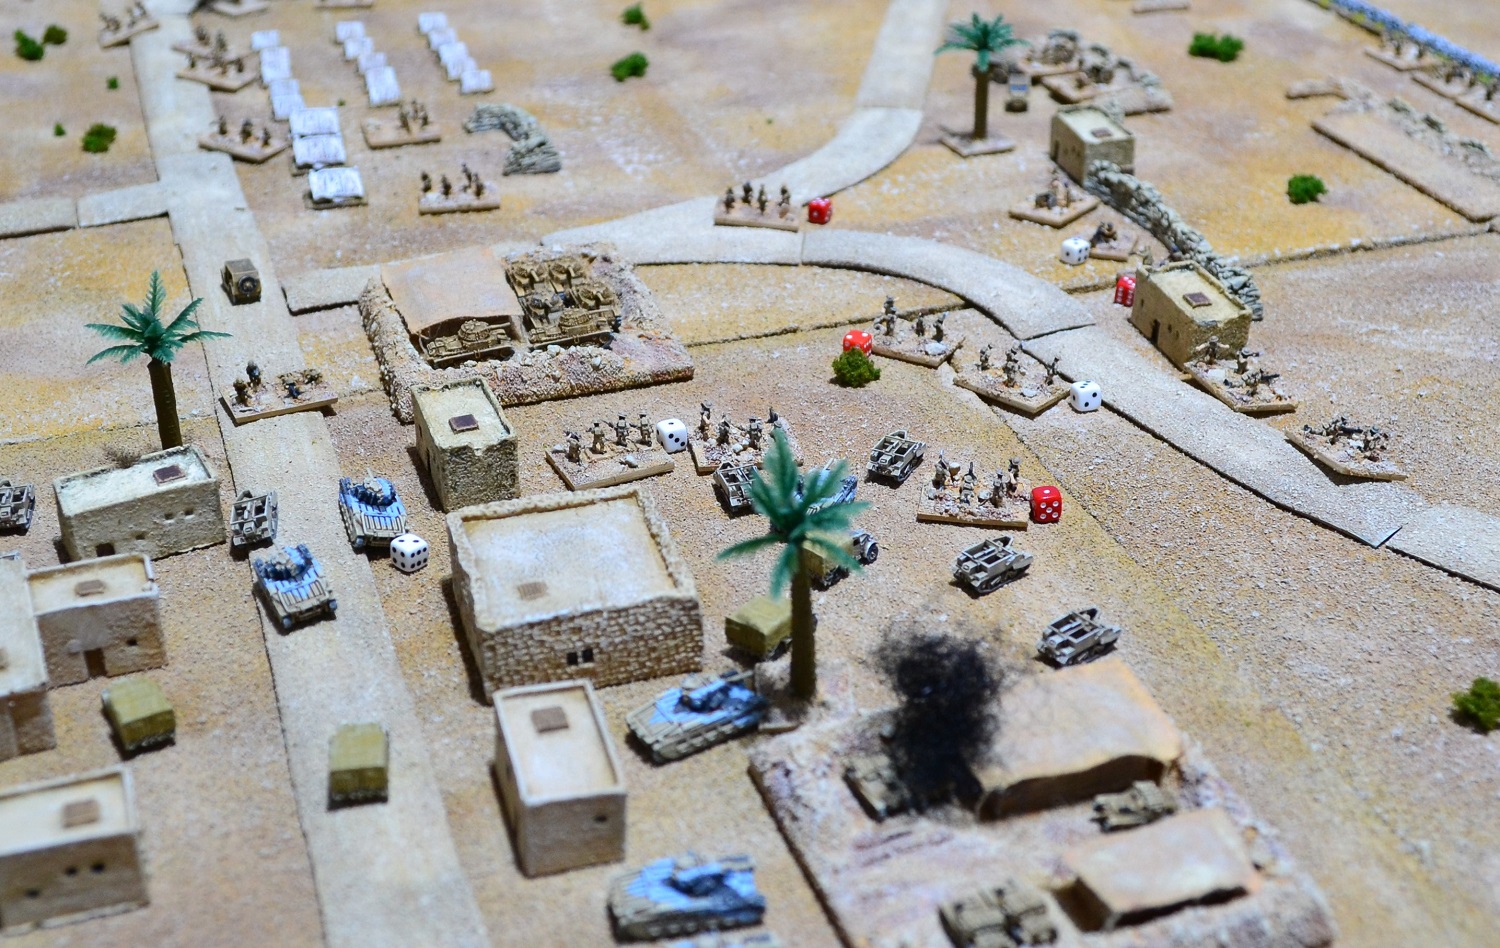
An overview at the end of turn 5. Command failures have delayed the advance of 'A' company of the Rifles (top right) and as a result the British advance at this stage is very disappointing. They were unable to exploit the earlier chaos of the Italians who have gradually been able to form effective defensive lines. The Italians are still vulnerable though, especially if 'A' company of the Rifles can get moving.
Turn 6:
 This turn sees a dramatic turn of events at the east perimeter. 'B' Company defeats a section of Italians by the perimeter leaving the way open for it to attack the Italians that have been holding off 'A' Company. Here, 2 sections of 'B' Company charge into the flank of an Italian section destroying it.
 While severals sections of 'A' Company give covering fire, two sections charge and destroy a section of Italian conscripts (middle right) leaving the way open to advance towards the centre of the Italian company.
 'A' Company's HQ fails its command roll so the CO takes over and rolls a double '1'! 'A' Company will get 2 actions instead of one which proves devastating for the Italians. Two more sections leap over the wall and join in the attack. In the middle the Kiwi transport drivers hurl themselves through the gap in the wall into the rear of an Italian section destroying it outright.
 One after another Italian section is destroyed virtually clearing them away from the eastern perimeter wall.


 During the Italian turn the East command company sandwiched between the Rifles and Fusiliers are completely suppressed and are unable to activate.


Turn 6:


Another view showing just the Breda MG team left at the perimeter (middle left).

'A' Company Rifles use their initiative move to advance on the Italians of East command. They pour fire into the Italians suppressing them.

The AT rifle section of 'A' Company joins the Matildas and between them shoot up an M13/40.


The Italian commander hopes to halt the advance of the Rifles and Matildas forming a defensive line of artillery and tanks. A combination of 75mm and 37mm anti-tank guns manage to suppress a Matilda tank but achieve nothing more this turn.
Turn 7:

The Fusiliers of 'A' Company begin mopping up. The Kiwi drivers close assault the Breda MG team wiping them out. In the foreground another section close assaults a rifle section and destroys it likewise.

The entire Italian company tasked with defending this part of the perimeter now consists merely of the HQ (middle) and one section (middle right top).

'A' Company Rifles close assault two heavily outnumbered conscript Italian sections destroying them both.

The British CO looks on with satisfaction on the progress made.

The Matildas now turn their attention towards the new Italian defensive line.

Now joined by another Matilda they concentrate fire on the M13/40's brewing up another. Sections from 'A' Company Rifles shoot up a 37mm anti-tank gun taking the Italian losses to 6 units past their break point. It is now their turn and they must test to see if they break. They require a double '1' to succeed! Needless to say they failed whereupon the Italian survivors surrendered.

An overview at the end of the game. 3 of the 4 Italian companies virtually cease to exist. A total of 35 Italian units were destroyed compared to 17 British. Although a decisive British victory it was not as one sided as the original action where the entire camp was captured for little loss. It was only in the final 2 turns that the battle turned decisively in the British favour. There was over confidence in the initial stages as the Rifle Brigade in particular recklessly charged into the disordered Italian camp only to find itself under heavy fire as the Italians recovered from their initial shock. There would be some explaining to do with the loss of 2 Matildas!
This was the first outing for my new wadis although they were out of the action. I underestimated just how big they were for 6mm and would probably be better for 10mm or 15mm. However, I will continue to use them for any significant wadis. i.e. equivalent to major rivers. I will need to construct smaller wadis for the future and to that end I am considering using the stream sections from Baccus as the basis for them. It will be much quicker to complete and hopefully more in keeping with the scale!
It must be my age and the impact it is having on my memory cells as I made numerous rules errors, especially early in the game. I have played BKC2 only 5 or 6 times in total with the last being almost a year ago. On the whole it is a great set of WW2 rules although I do have quibbles. One of which is the penetration power of small calibre Italian anti-tank guns against the thick armour of the Matilda. I can recall reading that at Arras the Germans found only their 88mm were capable of taking them out. One gun alone would unlikely be sufficient but concentrating 2 or 3 make it a real prospect under these rules. Even a lucky shot taking out a track would still leave it capable of fighting from a static position. It is still a great set of rules though and you have to think carefully how you will activate your units under this command system. It will be very interesting to see what changes BKC4 makes.
For the next game I intend to stick with WW2 to better familiarise myself with BKC2 and move this particular project on. The British have not yet finished clearing the Italian camps!
Jon, lovely game, i am not generally a desert fan, but you have made it look really interesting. I agree about the armour penetration of the Mattilda II. BKC4 looks to be close now.
ReplyDeleteAs an aside, while researching for my own game of McDowell, inspired by your own post, I found this superb link that shows strengths and musket types of 5 battles, including McDowell ..... you will be fascinated at the detail, link
http://www.brettschulte.net/OB_Master%20SCENARIOS.xls
Thanks for that link Norm, incredibly detailed and will be extremely useful. Front Royal just happens to be the next in line for playing.
DeleteVery interesting scenario. My favourite campaign ground. Never tried BCK RULES and I am tending to shift to more grand tactical type Rommel.
ReplyDeleteVery detailed figures too and great terrain
Many thanks David. I am more battalion level and for the next game I shall probably take it up to that level. I have heard good things about Rommel.
DeleteGood looking game & detailed report - looks like a load of fun!
ReplyDeleteBest wishes,
JJ
Many thanks warpaintjj
DeleteI used to play clash of armor.It has 3 great scenario books including one exclusive north African campaign
ReplyDeleteNow it's evolved into KampfgruppeCommander.
http://davidgrech.blogspot.com/2017/12/blog-post.html
Thanks for the link David. I like the look of a lot of these rules and Sam Mustafa has some great ideas. I have his Grande Armee rules for Napoleonics, some of the ideas of which I have imported across to General de Brigade.
DeleteGreat game and lovely terrain Jon! Thoroughly enjoyed reading your AAR.
ReplyDeleteGreat report - asl not much of a desert guy but you make it look tempting.
ReplyDeleteI’m proofing BKCIV now. It’s looking pretty good.
I appreciate you supplying the OOB
Seriously looking forward to seeing BKCIV. Its been a hard slog for Leon but hopefully will pay off in the end for him. Desert makes a change but as I continue to expand into 6mm I will be joining the masses in NW Europe!
DeleteNeither my scale or era, but as usual the game looks great and the narrative is very engaging. Bravo!
ReplyDeleteMany thanks Peter.
DeleteGreat report Jon, just discovered your blog and its an inspiration to me as I'm primarily a 6mm player and now a solo player. I'm also a fan of the BKC / CWC / FWC series of rules
ReplyDeleteExcellent, welcome to the blog grumbeast and pleased you enjoyed the AAR.
DeleteI've just discovered your Blog and very good it is too:). A most impressive BKCII Desert game you have put on here. I keep toying with some desert action but never seem to get round to it, like so many other projects!
ReplyDeleteKnow the feeling Steve. Won't live long enough to do everything I like! Many thanks for your kind comments.
DeleteGreat looking models and terrain.
ReplyDeleteMany thanks nundanket
Delete