After Nibeiwa the next target was Tummar West. Described as almost identical to Nibeiwa but 'Oyster' shaped. As at Nibeiwa the north west corner was poorly defended with a track accessing the camp.
2 infantry battalions of the 5th Indian Brigade, 4th Indian Division, along with the Matildas of the 7th Royal Tank Regiment and guns of the 25th Field Regiment, RA would launch the attack. Travelling from Nibeiwa, the Matildas drove into a minefield losing 6 of their tanks.
They met with the 5th Indian Brigade at 11.00a.m. on 9th December 1940 and were ready to attack. They were however delayed for one hour by a sandstorm. The artillery began their bombardment at 12.00 noon and the attack was launched at about 1.30p.m.
My game will start following the artillery bombardment. The Italians were better prepared than at Nibeiwa but they mistakenly believed the biggest threat was to the south east rather than the north west and thus the largest concentration of their forces were in the sector of the camp.
For this game I am returning to my favoured battalion level rather than company. It allows for the entire camp to be represented and its defenders. The primary sources for this scenario were the Toofatlardies 'Operation Compass' scenario book by Robert Avery, and the 'Benghazi Handicap' Command Decision book. I have used neither though for the scenario design which is my own construct.
The structure of the Orders of Battle were drawn from the 'Rapid Fire' rules guide books (which also happens to be very similar to Command Decision). Rapid Fire figure ratio is 1:15 and vehicles 1:5. It is a simple matter to translate to BKC in 6mm. Infantry companies are 3 stands each with each stand representing a platoon. For larger companies, i.e. 10 or 11 figure in RF, each company will be 4 stands. All other elements including HQ companies, Support units, vehicles, tanks etc are represented at 1:1.
Continued -
The Battle of Tummar West
9th December 1940
British v Italian
Scale = 6mm (GHQ, CinC and Heroics & Ros)
Table Size = 4'6" x 3'9"
Rules = Blitzkrieg Commander 2
ORBATS:
BRITISH
5th Indian Brigade
C/O Brig W L Lloyd CO(8) + Dorchester ACV
1st Bn Royal Fusiliers (Veteran)
HQ Coy HQ(8) + truck
AT Rifle platoon 1 stand with Carrier
A - D Companies
12 x infantry with 3 x 3t trucks and 3 x carriers
Support Company
1 x 3" mortar
1 x Vickers MMG
2 x Carriers
3rd Bn 1st Punjab Regiment (Veteran)
HQ Coy HQ(8) + truck
AT Rifle platoon 1 stand with Carrier
A - D Companies
12 x infantry with 4 x 3t trucks
Support Company
1 x 3" mortar
1 x Vickers MMG
2 x Carriers
New Zealand No.4 Reserve Motor Transport Coy (transporting Fusiliers)
2 x infantry (veteran with elite rating for close assault).
7th Royal Tank Regt
HQ(8) 1 x Matilda
A - C Companies
7 x Matildas
Artillery Support
FAO (7)
3 x 25pdr Field Guns (off table)
ITALIAN
2nd Libyan Division
CO(8)
6th Libyan Infantry Battalion (Conscript)
HQ Coy HQ(7)
1 x AT rifle platoon (Regular)
A - C Companies
12 x Infantry
Support Company
1 x Breda MMG
1 x 45mm mortar
7th Libyan Infantry Battalion (Conscript)
HQ Coy HQ(7)
1 x AT rifle platoon (Regular)
A - C Companies
12 x Infantry
Support Company
1 x Breda MMG
1 x 45mm mortar
14th Libyan Infantry Battalion (Conscript)
HQ Coy HQ(7)
1 x AT rifle platoon (Regular)
A - C Companies
12 x Infantry
Support Company
1 x Breda MMG
1 x 45mm mortar
1st Gruppo 2nd Libyan Artillery
3 x 75mm Field guns and tows
2nd Libyan Anti-Tank Company
3 x 47mm anti-tank guns and tows
20th AA Gruppo, 20th Corps Artillery
1 x 20mm AA gun and tow
238th CCNN Infantry Gun Battery
1 x 65/17 Infantry Gun Portee
21st Corps Artillery Battery
2 x 75mm Field Guns and tows
1 x 75mm Cierano
I have had to adjust the Italian artillery slightly to what I possessed but balances out in terms of strength.
The situation at the start:


Turn 4


BRITISH
5th Indian Brigade
C/O Brig W L Lloyd CO(8) + Dorchester ACV
1st Bn Royal Fusiliers (Veteran)
HQ Coy HQ(8) + truck
AT Rifle platoon 1 stand with Carrier
A - D Companies
12 x infantry with 3 x 3t trucks and 3 x carriers
Support Company
1 x 3" mortar
1 x Vickers MMG
2 x Carriers
3rd Bn 1st Punjab Regiment (Veteran)
HQ Coy HQ(8) + truck
AT Rifle platoon 1 stand with Carrier
A - D Companies
12 x infantry with 4 x 3t trucks
Support Company
1 x 3" mortar
1 x Vickers MMG
2 x Carriers
New Zealand No.4 Reserve Motor Transport Coy (transporting Fusiliers)
2 x infantry (veteran with elite rating for close assault).
7th Royal Tank Regt
HQ(8) 1 x Matilda
A - C Companies
7 x Matildas
Artillery Support
FAO (7)
3 x 25pdr Field Guns (off table)
ITALIAN
2nd Libyan Division
CO(8)
6th Libyan Infantry Battalion (Conscript)
HQ Coy HQ(7)
1 x AT rifle platoon (Regular)
A - C Companies
12 x Infantry
Support Company
1 x Breda MMG
1 x 45mm mortar
7th Libyan Infantry Battalion (Conscript)
HQ Coy HQ(7)
1 x AT rifle platoon (Regular)
A - C Companies
12 x Infantry
Support Company
1 x Breda MMG
1 x 45mm mortar
14th Libyan Infantry Battalion (Conscript)
HQ Coy HQ(7)
1 x AT rifle platoon (Regular)
A - C Companies
12 x Infantry
Support Company
1 x Breda MMG
1 x 45mm mortar
1st Gruppo 2nd Libyan Artillery
3 x 75mm Field guns and tows
2nd Libyan Anti-Tank Company
3 x 47mm anti-tank guns and tows
20th AA Gruppo, 20th Corps Artillery
1 x 20mm AA gun and tow
238th CCNN Infantry Gun Battery
1 x 65/17 Infantry Gun Portee
21st Corps Artillery Battery
2 x 75mm Field Guns and tows
1 x 75mm Cierano
I have had to adjust the Italian artillery slightly to what I possessed but balances out in terms of strength.
The situation at the start:

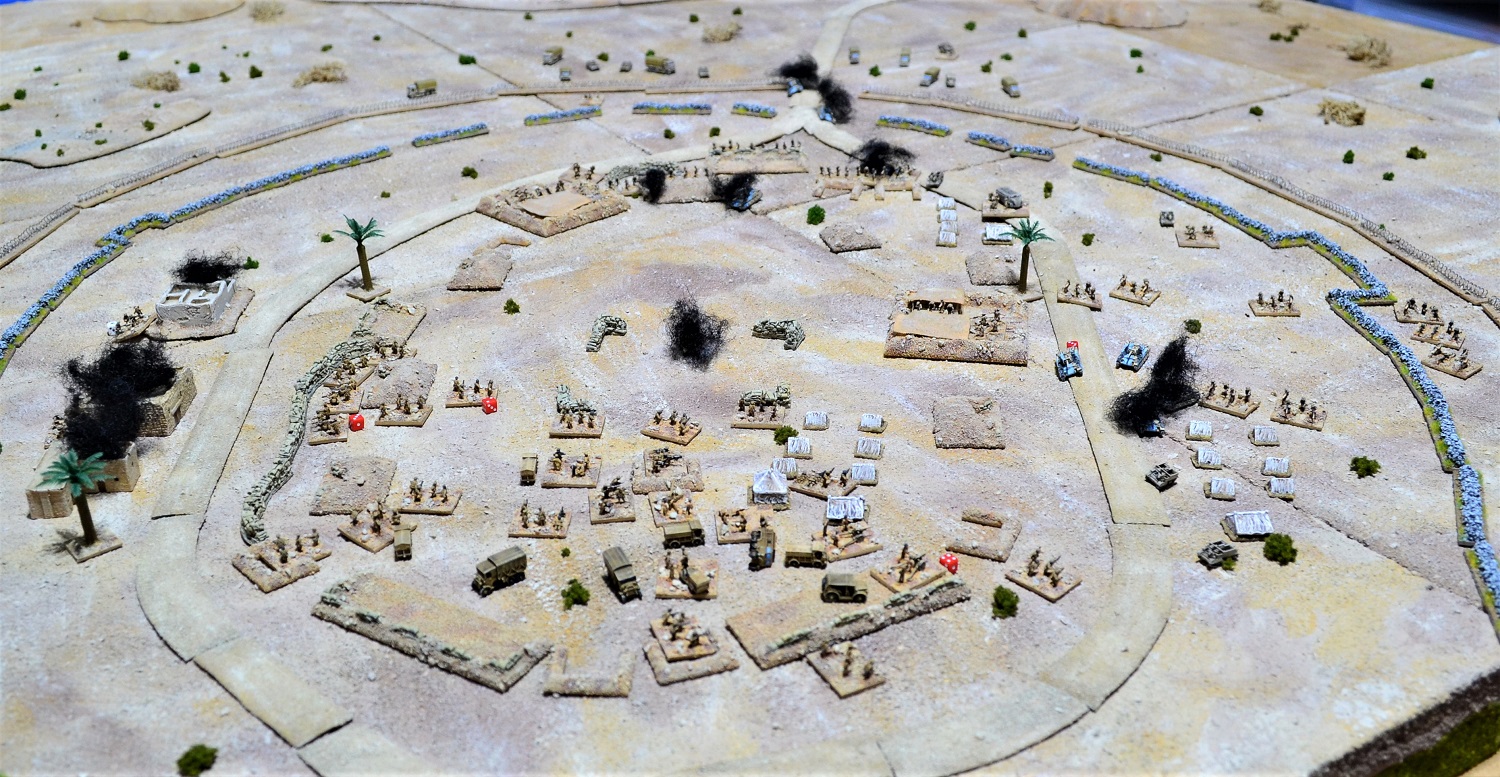
There was an anti-tank ditch and bank surrounding the camp. I have used barbed wire to represent this. Something else to model for the future! Therefore the barbed wire will be impassable to all but infantry who will treat it as a linear obstacle.
At this stage of the game the Italian defence was to the south of the camp following the earlier artillery bombardment (hence buildings on fire). The 6th and 7th battalions are in this sector supported by artillery. The 14th faces north and covers the access track into the camp. They are also supported by artillery.

The 14th Libyan battalion sights tanks in the distance and alerts the C/O.

The 6th and 7th Libyan battalions covering the south.


The advance of the British force. The Matildas in the original battle advanced into the camp 20 minutes before the arrival of the Fusiliers. I have therefore placed them in front and they get one automatic move for the first turn. The rest use command die rolls as per normal. In the photos the Fusiliers are travelling along the wadi and the Punjab battalion along the track.
Turn 1

The Matildas charge into the gap in the Italian defences but are met with a deluge of fire from the defending 75mm field guns and 47mm anti-tank guns. The lead Matilda is hit numerous times overwhelming its defences.

The 47mm anti-tank gun who had fired at the British tanks.

And the victorious 75mm field guns.

The Punjab battalion pulls off the track and begins to fan out.

The Royal Fusiliers pour out of a gap in the wadi.

Realising the treat is now from the north, the 7th Libyan infantry is ordered to relocate to back up the 14th. The 6th has to fan out to cover the gap left by the 7th.
Turn 2
 Turn 2 saw the beginning of the charge of the Matildas. They began by close assaulting the Italian anti-tank rifle platoon quickly defeating it.
 As the Matildas continue their surge into the Italian camp, the Punjabis debus and prepare to conduct their assault.


 The Fusiliers' carrier company debusses further forward and takes up position behind an abandoned stone wall.
 The 14th Libyan Battalion are not going down without a fight and with 2 activations the 47mm anti-tank gun and the 2 x 75mm field guns take advantage. They pour fire into the lead Matildas knocking out one and suppressing a second.

 The Matildas seek to get revenge on the Italian artillery and close assault all 3 units. They are supported by two further Matildas one of which is the HQ tank (the one without the Caunter camo scheme). The Italian 47mm anti-tank gun put up a fierce resistance (top of photo) fighting the close assault for 3 rounds before finally succumbing to the heavy tank.


 The two successful Matildas continued their attack with one driving into a suppressed rifle platoon and the other turning to attack the remaining 75mm field gun. The Matildas destroyed their opposition with ease.
 With more command roll passes the Matildas continued their path of destruction. One destroyed another rifle platoon while the Matilda in the centre of the photo had just dispatched a Breda MG team.
 The Punjabis pour along the camp access track while another of their rifle companies pour fire from behind the stone wall into the hapless Italian rifle platoons.


Turn 2


The crews of the Italian artillery hurriedly reload as the Matildas rumble towards them.

The Fusiliers debus and are joined by the New Zealand drivers.


A company of Italians pours fire into the Punjabis who are in an exposed position. One Punjabi company is wiped out entirely.
All remaining Italian commanders (1 x CO + 2 x HQ's) all failed their command tests leaving the bulk of the Italian force immobile.
Turn 3


One 75mm field gun was quickly overrun but the 2nd unexpectedly destroyed the attacking Matilda.

The Fusiliers leapt into action close assaulting the an isolated Italian rifle platoon and a 45mm mortar team destroying both.


The scene at the end of the British turn sees the Italian 14th Libyan battalion badly mauled.
It was now the Italian turn which brought with it a remarkable change in fortune. Having been bedevilled by command failures the dice Gods swung back in their favour.
 The most successful was the Italian 6th Libyan infantry which succeeded in having 4 actions awarded including a double '1' thrown. The Italian plan was now to form a defensive line across the centre of the camp taking whatever cover they could find. With the Matildas having forced their way into the camp their defensive positions had been compromised. The Italians were now pinning their hopes on being able to deliver overwhelming firepower on their attackers.
The 6th managed to fully relocate to the new line allowing their artillery to pour two rounds of fire into the Matildas. A 3rd rounds was ordered by the camp commander which earned them another British tank destroyed. The Matilda HQ tank also sustained hits but succeeded in avoiding becoming suppressed.
 The 7th Libyan infantry battalion was almost as successful with 3 actions. It managed to redeploy most of its units linking in with the 6th.
It was now the Italian turn which brought with it a remarkable change in fortune. Having been bedevilled by command failures the dice Gods swung back in their favour.

The 6th managed to fully relocate to the new line allowing their artillery to pour two rounds of fire into the Matildas. A 3rd rounds was ordered by the camp commander which earned them another British tank destroyed. The Matilda HQ tank also sustained hits but succeeded in avoiding becoming suppressed.


The view from the rear of the newly formed Italian defensive line with the brewed up Matilda in the centre of the photo.

A couple of platoons from the 14th battalion had fallen back to a newly deployed 75mm field gun leaving a suppressed platoon at the mercy of a Matilda (middle of photo).

What was left of the 14th Battalion took cover in, and next to one of the camp stores. From their they shot up a platoon of Fusiliers and suppressed another.

An overview at the end of Turn 3.
Turn 4

With the British closing in on the Italians, the FAO on seeing the congested tempting target, took the risk and called in an artillery barrage from the 25pdrs. The distance between the FAO and the target meant that there could be considerable deviation potentially bringing the barrage down on the British. There was a substantial deviation but in the opposite direction. Much of the barrage fell on empty ground but it did strike the rear of the Italian position suppressing 8 units,

The Fusiliers poured fire into the storage compound suppressing a platoon as the Kiwis lead the charge into it. Despite being suppressed the Italians fought hard causing the Kiwis to retreat but not without losing one of the two platoons defending the compound.

Two Matildas caught an isolated Italian platoon quickly despatching it.

The Matildas were activated in the command phase with all 4 surviving tanks descending on a hastily formed defensive line. The Italian 75mm field gun fired at the nearest Matilda hitting it but not having any real effect. The HQ tank came in from the flank and between the 4 tanks annihilated the Italians.

The tanks consolidated their victory but failed to roll any further command activations.

Behind them the Punjabis advanced to support them threatening the Italian right flank.

The Italians had a complete reversal of fortune in their command phase will all command elements failing their activation rolls. Several units were able to use their initiative with several firing on the British. The most successful was a combined artillery strike an a lone Universal Carrier that had strayed too far forward successfully destroying it.

At the end of the turn the Italians found their right flank particularly vulnerable and would require more successful command rolls in the next turn to have any chance of rectifying the situation.
Turn 5
 Turn 5 proved to be rather uneventful with both sides suffering from command failures. The Matildas using their initiative phase and one command action succeeded in destroying another Italian platoon and causing another to retreat suppressed.
 The Fusiliers shot up another platoon of the Italian 14th with the rest of the battalion entering into a firefight at long range with the main Italian position.
 The Punjabis sacrificed any initiative moves as only a handful would have been able to activate in the hope that all the battalion could move in the command phase. Annoyingly both battalion HQ and the Brigade C/O failed their command rolls leaving the entire battalion static.
 The Italians were in little better position with very few activations. They lost a 75mm field gun and their 75mm portee to incoming fire from the Fusiliers. They managed to suppress a few British units in return but it was increasingly obvious that they would have to fall back to avoid being taken in the rear by the Matildas. There was also a need to get their units behind whatever cover was around, which in this part of the camp was not substantial.
 Two 47mm AT guns were relocated to counter the Matildas. A few units were pulled back but most remained static following command roll failures.
Turn 6
 The Matildas attacked in their initiative phase taking out another Libyan platoon. Another tank was not so lucky. It close assaulted another platoon who managed to last out for a 2nd round of combat before having a very lucky die roll compared to a poor one of the Matilda who failed to save any of the 5 hits and was destroyed in the process.
 The Fusiliers, with a company of Punjabis (top middle) poured fire into the main Italian position. Then, on a command roll, the Fusiliers HQ rolled a double '1' and hence two actions were allowed. The consequences were devastating for the Italians. As the Fusiliers poured their repeated fire into their troops, the Italians lost 65mm infantry gun portee with several platoons and a couple of 45mm mortars.
 One company of Fusiliers ran around the burning buildings surprising two Libyan platoons who were promptly assaulted. Both were destroyed.
 The Fusiliers company deployed behind the buildings to fire on the 7th Libyan battalion defending a wall of sandbags.
 Those Punjabis that were able, took no chances and moved in the initiative phase which was just as well as their HQ failed its command roll. The C/O succeed in activating them once and they poured fire into the storage compound destroying a platoon stand.
 Having had their numbers thinned out by the Punjabis, the remaining Libyans in the storage compound continued to hold their ground.
The heavy casualties suffered by the Italians this turn took them 2 units past their breakpoint. The C/O would now have to take a break test in the command phase. He would need to roll equal or below his CV of 8, -2 for the casualties so 6 or below. He succeeded!
 Despite the successful dice roll, the Italian position had become precarious to put it mildly. Several of their units were suppressed and there was precious little cover from fire coming in from the Fusiliers. During the initiative phase several infantry platoons pulled back to give the 47mm AT guns a clear field of fire towards the Matildas. 2 platoons with AT rifles joined them. All those units that were able returned fire on the Fusiliers but only managed to suppress a couple of platoons.
 The 2 AT guns together with the 2 AT rifles took advantage of their 2 activations firing repeatedly at the Matilda HQ tank. With an excellent 5 hits the Matilda rolled to save (4 or above for the heavy armour). All failed! The HQ tank brewed up leaving just 2 surviving Matildas.
 The ever shrinking line as the Italians withdrew further towards the southern perimeter of the camp seeking whatever cover they could find.
 The 7th Libyan infantry line a sandbag wall protecting the Italian left flank from the company of Fusiliers positioned around the burning buildings.

Turn 5


Turn 6


The heavy casualties suffered by the Italians this turn took them 2 units past their breakpoint. The C/O would now have to take a break test in the command phase. He would need to roll equal or below his CV of 8, -2 for the casualties so 6 or below. He succeeded!


The final act of the turn saw the Punjabis lose a platoon to fire from the storage compound.


Turn 7

Turn 7 saw a duel between the Italian anti-tank guns and the Matildas with one suppressed each.

Having deluged the storage camp with machine gun and rifle fire the 2 defending Italian platoons were destroyed leaving the way clear for the Punjabis to occupy it.
Elsewhere another Italian platoon was lost to long range fire from the Fusiliers. There was little the Italians could achieve in their initiative phase which brought them on to another break test. With the additional losses it now meant the C/O had to roll 3 or less on 2 x D6. That was too much to ask and the Italians finally surrendered. This is the final position at the end of the game.
The objectives were simple enough. The British had to capture the camp and the Italians defend it. On that basis the British were victorious. A look at the casualties:
British - 11 units
Italians - 34 units
A resounding victory then but one with a sting in its tail. Of the 11 British units lost, 6 were Matildas which would be sorely missed.
Less mistakes were made this time and once again I found BKCII highly enjoyable, even where the outcome was almost inevitable. The importance of cover was really highlighted in this game and also avoiding units becoming isolated.
That looks and sounds brilliant! I didn't fancy the Italians chances against the Matildas but they put up a good fight.
ReplyDeleteMany thanks Jim. Yes it was always going to be a tough one for the Italians compounded by their conscript status v veterans.
DeleteWhat a lovely looking game, full of action and swings of fortune. I think BKCII to be a great set of rules and they are certainly in my all time favourite top 3. 6mm really works well for the Western Desert, much more so than my favoured 10mm.
ReplyDeleteMany thanks Steve. One of the factors I like about the smaller scales is the feeling of distance on the tabletop. Unless you have a massive table it is hard to replicate in the larger scales.
DeleteThey look great
ReplyDeleteTake care
Andy
Many thanks Andy.
DeleteYou are welcome
DeleteA very attractive and engaging action, Jon!
ReplyDeleteThanks Peter
DeleteWonderful!!! Another fantastic game.
ReplyDeleteCheers, Richard P
Thanks Richard
DeleteInteresting. Do you know what the historical casualties were?
ReplyDeleteHi Sam. Not sure is the simple answer. At this stage of the war the Italians suffered from very poor leadership leading to low morale so very probably high. Especially captured.
Delete