Hot on the heels of Big Bethel I decided to play out another ACW battle but this time from a Guns at Gettysburg scenario book.
One of my ACW projects is to work through the GaG Scenario book 4, "Stonewall, The Battles of General T.J. Jackson CSA". My next scenario (#3 in the book) is the Battle of McDowell, 8th May 1862.
The book recommends table sizes of 6' x 4' or 5' x 3' for 10mm or 15mm figures. When scaling down for 6mm I have born in mind my base sizes and movement rates. GaG recommends basing figures 4 to a base with each figure on an 8mm - 12mm frontage depending on your personal preference. Taking the 10mm average this will give a base frontage of 20mm compared to my 15mm with 6 figures to a base. I have therefore increased by 50% the number of figures listed in the scenario orbats.
Now comes the beauty of 6mm if you are short on space. I have taken the smaller table of 5' x 3' and reduced that by 25% to match the footprint of my figure bases. This translates to 3'9" x 2'3" which corresponds with my 9" terrain tiles. If you are really short on space there should be no problem reducing that further still to 3' x 2'. Over 600 figures will be on the table!
Another factor I had to look at was game length. This scenario gives a game length of 12 turns. I factored in the movement rates for 6mm (as with General de Brigade, the rules give alternative movement rates for 28mm in inches. I take this scale but use cms instead of inches). I also allowed a little for my different Command and Control system which can take units a little longer to traverse battlefields. I therefore increased the number of turns by 25% giving 16 turns for my game.
On to the game:
The Battle of McDowell
8th May 1862
Scale = 6mm (Baccus figs)
Table size = 3'9" x 2'3"
Union = 324 figures
Confederate = 300 figures
Rules = Guns at Gettysburg
Scenario #3 from Guns at Gettysburg Scenario book 4.
"Stonewall, The Battles of General T.J. Jackson CSA"
Jackson with Ewell's command sought to deceive the Federals into believing the Confederates were about to leave the Shenandoah Valley when they took the cars from Mechum's station for Staunton. Instead Jackson marched on Milroy's advanced post at McDowell.
Unlike other generals, Milroy was not taken in by Jackson's ploy and he determined to defend his position on the Bull Pasture River and asked for reinforcements. Schenk marched 34 miles in a day to Milroy's assistance with his infantry brigade (1500 men), a battery and a squadron of cavalry.
At 10.00a.m. on 8th May Schenk's troops were at Milroy's camp. Milroy wanted to launch an all out attack on the Confederates but a compromise was reached whereby it was decided to deliver a blow to the head of the Confederate column and then withdraw from their front before the bulk of the Rebel army could assemble.
Victory Conditions:
- Union: Prevent any Confederate units having permanently moved forward from off Sitlington's Hill at the close of play on Turn 16.
- Confederate: Have one or more steady but not isolated regiments (supported within 18cms) across Bull Pasture River and prevent the occupation of Sitlington's Hill by any steady Union infantry units on Turn 16.

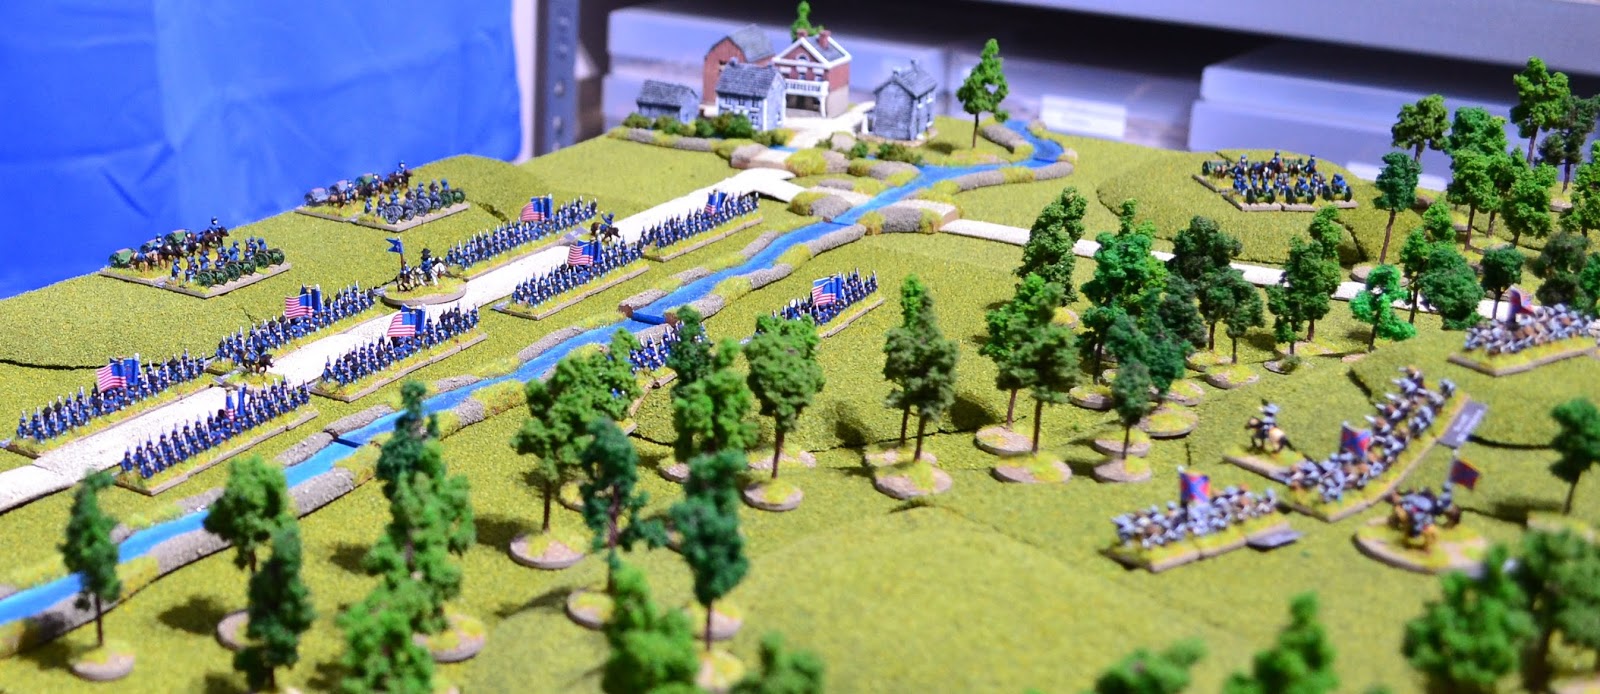
Overview of battlefield.
ORBATS:

A brief explanation of the orbats. Column 3 is the number of stands in each unit (infantry 6 figures, artillery 1 cannon and 4 crew). Cavalry in italics is the number of dismounted stands (3 figs per stand) + number of horse holders. 4th column is number of figures.
 Initial dispositions. The 3 reinforcement Confederate brigades must test for arrival. If fail their arrival is delayed one turn.
 The battle opens with McClean's and Milroy's brigades advancing towards Sitlington Hill. All 3 Union batteries open fire on Scott's position inflicting a couple of casualties on the 52nd Virginia.
Turn 2:

Turn 3:
 Connor maintains a column of march as it enters the woods. Maintaining this formation and keeping away from the densely wooded slopes he is able to move at normal speed.
 The Confederates have the initiative and open fire on the Union troops of McClean's brigade as they near the wood's edge. Two of the 3 battalions have smoothbore muskets placing the Union troops at long range. The 44th Virginia with a mix of smoothbore and rifle muskets are able to fire at effective range. Just 2 of the Union troops became casualties.
McClean ordered his troops to open fire in their unformed state and they luckily managed to inflict 2 casualties on the Rebels. They do have the benefit of having rifled muskets so all were in effective range.
Turn 4:
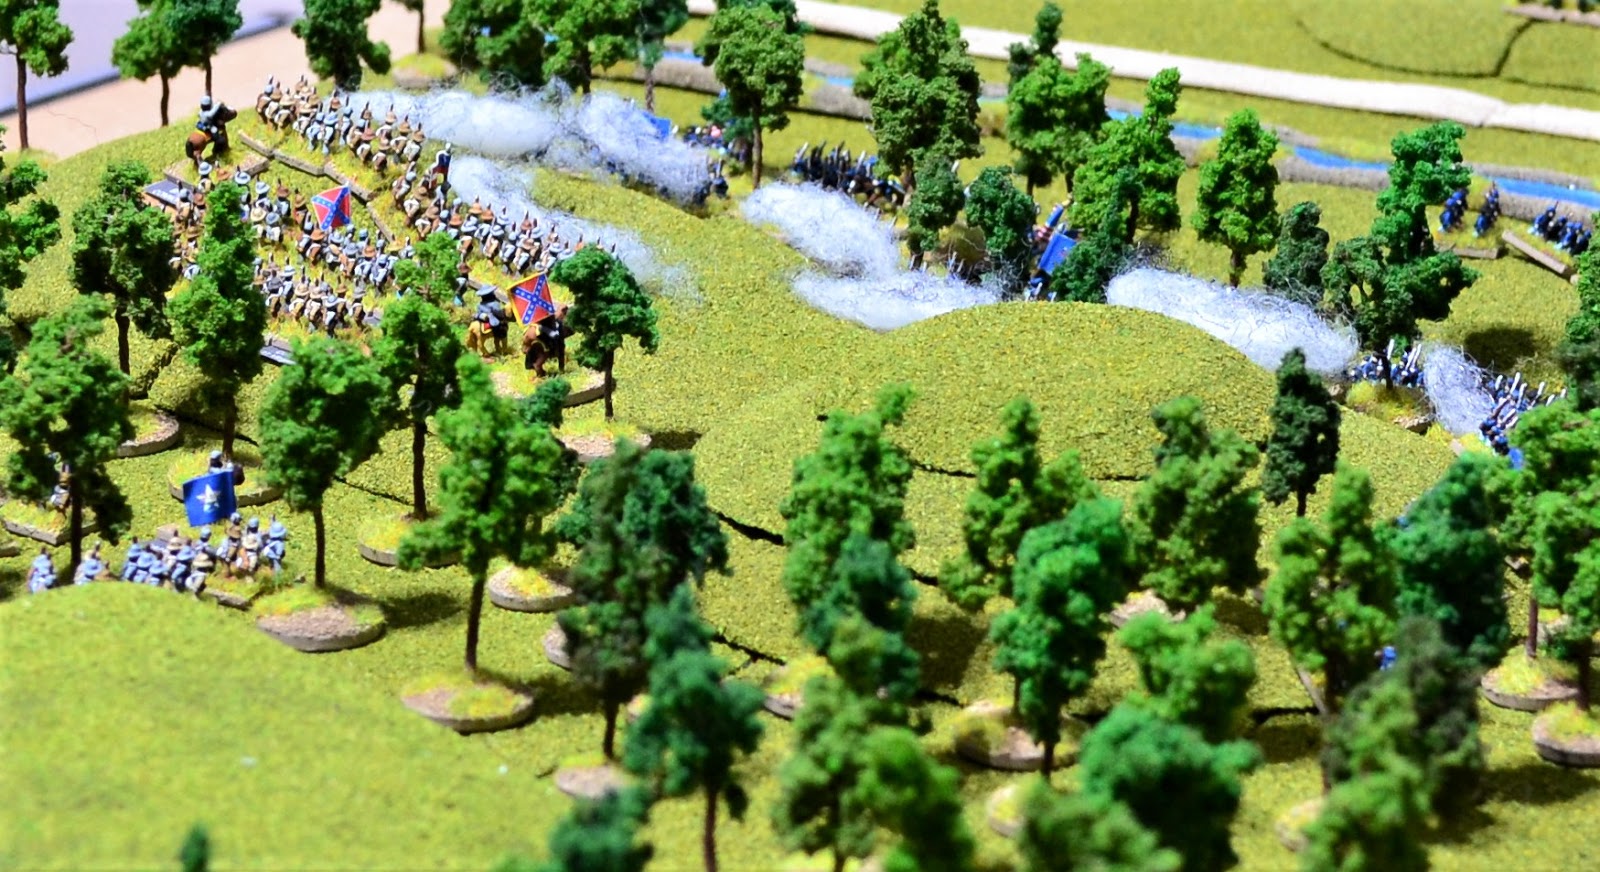
 Scott's Brigade exchanges steady fire with McClean's Brigade which is now positioned along the tree line and still unformed. Neither side gets the upper hand with equal casualties being inflicted.
 Lee's Brigade in the foreground with Milroy to the right continue towards the wood to support McClean.
Turn 5:
 Scott's Brigade suffers this turn with particularly accurate fire by the 75th Ohio (at the far end in the photo directly opposite Sitlington Hill). The 58th Virginia atop Sitlington Hill suffered heavy casualties losing a stand and having to take a morale test which it passed.
Turn 6:
 After the success of their volley, McClean intends to seize the opportunity and orders his brigade to charge. The 52nd Virginia (middle of photo) and 58th Virginia (on Sitlington Hill) are the targets for his brigade. The Confederates are vulnerable strung out in extended line. The Union troops though are still unformed and having to charge up a steep hill in the teeth of fire from the Rebels. Luckily for the Union side their casualties were relatively light. The green troops though were having none of this with both battalions thrown into an uncontrolled retreat.
 Milroy's Brigade are faced with the rapidly retreating brigade of McClean as they enter the wood.
 Lee's brigade similarly has to make way for the retreating troops while in the distance the Rebels shout suitable insults down from the top of their perch!
 With the distance crackle of musketry, Connor urges his brigade on to reinforce Scott.
Turn 7:
 The final Confederate brigade of Campbell arrives. This means all the Confederate reinforcements arrived without any delays.
 Lee's and Milroy's brigades are now climbing the wooded slopes to attack Scott's brigade. In the foreground McClean successfully rallies both battalions.
Turn 8:
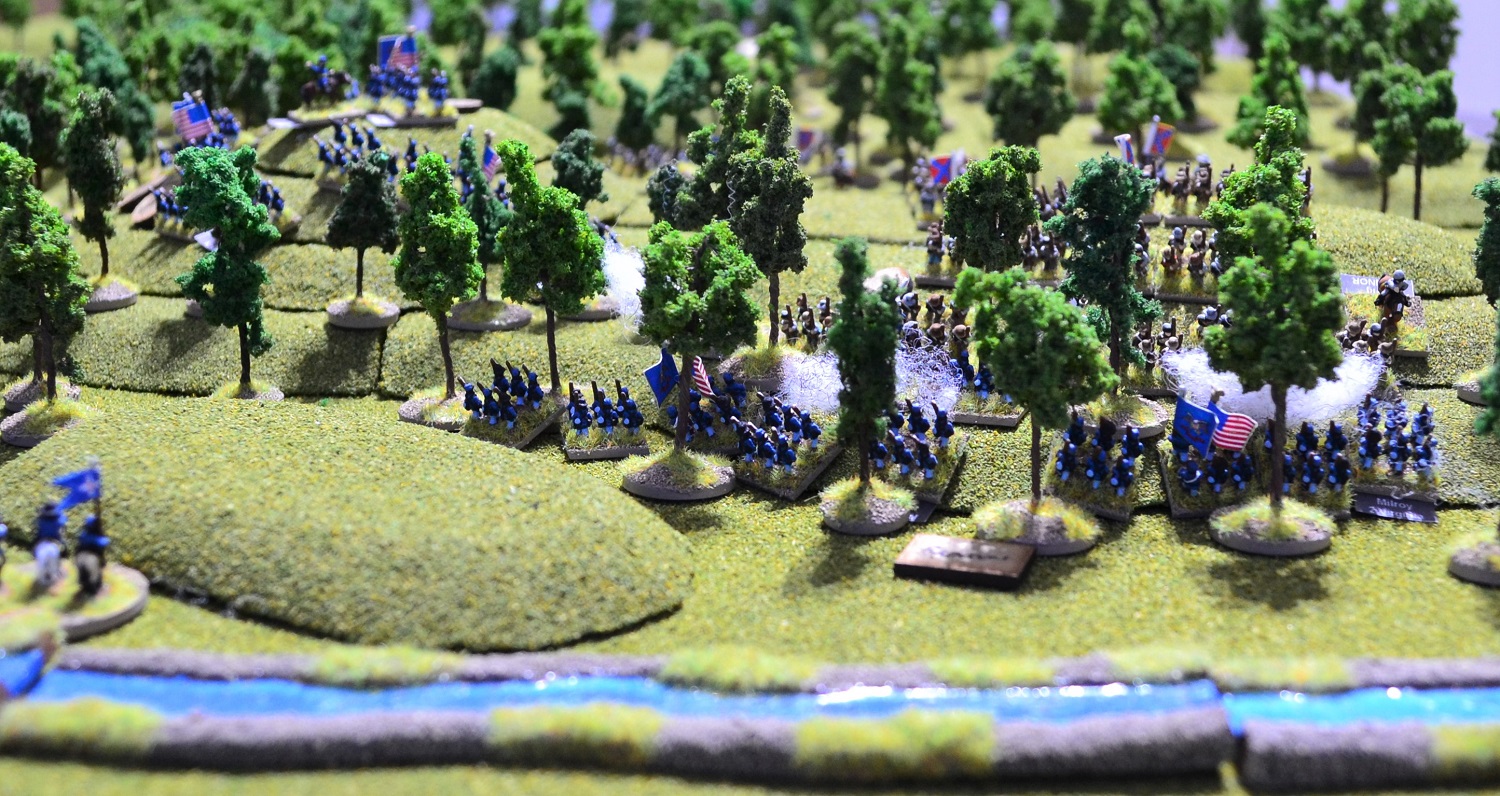
 Scott's Brigade are mightily relieved to see Connor's Brigade emerge from the wood climbing the slopes towards them.
 In the meantime, Scott's Brigade is getting steadily worn down with the continual firefight with the Union troops to their front. A glimmer of hope for them emerges when the 82nd Ohio of Lee's Brigade (in the woods at the top of the photo) runs low on ammo (double '1' thrown when firing).
 Lyon's cavalry dismount and enter the woods seeking to assist the 5th Virginia (Union) to their right outflank the Confederate line.
Turn 9:
 Connor forms his Brigade into a brigade column with the aim of throwing those damn Federals out of the woods. They are hampered though by the rearmost battalion still in the wood and therefore unformed. It will take them an extra turn to form up properly. Scott closes in his brigade from Extended Line to Line formation to make way for Connor.
 There is a danger of Connor arriving too late as the 44th Virginia of Scott's Brigade (middle left) takes heavy casualties losing a base. It fails its morale test and routs. Fortunately Scott's Brigade passes its Brigade morale test.


 Having entered the wood, Lyon's cavalry suddenly spot Taliaferro's Brigade marching towards them along the Turnpike. A messenger is sent to Schenk alerting him to this new threat.


 |
| Scott's Brigade on Sitlington Hill. |
 |
| Overview at Start |
 |
| 6pdr battery on Cedar Knob. |
 |
| The main Union position. |

Turn 2:
 |
| Connor's brigade arrives on time. |
 |
| Lyon leads his Union cavalry onto the battlefield. |
 |
| Scott orders his brigade into extended line to better cover the length of the hill and ridge line. |

McClean leads his brigade through the woods. It is dense at this point unforming his two battalions. In the foreground Milroy's brigade is about to enter those same woods.


McClean ordered his troops to open fire in their unformed state and they luckily managed to inflict 2 casualties on the Rebels. They do have the benefit of having rifled muskets so all were in effective range.
Turn 4:
 |
| Connor's Brigade wind their way through the woods towards Sitlington Hill |


Turn 5:

 |
| The arrival of Taliaferro's Brigade advances along the Turnpike |


Turn 7:

 |
| Taliaferro continues to advance along the Turnpike. |

 |
| An overview of the current situation at end of Turn 7. |


Turn 9:


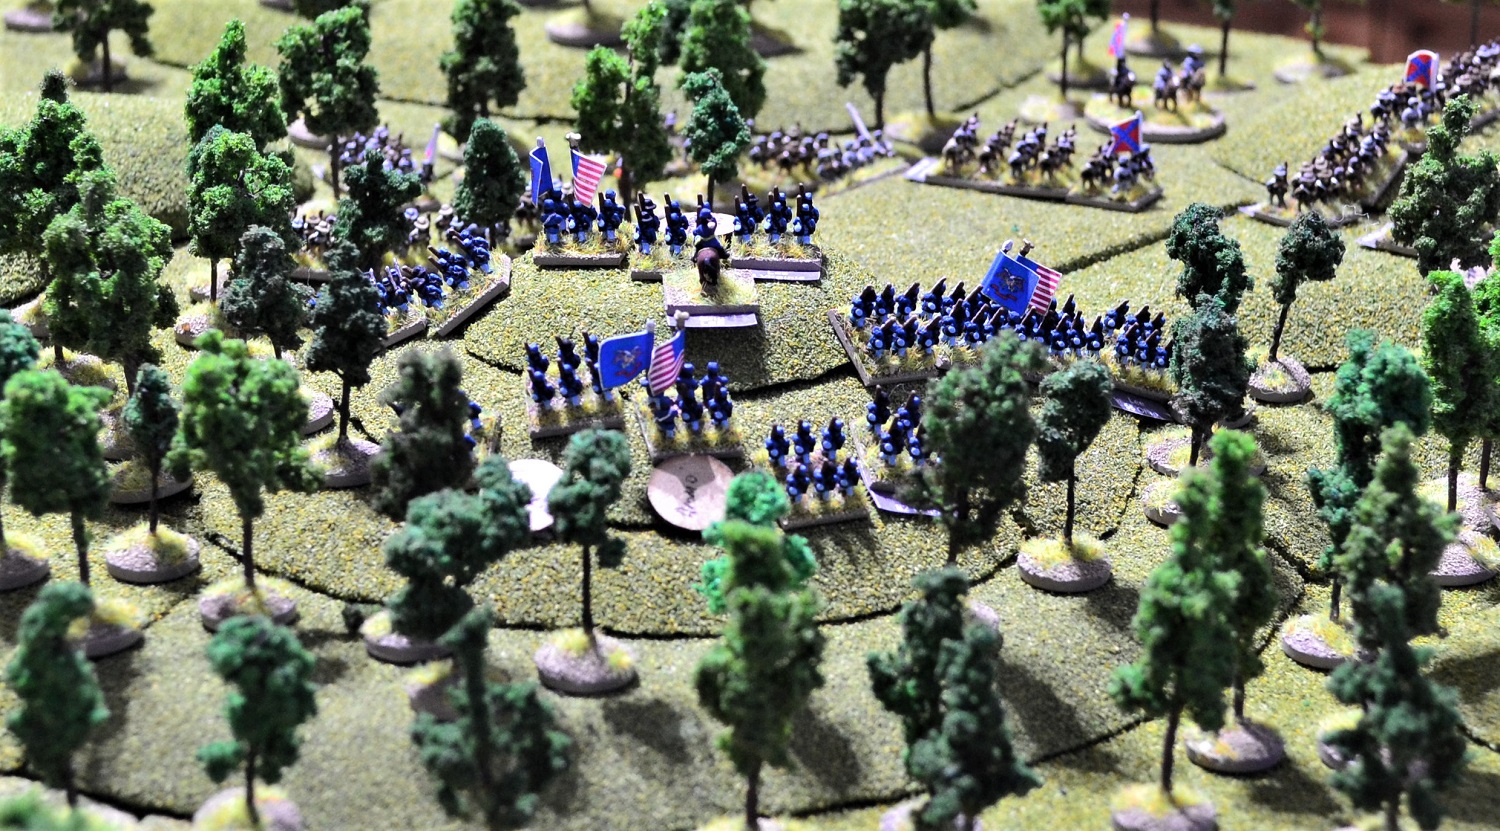
Two more views of Scott's position with Connor preparing to attack.


The view from Taliaferro. Movement is spotted in the woods ahead of them.

Meanwhile Campbell's Brigade continues snaking its way through the woods towards Scott's position.
Turn 10:
 Taliaferro deploys his brigade into a brigade column and prepares to see off those pesky Federal cavalry. The dismounted cavalry open fire causing a casualty among the Rebel brigade.
Scott's Brigade on Sitlington's Hill takes more casualties this turn. The 44th Virginia fails its rally test and disperses. The 52nd Virginia retreats and the 58th Virginia atop Sitlington's Hill is reduced to below 50% strength. It fails its dispersal test and as a result a Brigade morale test is taken. The Brigade breaks meaning that its last in tact unit, the 52nd Virginia, also disperses as it is already retreating. This means:
 With Scott's Brigade streaming from the field, Sitlington's Hill becomes empty of Rebel troops.
 Connor's Brigade at the opposite end of the ridge continues to form up its Brigade column. The 12th Georgia fires off its first volley shredding the Federal troops lining the edge of the woods. The Union troops hold steady and return fire causing several casualties.
 The 5th Virginia (Union) of Lee's Brigade advances to the foot of Sitlington's Hill.
 On hearing of Confederate troops moving along the Turnpike, Schenk orders McClean's Brigade and a battery of 6pdr's to cover the Reb's advance.

 With Connor's Brigade all but ready to launch his charge, the 12th Georgia fire off a 2nd volley to soften up their targets in the woods.
 To the right Milroy's Brigade returns fire on Connor's Brigade while Lee's Brigade on the left climb Sitlington's Hill.
 Lee's Brigade are still unformed as they struggle up the steep hill. Lee intends to waste no time reforming with his priority to gain the hilltop.

 Connor launches his long-awaited charge. As they pound down the hill, the 52nd Ohio and 73rd Ohio open fire. The 52nd rolls a double '1' and becomes low on ammo. The 73rd rolls '11' causing 5 casualties. The two supporting battalions help the 12th Georgia pass their charge home morale test. This is too much for the two Union battalions who perform an uncontrolled retreat through the ranks of the 2nd and 3rd Virginia (Union) to their rear.
 As Connor's Brigade charges through the wood they are met with ferocious fire from the 2 unformed Union Virginia battalions (one rolls a double '6'). Several casualties are inflicted but Connor survives his 'Risk to General' test. The 12th Georgia lose heart and falter as a result of the withering Union fire.


 Campbell hurries his Brigade onto the ridge with two battalions forming line in the woods although they will be unformed.

 McClean's Brigade and a battery of 6pdrs deploy across the Turnpike and observe the firefight ahead.

Turn 10:

Scott's Brigade on Sitlington's Hill takes more casualties this turn. The 44th Virginia fails its rally test and disperses. The 52nd Virginia retreats and the 58th Virginia atop Sitlington's Hill is reduced to below 50% strength. It fails its dispersal test and as a result a Brigade morale test is taken. The Brigade breaks meaning that its last in tact unit, the 52nd Virginia, also disperses as it is already retreating. This means:


Not a moment too soon, Campbell's Brigade moves towards Sitlington's Hill.
Turn 11:


Taliaferro advances steadily along the Turnpike, stopping momentarily to exchange fire with the dismounted cavalry secreted in the woods to their front.
Turn 12:
A dramatic turn of events:


Milroy attempts to rally both his green Ohio battalions but fails with the 73rd continuing to retreat and the 52nd routing. He takes a Brigade morale test and fails! This means both Ohio battalions disperse and the rest of his Brigade is broken and will retire next turn. Connor has achieved his aim and collapsed the Union right flank.

The Confederates are startled to see Lee's Brigade swarming onto Sitlington's Hill.

A photo from behind Lee's position.


Taliaferro moves into effective musket range and deliver a shattering volley into the dismounted cavalry. This is too much for the green troops and the cavalry rout as a result.
Turn 13:
 On seeing the Union battery deployed across the Turnpike ahead, Taliaferro moves his small brigade towards the cover of the wood.
 Campbell knows he must clear Sitlington's Hill of Union troops so deploys his newly arrived brigade across the ridge and in the wood observing the tough challenge ahead.
 Milroy halts what is left of his brigade on the west side of Bull Pasture River and begins reforming the two battalions.
 Lyon fails to rally his routing Cavalry and they promptly disperse from the field. In the foreground, McClean moves a single battalion towards the centre as a precaution against the victorious Confederate left flank.
Turn 14:
 Campbell's Brigade advance half a move towards Lee's Brigade atop Sitlington's Hill. This allows them to deliver a volley to soften up the green Federal troops. The 42nd Virginia deliver a shattering volley (a double '6') inflicting casualties on the 55th Ohio and caused them to falter. In the subsequent morale test they 'Go to Ground'. A Risk to General test was made as a result of the double '6' and Lee rolled a double '1'! He was shot down while urging his men to retreat. He was disgraced and removed from play. His Brigade would be without a Brigade Commander for the next turn.
 With Campbell doing well in softening up the Union troops on Sitlington's Hill, Connor has a fit of indecisiveness in the foreground. He has failed his command and control test and puts his brigade on hold. This is crucial as the opportunity of exploiting the gap in the Union line is slipping away.
 The I/1st Ohio 6pdr battery opens fire on Taliaferro's Brigade as they appear at the edge of the wood ahead of them causing a couple of casualties.
Turn 15:
 Campbell orders his brigade to charge to drive the Federals from the hilltop. On the left of the line, the 42nd Virginia charged the 55th Ohio that has gone to ground. As a result the Ohio battalion could only deliver a ragged volley which was insufficient to stop the Rebels. As the Confederate infantry rapidly closed on them the 55th Ohio panicked and retreated in the face of the charge.
The charge on Sitlington's Hill was allocated to the 48th and 21st Virginia with the latter still unformed having cleared the dense woods. As they scrambled up the steep slope the 5th Virginia (Union) fired into them causing both units to halt.
 They each fired a volley in response downing many Union troops. The green troops, already shaky seeing their neighbouring battalion disappear back into the woods, abandoned the hilltop falling into a chaotic retreat.
 Taliaferro rashly decided to throw his brigade at the battery of Union artillery intending to clear the Turnpike in no short order. The battery commander, not believing his luck, fire a blast of canister at the dense brigade column. A total of 11 casualties were inflicted, 5 on the lead battalion and 3 each on the following battalions. Despite the heavy casualties, the lead are rearmost Confederate battalions held their nerve and continued to advance. The centre battalion, the 23rd Virginia dropped to the ground!
 Milroy failed to recover his brigade from Broken status severely hampering his ability to manoeuvre his troops. They had however reformed and fired off an effective volley at long range against the 12th Georgia of Connor's Brigade who had rushed, unformed, out of the woods to the river's edge.
Turn 16:
 Taliaferro lead the 37th Virginia on a reckless charge against the I/1st Ohio 6pdr battery. As they closed the battery raked them with a blast of canister. Taliaferro survived and waving his men on, despite several of their number falling, they charged home. The gunners failed their morale test and attempted to limber up (an emergency limber test was conducted) but they were too late and overrun.
 With Union troops falling back off Sitlington's Hill it was there for the taking by the Confederates. The Union won the initiative test but their nearest unit, the 82nd Ohio was unformed by the retreating 5th Virginia (Union) and unable to take advantage of their initiative.
 Campbell's Brigade triumphantly re-occupies Sitlington's Hill. In the foreground, Taliaferro occupies the position held by the battery of Ohio artillery.
 Milroy's Brigade (right of photo) is still 'Broken' but his two battalions continue to pour steady volleys at long range into the 12th Georgia.

So that is the allotted 16 turns completed. It is time to assess who has won.
Union - Failed to prevent any Confederate units permanently move forward off Sitlington's Hill (Connor's Brigade were secure on the east side of the river).
Confederate - Have one or more steady but not isolated regiments (supported within 18cms) across Bull Pasture River - Failed; Prevent the occupation of Sitlington's Hill by any steady Union infantry units - Succeeded.
Losses:
Union - 116 (4 complete units lost)
Confederate - 109 (3 complete units lost)
Overall a Confederate victory albeit not a decisive one. I had toyed with the idea of playing on to an obvious conclusion but felt that there was little enjoyment to be had in continuing.
If you are limited with space this could easily have been played on a 3' x 2' table and demonstrates the versatility of 6mm figures.
A final observation. It is always fun playing through actual historical scenarios but I have to admit that I often think 'if only this were part of a campaign'. I am toying with the idea of an ACW campaign loosely based on Jackson's in the Shenandoah Valley. It will be fictional but using the Orbats from the units involved. Will see how that develops but whatever happens, I really need to give an ACW campaign some serious consideration.


Turn 14:


Turn 15:

The charge on Sitlington's Hill was allocated to the 48th and 21st Virginia with the latter still unformed having cleared the dense woods. As they scrambled up the steep slope the 5th Virginia (Union) fired into them causing both units to halt.


Turn 16:


The end of turn 16.
So that is the allotted 16 turns completed. It is time to assess who has won.
Union - Failed to prevent any Confederate units permanently move forward off Sitlington's Hill (Connor's Brigade were secure on the east side of the river).
Confederate - Have one or more steady but not isolated regiments (supported within 18cms) across Bull Pasture River - Failed; Prevent the occupation of Sitlington's Hill by any steady Union infantry units - Succeeded.
Losses:
Union - 116 (4 complete units lost)
Confederate - 109 (3 complete units lost)
Overall a Confederate victory albeit not a decisive one. I had toyed with the idea of playing on to an obvious conclusion but felt that there was little enjoyment to be had in continuing.
If you are limited with space this could easily have been played on a 3' x 2' table and demonstrates the versatility of 6mm figures.
A final observation. It is always fun playing through actual historical scenarios but I have to admit that I often think 'if only this were part of a campaign'. I am toying with the idea of an ACW campaign loosely based on Jackson's in the Shenandoah Valley. It will be fictional but using the Orbats from the units involved. Will see how that develops but whatever happens, I really need to give an ACW campaign some serious consideration.
Jon, very enjoyable and bonus of being compact enough that plenty of gamers could have a go with this. With that in mind, you mention that at one point the woods become dense. Are the woods generally light, with just above Sitingtons Hill being dense. The Green v Regular situation will bring some interesting nuance in replays.
ReplyDeleteThanks Norm. The dense woods are those on the slopes of the hills, mainly around Sitlington's Hill. The rest are open woods or difficult terrain in the rules (dense are severe). Movement is halved in all but units are not able to form up in the dense woods. Units in column of march can move normal speed in open woods and half speed in dense but can remain formed (useful for the Confederates). The Union troops did suffer from their green status.
DeleteThanks Jon, that must have exhausted your supply of trees :-)
DeleteI quite fancy giving this a go.
No probs Norm. Nice little action to fight. Yes it did exhaust my supply of trees.... will have to knock up a few more!!
DeleteInspired by your game, I have since played this and really enjoyed the flow of battle, which was very similar in nature to yours.
DeleteFlattered to hear that Norm. I read through your version and thoroughly enjoyed it.
DeleteAs Norm says, this is was a very enjoyable battle report. Your table looks superb and the action was hot. If not for the seemingly wasteful loss of life by some fortuitous Federal fire, the Rebels may have gained a little larger margin of victory.
ReplyDeleteThis is really a good-sized action for a regimental-level battle. I may give this one a try too!
Good job!
Many thanks Jonathan. Yes I would recommend giving it a go. Lots of possibilities and presents both sides with very different problems.
DeleteSounds like a battle for my Airfix ACW figures! You sure make 6mm look good!
ReplyDeleteMany thanks AP. I really wish I had kept my Airfix figs. My earliest wargaming was with those 50 years ago!
DeleteGood morning Jon
ReplyDeleteWell a tree production line might be in 2019 plan now.
Great scenario well documented a really good read and visual treat.
Regards
Peter
Hi Peter. When I see some of the superb 6mm 'forests'created by some on a fixed base I sometimes wonder if I have gone down the right route with individual trees. However, what I find is useful having loose trees is that you have the ability to create whatever shape and size of wood you want. Also easy to move troops through them. I do them in batches of 10 which is relatively easy and soon builds up.
DeletePleased you enjoyed the read and thanks for your comments.
All the best
Jon
Hi Jon
ReplyDeleteI would also also thought that tight clumps of trees make it near impossible to recreate woodland skirmishes because of movement problems.
Still an interesting problem to resolve.
Regards
Peter
First time to your blog and I really enjoyed the ACW write up. Very nice scenario and report. I’m a big fan of ACW and you do it very well.
ReplyDelete6mm is a great way to play out a battle. 😀
I’ll have to follow your blog from now on and have a look around. 😀
Thanks Stew and welcome to the blog. Hope you find the rest of it an entertaining and useful read.
DeleteYou really do set a great table, Jon, and your battle reports are a delight to read. This one was no exception! Two thumbs up for the Valley campaign idea, too. With a great many
ReplyDeleterelatives (now only distant ones remaining) in Virginia, I have driven down the Shenandoah valley several times. Beautiful country!
Thanks Peter. I 'toured' the area of McDowell on Google street view to get an idea of the topography in the area. I concur it does indeed look beautiful in that area. I envy you the chance to drive through the valley and seeing some of those battlefields.
Delete