The second battle of the campaign involves the 16th Gemima Legion advancing into what is present day Suffolk. They hoped to persuade the local Trinovantes tribe to ally with Rome but as they approached a village at the mouth of an estuary there appeared to be little prospect of that.
A reminder of the present situation -
As the Roman Legions begin their advance into England the Atrebates tribe have now been pacified (see previous battle) and the Cantii allied.
The task for the 16th Legion is to seize and hold the East, Midlands and North.
Continued -
 |
| A peaceful scene as the inhabitants of the village go about their daily lives, fishing, farming and general mingling. The village is located at the head of a tidal estuary. |
 |
| The villagers peace is about to be disturbed. |
 |
| The calm before the storm. |
Battle Details:
Table Size - 4'6" x 3'
Rules - Own modified General de Brigade
Figure ratio - 1:15 approx.
Orders of Battle
A brief explanation of the Orbat chart. A v M and A v F = Attack value v Mounted, Attack v Foot. Numbers in brackets = armour penetration value (i.e. deduct this figure from opponents armour value). Where marked with an asterisk means 1st round of combat only. S = shooting. AV = Armour Value. The rest is self-explanatory.
 |
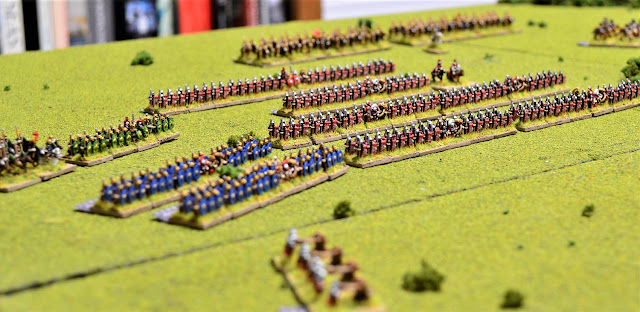
| The Roman army from left to right - 16th Legion of 10 cohorts with the large 1st cohort to the front. Centre - 2 x Medium cavalry, 3 x Equitata (1 x auxiliary + 2 x Batavian). Right - 4 x Auxiliary cohorts, 4 x Scorpios. |
 |
| Swarms of Trinovantes warriors stream past the startled village and spread out among the fields. |
 |
| Chariots and light horse protect their right flank. |
 |
| Slingers and Javelinmen screen the warbands. |
 |
| The Trinovantes left flank. |
 |
| In the distance the Romans arrive deployed across the approaches to the village. Here their right flank is commanded by their Legate. |
 |
| The Tribune commanded the left flank. |
 |
| The third command is the reserve of cavalry. |
 |
| An overview at the start. |
NEXT: The Battle Commences


Baeutiful terrain and figures as always Jon, with the last shot very evocative, as you really get the impression of massed Roman ranks bearing down on the village, with the Britons rushing to the defence. The village life details are an excellent addition.
ReplyDeleteSo much time and effort spent to in creating a really atmospheric set up. The village itself is magnificent. Looks as though the Roman force will be able to stretch across the entire width of the table which probably removes much of the risk of outflanking. However, the large woods on the left of the British deployment offers some opportunities here if the Romans move between both woods. Looking forward to seeing how this develops.
ReplyDeleteMany thanks for the comments. The tribal leaders have a little trick up their sleeves.... more to follow!
DeleteThe settings make the games.
ReplyDeleteI agree there Dave.
DeleteGood morning Jon, I have to say your tables always look excellent and tell a story in themselves. I especially like the way the water is set up as a small port.
ReplyDeleteRegards Peter
Many thanks Peter.
Delete