Before I start with the AAR, a word about Skirmishers. Followers of my blog will be aware I have been experimenting with skirmisher rules for this scale. I have found it not practical to deploy skirmisher bases - they are simply too fiddly. Therefore skirmishers will be treated in the abstract similar to the Grande Armee rules. Units are given an SK factor and when within range of the enemy, will fire as per the GdB rules.
Another house rule to deal with the rocky terrain in this game, was to introduce a new terrain type of 'broken'. Basically the same as 'difficult' but infantry are unable to form up. In the rules unformed infantry are unable to charge. In this terrain I have allowed them to 'advance to contact' testing as if charging but gaining no charging benefits. Not quite so easy for the French!
On to the game:
 |
| A reminder of the initial French deployment. |

Peace is broken by the thunderous roar of the opening salvo from the massed French artillery signalling the start of the action. The Spanish Walloon Guards sheltering among the rocks suffered the first casualty as cannon balls rained down on them.
Continued -

On the French left the 21st Division and 5th Cavalry Division move out towards their redeployment positions.


The 21st Division approaches its Reserve position.

After 1 hour of bombardment (4 turns) to soften up the Spanish, the general order to advance is given. Tromelin's brigade (middle top) is delayed by 2 turns before it moves off to support Bony's brigade. Otherwise all units move off as ordered.

An ominous quiet descends on the battlefield as the Spanish observe the oncoming French infantry. They have now entered broken terrain and as a result unit cohesion begins to break up.


The Andalucia Volunteers occupying the high ground begin to realise that some French troops are heading in their direction and keep their heads down as skirmishers open fire on their position. They were rather hoping that the French would conveniently enter the valley below them presenting easy targets. Unfortunately for them, their carelessness revealed their position!
 Turn 12 produces and unexpected problem for the French. As French and Spanish skirmishers exchange shots, a double '6' by the latter results in Bony being wounded. Although only a light wound he will have to retire to seek medical attention.
 Turn 13 and the French continue to make their way through the increasingly rocky terrain and as they do so struggle to maintain their formations.
 On the hill, the Andalucian Volunteers open fire on the approaching French but their ragged volley proves to be totally ineffectual.
 An overview of turn 14 as the French continue to lose cohesion the closer they get to the Spanish position. The latter are under strict orders to hold their fire until the last moment.
 The Andalucian Volunteers fires off another volley as the 2/11th Line approach but again without success. They stand as the French engage with fixed bayonets. The Spanish conscripts are no match for their well trained opponents and are forced to retreat.
 During turn 15 an attempt to rally the Andalucian Volunteers failed utterly. They promptly dispersed from the field!
 An overview of turn 15. All skirmishers have now been recalled and the Spanish brace themselves as the French approach.
 Turn 16 passed uneventfully but turn 17 saw the main French assault commence. Starting with the Spanish left, the 1/11th Line scrambled over the rocks and ploughed into the Toledo regiment who had faltered in the face of the French. The French quickly overcame the Spanish defenders who were forced to retreat.
 The Seville Regiment had more success inflicting casualties on the advancing French 2/5th Line who faltered prior to making contact.
 All did not go well for the Spanish in the centre. The 1/5th Light advanced on the Walloon Guards who had already suffered significant casualties. This proved too much for them and they routed prior to contact.
 With the Walloon Guards having abandoned the Spanish centre, all attention now turned towards their right defended by the weak battalions of the Catalonia Light Infantry and the Saragossa Regiment.
 A closer view as the veteran 2/10th Line weave their way through the rocks towards contact. The Catalonia Light Infantry wasted no time and promptly retreated leaving the heavily outnumbered Saragossa Regiment to hold the line. There could only be one outcome but although defeated, the Saragossa Regiment only suffered a 'push back' result.

 In response, Morillo ordered the 1st Leon battalion (centre of photo) to relocate to counter the French threat.
All was not going well for Morillo with only one battalion still holding the front line. He would have to reorganise his troops quickly to avoid a crushing defeat.


 The Seville regiment conducts a rare Spanish charge and launches itself into the faltering 2/5th Line hoping to turn the tide in a part of the valley floor at least. They were defeated outright in the subsequent melee and are forced to retreat.
 Morillo is now starting crushing defeat in the face having seen the Walloon Guards streaming away from the battlefield in a blind panic.


 The only Spanish battalion or the right flank remaining on the valley floor is the Saragossa Regiment. Despite being outnumbered by more than 2:1 they give a good account of themselves against the French 2/10th Line. They will nevertheless be pushed back to join their comrades on the ridge slopes.


 Another Spanish regiment departs the field as the Toledo regiment fails to rally. On the Spanish right flank the valley floor has now been abandoned with Spanish units attempting to form a new defensive line on the steep slopes.
 Morillo attempts to rally the retreating Seville regiment as the first of the French battalions approach the ridge crest.
 Turn 21 sees the Catalonia Light Infantry, despite being heavily outnumbered, do a sterling job in attempting to fight off the veteran 2/10th Line as they push up the steep slope on the Spanish right flank. They are though pushed back leaving all Spanish units now on the ridge crest.
 Del Parque joins the Fusiliers of Eastern Spain in the centre as they pour ineffectual volleys down on to the advancing French battalions.
 Morillo fails to rally the Seville Regiment and has now fled the field. He contemplates a crushing defeat having observed his brave Spanish soldiers brushed aside with ease. Morillo scans the ridge crest. His small straggling line of troops contrasts with the triumphant French battalions swarming across the valley floor.
 Successive French battalions climb the steep slope to deliver the final death blow to the heavily outnumbered Spanish.
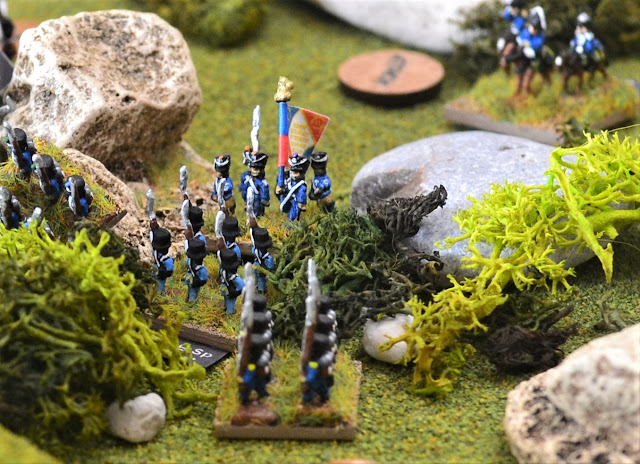
 A Spanish cheer erupts from the ridge line. The French 1/5th Light launched their charge at the ridge line but despite a ragged Spanish volley (centre of the photo) they lost their nerve and retreated back down the slope. Worse was to come for the French. The battalion commander attempted to rally the 5th Light but they inexplicably threw down their muskets and fled the field (a double '1' was rolled!).
 The 2/10th Line are the first to charge the Spanish right flank scrambling over the rocks to exchange blows with the heavily outnumbered Saragossa regiment. The Spanish were not prepared to give any further ground successfully pushing back the French battalion back down the slope.
 Morillo was heartened by this turn of events but the scale of his problem unfolded before him as more and more French approached his precarious position.

 2 French battalions charged the 1st Leon (top right). Encouraged by Morillo who had remained with them they fired a steady volley at both battalions. Once again the French struggled with the 2/27th Line retreating back down the slope. The 2/84th continued their scramble onto the ridge crest to be met by the fired up Spanish. With Morillo in the lead they engage in a melee for control of the ridge.
 Bony joins the 1/10th Line in a charge up the steep slope into the small battalions of the Catalonia Light and Saragossa who both stand firm and engage in a desperate melee.
 It is now turn 25 with only 7 moves left for nightfall. The valley floor is increasingly chaotic as retreating French units intermingle with supporting battalions.
 Where Morillo had despaired of a crushing defeat in which he would see his small army annihilated he dared hope that they just might be able to hang on until darkness. The ever diminishing numbers of the 1st Leon again succeed pushing the 2/84th Line back to the valley floor. A significant threat is emerging on their left though.
 Miraculously the Spanish have yet more success as the Catalonia Light infantry and the Saragossa regiment eject the 1/10th Line together with Bony from the ridge.
 It is now turn 26 and the Catalonia Lights with the Saragossa Regiment firmly hold the crest on the Spanish right flank. But for how much longer?
 Morillo pulls the 1st Leon back along the ridge protecting the flank of what is left of his ccntre.
 Taking on the appearance of a last stand the last of the Spanish battalions holding the ridge centre pass morale tests to meet the advancing French battalions in melee. On the left, the Conscript Fusiliers of Eastern Spain bolstered by Del Parque melee with the 4th Swiss. On the right, Tromelin leads the 1/107th Line into the 2nd Leon. Both Spanish battalions narrowly lose their melees and are pushed back. The 2 French battalions are disordered and in no position to follow up.
Morillo realises that there is now no chance of holding out any longer and orders a general retreat. The remnants of his army march down the eastern slopes of the ridge with their heads held high. Lobau is happy to see them leave the field unmolested deciding it is now a higher priority to rest his tired Corps overnight before taking Brandenlea the following day.
Morillo is unable to retire on Brandenlea with his pathway being blocked by French cavalry. Sending a messenger to his cavalry and artillery in Brandenlea he orders them to join him on the road to rejoin Wellington. Although defeated, he has made his point. The Spanish will always fight to save their capital.
Final thoughts:
It was always going to be tough for the Spanish but their dice rolls were consistently awful until they retired to the ridge line. From this point on the dice roll results were reversed almost entirely leading to an exciting finale. It was beginning to look like I would be reporting on nothing other than a massacre - not a great deal of fun nor does it make for an interesting AAR!
Overall casualties were relatively light reflecting on the ineffectiveness of musketry among the rocky terrain. Even more so with most of the firing performed by largely poorly trained Spanish troops.
French casualties = 18. 8 recovered leaving overall loss of 10.
Spanish casualties = 36. 9 recovered leaving 27 lost.


French infantry were now pouring across the high ground towards the Spanish flank and rear.

All was not going well for Morillo with only one battalion still holding the front line. He would have to reorganise his troops quickly to avoid a crushing defeat.

An overview of the valley floor on turn 18,

The Spanish right flank desperately holds on as pressure builds.


In turn 19 Spanish troops on their right flank gradually pull back onto the ridge to regroup.

The daunting sight of the French approaching the Spanish right.


Over on the French right they continue to swarm across the valley floor and sides towards the ridge.

An overview of the centre.

In that centre, the Conscript Fusiliers of Eastern Spain are charged by the 1/5th Light infantry. They are easily defeated and will retreat the next turn.


An overview on turn 24.


Morillo realises that there is now no chance of holding out any longer and orders a general retreat. The remnants of his army march down the eastern slopes of the ridge with their heads held high. Lobau is happy to see them leave the field unmolested deciding it is now a higher priority to rest his tired Corps overnight before taking Brandenlea the following day.
Morillo is unable to retire on Brandenlea with his pathway being blocked by French cavalry. Sending a messenger to his cavalry and artillery in Brandenlea he orders them to join him on the road to rejoin Wellington. Although defeated, he has made his point. The Spanish will always fight to save their capital.
Final thoughts:
It was always going to be tough for the Spanish but their dice rolls were consistently awful until they retired to the ridge line. From this point on the dice roll results were reversed almost entirely leading to an exciting finale. It was beginning to look like I would be reporting on nothing other than a massacre - not a great deal of fun nor does it make for an interesting AAR!
Overall casualties were relatively light reflecting on the ineffectiveness of musketry among the rocky terrain. Even more so with most of the firing performed by largely poorly trained Spanish troops.
French casualties = 18. 8 recovered leaving overall loss of 10.
Spanish casualties = 36. 9 recovered leaving 27 lost.
NEXT - MAP MOVES
What a cracking looking game Jon:). At one point I thought it would be a complete French steam roller victory, but then suddenly the Spanish started to turn the tables. Thinking the Spanish might just hold on, the tables turned once again. I really felt for them in this game and thought the terrain might help them as it looked great for defence, but you can't account for poor die rolls. Looking forward to the map moves and the next game.
ReplyDeleteMany thanks Steve. Yes it was an enjoyable game in the end.
DeleteGreat game Jon, your table is always a joy to see! It’s a relief that the Spanish were not so hopeless; I wouldn’t like to be spending my time painting up such an utterly useless mob 😃
ReplyDeleteMany thanks Mike. Aha - yes the 'not so successful' Spanish. As somebody pointed out on facebook, you have to hand it to them, despite repeatedly losing battles they would simply not lie down and give up. As my Spanish collection builds I intend to play out some historical Spanish v French actions. See if I can turn history on its head!
DeleteI really enjoyed that AAR. Napoleonics is one of the few periods i have struggled to get to grips with but a report like this makes me want to give it another go.
ReplyDeleteMany thanks Elenderil. Pleased that it has enthused you over Napoleonics. It does not have to be the large set piece battles they are famous for.
DeleteExcellent AAR, I love the look of the thing - that scale makes it seem like a battle and not a skirmish. Your paint jobs are great too.
ReplyDeleteMany thanks for that Joseph. Very much appreciated.
DeleteGreat looking game and a stirring report The broken ground very evocative - I expected to see some Guerillas bust forth from the rocks at any moment...
ReplyDeleteThanks Peter. Ah the Guerillas! That merry band is operating further north threatening French supply lines. Hope to have them in action soon.
DeleteWow - what a battlefield! A superb commentary to match the setting and the troops. An enjoyable posting.
ReplyDeleteMany thanks for that AP. Pleased you enjoyed it.
DeleteGreat layout as usual Jon what a great promotion for 6mm wargaming.
ReplyDeleteRegards
Peter
Many thanks Peter.
Delete