4.00pm - 5.00pm
There was a lull in the action at 4.00pm as both sides sought to recover and reposition. There was activity on the Allied left flank where the French were continuing to attempt to exploit the weakness in the allied line. The 19th Division of 6th Corps also sought to consolidate it's position around Smohain and Papelotte in preparation of the arrival of the Prussians.

Vandeleur with the last of his brigade, the 12th Light Dragoons, sought to clear some of the French cavalry away from the Hanoverians. He charged the 9th Cuirassiers but at the last moment the confidence of the Light Dragoons evaporated as the 9th Cuirassiers counter-charged. They were caught at the halt by the Cuirassiers but nevertheless put up a good fight before being overcome. They were pushed back and the Cuirassiers had become unformed.
Continued ...
Continued ...

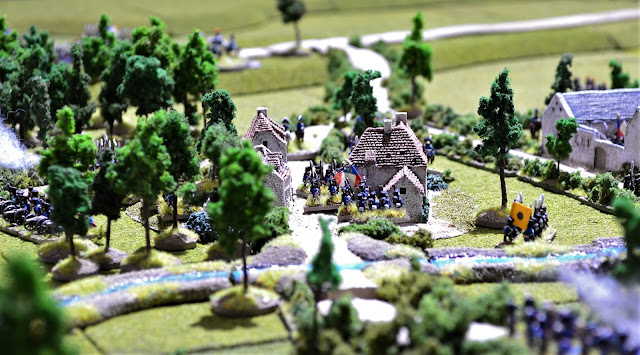
The 2 battalions of the 5th Line assaulted to the two buildings on the east side of Smohain successfully capturing both for no loss. The 2/28th Nassauers now just held the largest building on the west side of the village.

The French artillery continued their bombardment with Rogers' battery on the Ohain Road east of the crossroads being the target. Once again the 12pdr Guard batteries proved lethal landing their shot bang on target. It decimated the British battery with the survivors dispersing. The Ohain Road (running through middle of photo) was now clear of allied artillery.

The last battery remaining on the ridge, Sandham's Foot Battery from the 1st Division ignored his order to pull back and continued pouring fire into the oncoming columns. Being low on ammo reduced it's effectiveness but nevertheless still took casualties. French artillery attempted to put it out of action but their aim failed them on this occasion.

Back on the allied left, the 2/29th Line (middle of photo straddling Ohain Road) who had been firing on the square of the Verden Landwehr, decided the time was right to fix bayonets and charge. The Landwehr who had lost well over a third of their number, routed in response. This generated several morale checks among the battalions in the vicinity. A couple faltered but the principle problem occurred with Col Best's Brigade morale check. The brigade broke which translated Verden's rout into a dispersal.

There was a lull in the fighting around Hougoumont as Soye rallied his battalions that had been pushed back.
There were two significant allied rally checks. The first was not really a surprise. The Cumberland Hussars failed to rally and routed from the field. No doubt to alert Brussels of the allied defeat! The second was a surprise. The 1st Dragoon Guards also failed their rally and routed following the Cumberland Hussars. This was a loss Wellington could not afford to lose. The 3rd KGL Hussars managed to rally from rout despite Arentschild being absent to have his wounds treated.
In the photo can be seen Dornberg who had finally moved his brigade to counter the French on the right (middle right of photo).


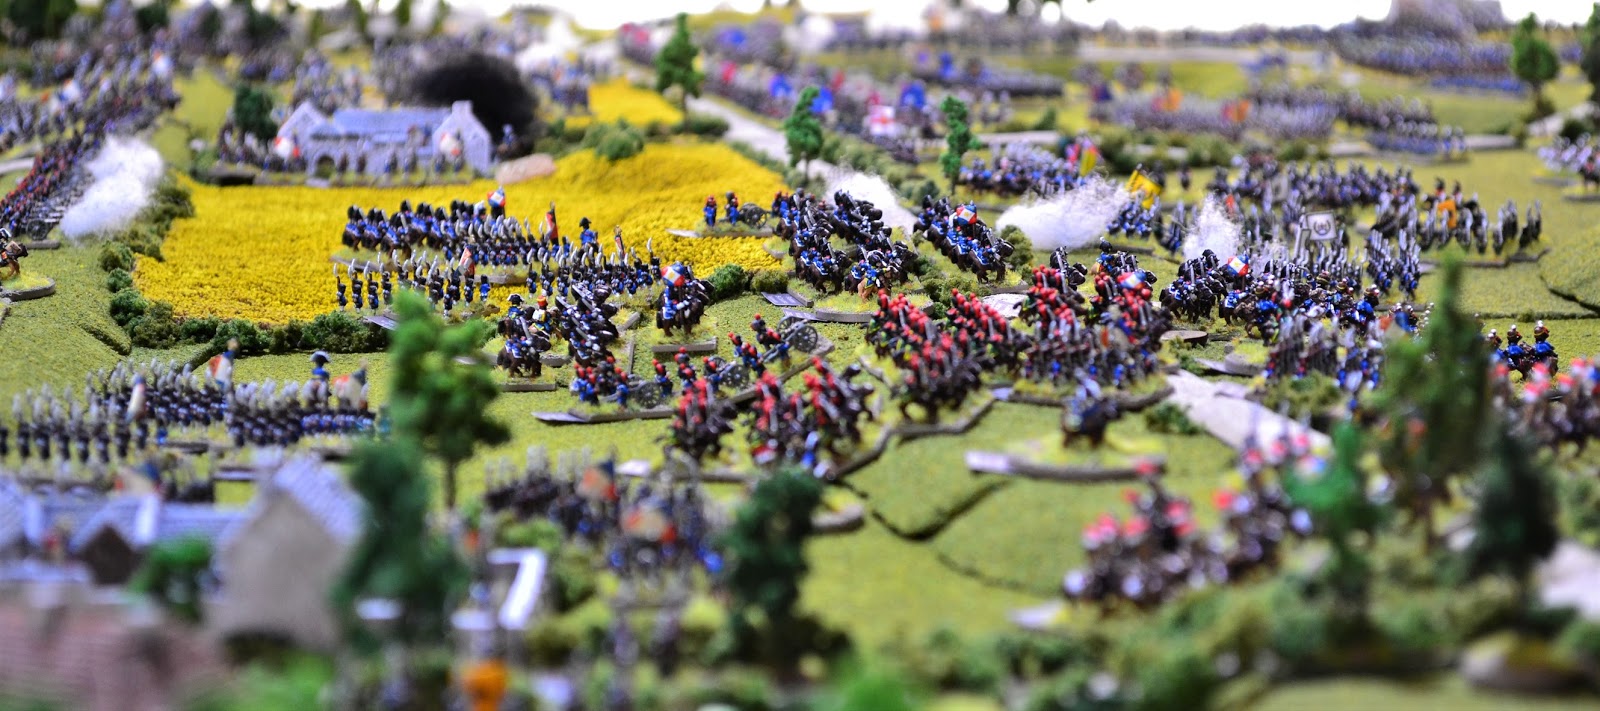
3 photos of the allied left whose units must have been looking over their shoulder willing the Prussians to arrive. The sight of the huge number of Guard Chasseurs approaching the ridge (middle of last photo) was causing consternation among the allied ranks.
In the next turn the action around Smohain intensified as the French sought to secure the hamlet prior to the arrival of the Prussians.
 The 2/2nd Nassau had been in line formation bridging the gap between Smohain and Papelotte. The French 1/95th Line charged the Nassauers in line formation with the 2/11th Line charging in column formation on it's right flank. The Nassauers fired off a highly effective volley killing 4 from the 1/95th and 2 from the 2/11th. The 1/95th had failed it's charge home test and retreated. The 2/11th pressed on with it's charge. The 2/2nd Nassau, shocked at still being charged after bringing down so many French, turned tail and routed (middle of photo).
The 2/11th continued it's charge into the last building in Smohain occupied by the Nassauers (building on the right of Smohain in middle of photo). The ensuing melee was a stalemate and would have to continue for another turn.
 Elsewhere in Smohain the French began to prepare for the arrival of the Prussians. Annoyingly they came to the attention of the Nassauers in Frischermont who decided to take pot-shots at them.
 The 3rd French Lancers saw an opportunity of ridding the French right flank of a half battery of Dutch Horse Artillery positioned on the forward slope of the ridge above Smohain. It launched into a charge and predictably the battery limbered up and evaded the charge. The Lancers at the end of their charge in the photo to the left of centre partially hidden by trees. On the Ohain road is Vincke.
 Vivian saw an opportunity for the 1st KGL Hussars to gain some glory. A short distance ahead of them the 9th Cuirassiers was unformed. This was the ideal opportunity for the light cavalry to turn over the heavy Cuirassiers. They charged into the French cavalry with Vivian at their head.
 This really was not the allied cavalry's day on the left flank. This resulted in the KGL Hussars being pushed back. The sweetener was the risk to General. If a General was leading a force in melee then any double thrown by the opposition results is a risk to him. In this case Vial received a wound. He carried on regardless but his wound was such that it affected his ability to lead. From now on he would be classed as 'poor'.
 A French horse artillery battery unlimbers within canister range of the 7th Belgian Line and fires into the square (middle of photo). 4 casualties are caused but the Belgians pass their morale test.
 The French artillery now reverts to lobbing salvos blind over the ridge to make life as uncomfortable as possible for the allies. Battalions on the reverse slope lie down once again but other units are being re-positioned or in squares. One salvo lands among the 8th Belgian Hussars killing one of their number and causing them to falter.

 H.Halkett's Brigade of Hanoverians on the far right of the allied line come to the attention of Donop's Cuirassiers brigade. The 2nd Division KGL Horse Artillery battery that was deployed with the Hanoverians was being problematic for the French. Donop decided it was time to see them off and try his luck against the conscript squares. He charged with the 12th Cuirassiers. The KGL battery immediately limbered up and evaded. The Cuirassiers continued their charge towards a square made up of the Saltzgitter and Bremervorde Landwehr battalions. The square held in the face of the charge and repulsed the Cuirassiers.
Another turn of minimal action and was one mainly of manoeuvre.

 Dornberg's light cavalry brigade formed up ready to counter the French on the allied right flank (middle of photo). Arentschild reformed the 3rd KGL Hussars in support to their rear and Grant did likewise with his surviving cavalry behind their right flank.
 Foy and Bachelu's Divisions prepared for the main attack with Charlet's Brigade moving past La Haye Sainte ready to assault the area around the crossroads.
 All battalions along the ridge were positioned just behind the ridge line and were ready to deliver their first volleys against the advancing French.
 In the foreground Soye and Bauduin had moved their battalions into a position where they could launch simultaneous assaults from all sides on Hougoumont.


 Trip's heavy Dutch/Belgian cavalry brigade now formed into column of squadrons and is ready to counter the French cavalry on the allied left flank.


 Detmer's Brigade of Chasse's Dutch/Belgian Division crosses the Genappe - Brussels road to support the allied left.


Total units lost at 5.00pm: French = 27, Allies = 25, Prussian = 1
In the next turn the action around Smohain intensified as the French sought to secure the hamlet prior to the arrival of the Prussians.

The 2/11th continued it's charge into the last building in Smohain occupied by the Nassauers (building on the right of Smohain in middle of photo). The ensuing melee was a stalemate and would have to continue for another turn.


Another turn of minimal action and was one mainly of manoeuvre.


Behind the allied left flank.

Trip continues his move towards supporting the allied left.
The Guard Chasseurs move across the ridge.
4.30pm
After a short lull this turn things started to warm up and of course the Prussians arrived! Starting with the French left we will work across the battlefield.

The success of the Carabiniers so far had clearly gone to Blancard's head. He decided to order both regiments to charging anything that moved.

He lead the 2nd Carabiniers into a charge on the whole of Dornberg's Brigade. In the foreground the 1st Carabiniers charged Bolton's Foot battery, the crew of which evaded into the adjacent squares. They then continued their charge towards the square of the 51st Light Infantry. They faltered under fire from the square losing casualties.

Blancard was counter-charged by the whole of Dornberg's Brigade. He was hopelessly outnumbered but what the hell, this was the elite Carabiniers.
He had to beat the highest of the three die rolls of Dornberg's brigade. When all modifiers were added, the heavy French cavalry had defeated Dornberg causing all three light cavalry regiments to retreat. They had clearly buried themselves into the mass of Anglo/German cavalry with such force as to demoralise them. There was a price to pay for this rashness however. There were a total of 17 Carabiniers in melee with 74 Light Dragoons. The winner kills 1 per 4 and the loser 1 per 8. The Carabiniers therefore killed 4 and the Light Dragoons killed 9 Carabiniers. This took them past the dispersal point but as they has won the melee they were ok for now. But with just 8 Carabiniers left they were a spent force, although they did get a Superb Discipline result in their pursuit test.

Jerome Napoleon launched his divisional attack on Hougoumont and every battalion passed their charge home tests despite losing several casualties to fire from the Coldstream Guards. A total of 8 French battalions were now in melee around the entire circumference of the Chateau.
The company of Guards at the north gate fought off the 1/2nd Line. The two companies of Guards left in the Gardener's House did likewise to the 3/2nd Light. Problems arose for the garrison at the west gate and east side of the building bordering the garden. The company of Guards at the west gate was pushed back with the 3/2nd Line forcing their way into the courtyard. Even worse was to occur at the east gate facing the garden and the adjacent farmer's house occupied by the company of Lunebergers. Bauduin leading the 1/1 Light battalion forced their way in through the gateway destroying the company of Guards defending it. Elements of the 2/2nd Line and 3/1st Line fought their way into the farmer's house overwhelming the Lunebergers. With French infantry now swarming into the courtyard and buildings it was over for Byng and the Coldstream Guards. Hougoumont had fallen!

An overview of the slow progress of Bachelu and Foy's Divisions as they approach the ridge. Several brigades failed to activate this turn and one of those was Campy's brigade of Bachelu's Division. With the allies on the reverse slope the plan for both divisions was to place themselves in a position where they could deliver a volley of musketry before launching assaults across their entire frontage.
Jamin of Foy's Division had other ideas. Frustration at the slow progress boiled over when Campy's Brigade stopped dead in it's tracks.

He ordered his brigade to charge with fixed bayonets and off he went in the lead. The 3 battalions who followed him crossed the top of the ridge and found themselves staring down the muzzles of over 800 Grenadier Guards.


The 2nd battalion of the Grenadiers Guards rolled the dice and double 6! Exactly what you would expect by such an illustrious unit. 9 casualties were inflicted against the 3 battalions and all faltered. Jamin himself was oblivious to the hail of musket balls whistling past and creating havoc with his battalions as he continued to charge the British line. He was promptly captured by some rather amused Guardsmen and taken to General Maitland who congratulated him on such an impressive display. He might want to bring a few people with him next time!

To the right of Jamin's charge, the 1/4th Light had obeyed Jamin's orders and also charged in line formation. It's target was the 3rd battalion of the Grenadier Guards. The Guards fired but they were in double line 4 deep so only half the battalion fired. They had a good result and killed 3 of the 1/4th Light. Not having the benefit of Jamin in the lead appeared to do the trick and they charged home.
In fact, not only did they charge home but in the ensuing melee the succeeded in pushing the Guards back. They had actually breached the strongest part of the allied line! Jamin might have been right after all!


On the allied left the French launched into several attacks in their continued attempt to roll up that allied flank. In these photos, 3 charges into melee are made. From the left:
Gobrecht, having rallied the 4th Lancers from their falter, charged the 10th Hussars. The latter, also having rallied, counter-charged. The Lancers were defeated and would have to retreat. The Hussars would be pursuing in the next turn.
In the centre and foreground, the 2/8th Line charge into the Hildesheim Landwehr battalion who were still in square with a fellow battalion forming the opposite two sides. The French battalion won easily causing the Hanoverian battalion to retreat.
Finally the two largest squadrons of the Guard Chasseurs lead by Lefebvre charged the 18th Hussars who counter-charged with Vivian in the lead. The 18th Hussars gave a good account of themselves but were pushed back in melee. They crucially lost 6 of their number equating to almost 30% of their total while only inflicting 2 in return.

In Smohain the French unsuccessfully attempt to eject the Nassauers from the last house they occupy in the hamlet.
The Prussians arrive:

In the distance the lead elements of the Prussian 4th Corps emerge from the Bois de Paris.

Schwerin's Cavalry Brigade screens the advance. Here the 1st Uhlans is ahead of the lead battalions of Hiller's 16th Brigade.

The 6th Hussars screen the arrival of Losthin's 15th Brigade.

In an attempt to link up with Wellington's left, Bulow sends the Fusilier Battalions of the 18th Infantry and 3rd Silesia Landwehr under the command of an ADC towards Smohain.
Separately, another ADC leads the 1st battalions of the 15th Infantry and the 1st Silesia Landwehr south heading for Vivere wood (currently off table).

The French 6th Corps are ready to meet them.

Colbert launches his two Lancer regiments at the Prussian Uhlans. The latter counter-charges. Unfortunately for the French the 1st Lancers lose their nerve and halt (the right unit in photo). The Uhlans win the melee pushing the 2nd Lancers back. The Prussians will pursue in the next turn.

Domerget and Vinot head their Chasseurs in a charge on the Prussian 6th Hussars. The 4th Chasseurs falter but the 9th Chasseurs and Vinot's 12th Chasseurs clash with the counter-charging Hussars. The Chasseurs win decisively causing the Hussars to retreat. The 9th and 12th Chasseurs will retire next turn with blown horses.


In the meantime the Young Guard in Plancenoit prepare to defend the village. The remaining Old Guard artillery battery has joined them and is sited to protect Plancenoit directly.
The Prussians and Allies have the initiative in the next turn.

Schwerin with his Uhlans are unable to pursue the French 2nd Lancers so they perform an uncontrolled charge against the 1st Lancers. The Lancers successfully counter-charge lead by Colbert. The French Lancers narrowly win pushing back the Uhlans. Each side loses 3 casualties.


The 3rd Silesia Landwehr cavalry charged a battery of French horse artillery who had been in a threatening position on high ground to the south of Frischermont. The battery limbered up and evaded rather than risk annihilation. The Prussian cavalry adjusted it's charge towards the 12th Chasseurs who were unformed with blown horses. They charged home carving a path into the struggling Chasseurs. The Prussian conscripts timed their charge perfectly and overturned the Chasseurs who were forced to retreat. The elated Landwehr cavalry decide to pursue them.

The whole of the Prussian 15th and 16th Brigades had now arrived along with Bulow.

Thile leads the 1st and 2nd battalions of the 3rd Silesia Landwehr into woods to the east of Frischermont to add to the two battalions commanded by an ADC striking towards Smohain and linking with the allied left.

Having seen off the last French attack, the commander of the 2/28th Regt of Nassau marches out of Smohain abandoning it to the French. He feels nothing more can be gained from defending the last house of the hamlet and to remain risked destruction. He now sought to rejoin the rest of his brigade.
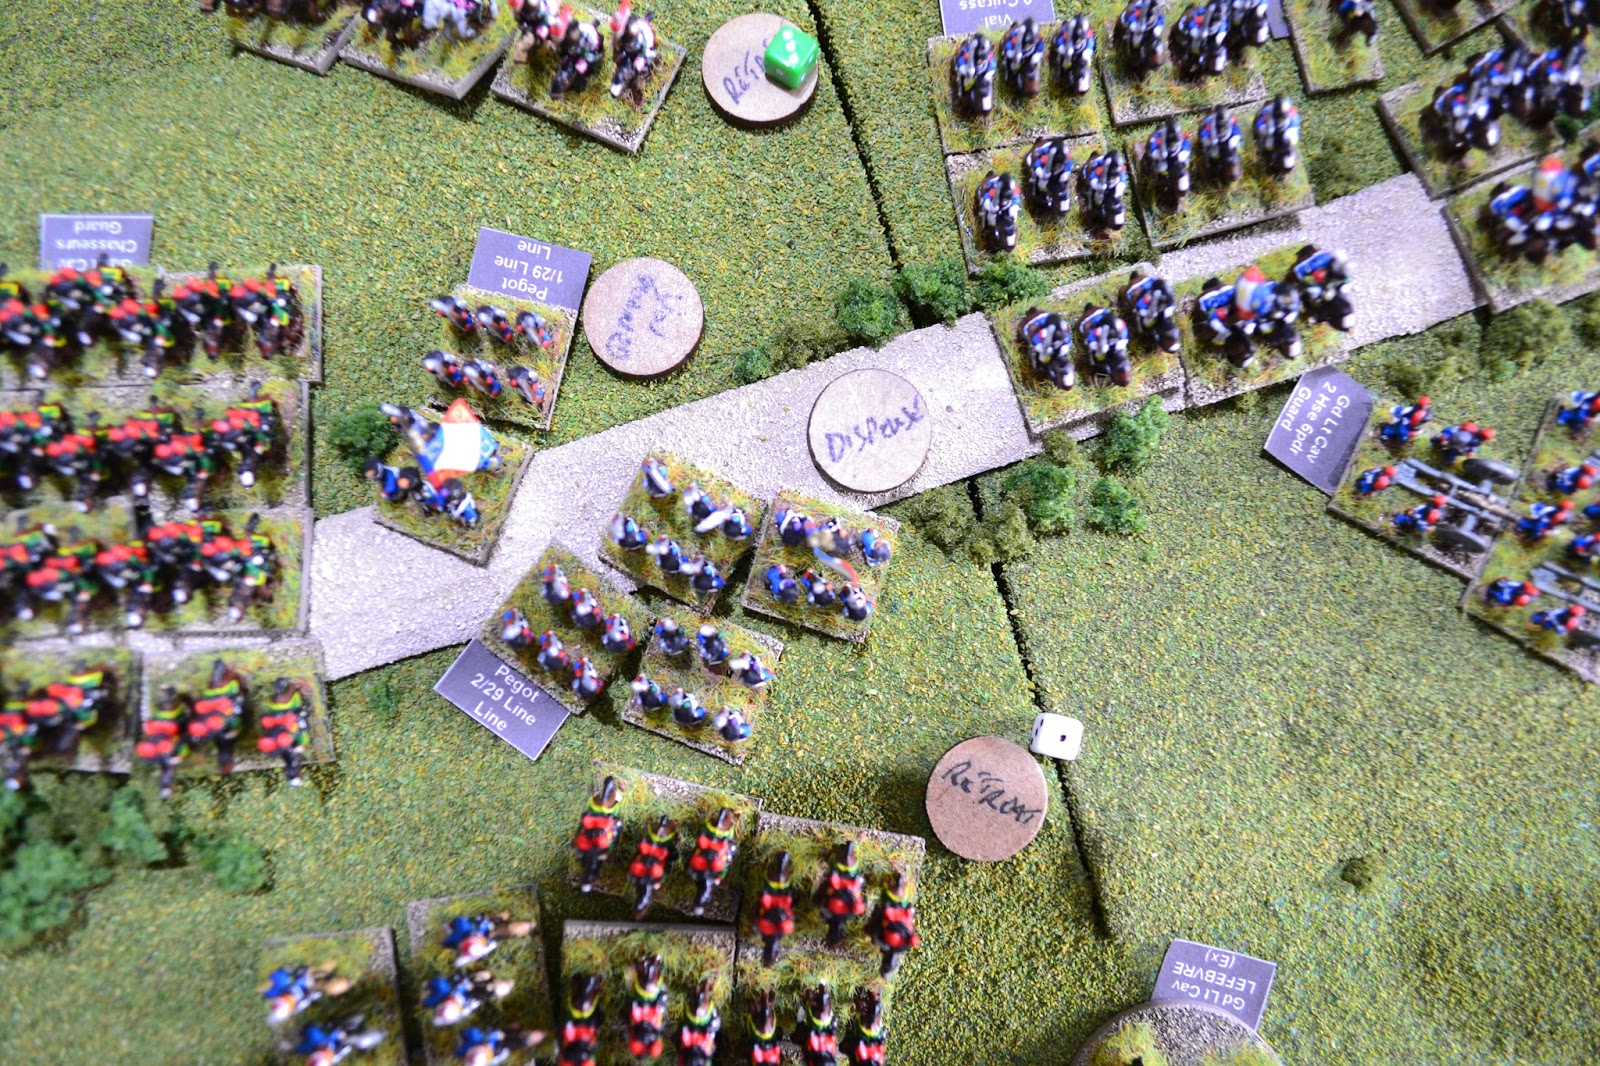
Ahead of the 2/28th Regt on the allied left, the 10th Hussars commenced it's uncontrolled charge. The small 1/29th Line was directly in front and the closest unit. As the 10th Hussars thundered towards them they immediately retreated. The 2/29th Line was the next to face the charge and they also retreated before the Hussars could make contact. As they galloped forward the flank of the Chasseurs of the Guard came into view. They were unformed!

The two large squadrons of Chasseurs were unable to respond with a counter-charge and stood their ground as the 10th Hussars ploughed into their exposed flank. The two smaller squadrons of Chasseurs to the left in the photo were also unformed and therefore could not intervene in the charge. The 10th Hussars made up for their earlier reticence and caused havoc among the Guard cavalry. They are forced to retreat losing 6 casualties. The 10th Hussars are left unformed having lost 4.

Vincke suddenly came over all aggressive! He grabbed the nearest battalion, the Hameln Landwehr, and charged the 1/8th Line on the Ohain road. The French battalion fired off a hasty volley to no effect and the Hameln charged home with Vincke in the lead. The Hanoverians were successful in the melee pushing back the French battalion. The large numbers of Hanoverians compared to the French reflected in the casualties inflicted with the French losing 5 to the Hanoverians 1.

Gardiner's RHA battery responded superbly to the threat posed by the French 3rd Lancers to the flank of Vincke's Hanoverians. They poured a salvo of shot into the 3rd Lancers who faltered having suffered 4 casualties.

The 19th Division foot battery fired with their first salvo of the battle at the approaching Prussian infantry. Somebody forgot to bring the ammo! A complete miss with a near empty Caisson.

Pegot's brigade had been spread to the 4 winds. However, he still had the 2/8th Line with him which was in good shape. He charged the Gifhorn Landwehr which was unformed. The Hanoverian battalion retreated in the face of the charge. Unfortunately for the Hildesheim Landwehr who was already retreating, this left them exposed to the charging 1/8th Line who duly struck home (middle of photo). This was an automatic win for the French and the Landwehr would continue retreating having lost more casualties.


An overview of the French right.

Donzelot's 'Division' of two battalions moves to support the 6th Corps against the Prussians (lower right of photo). Elsewhere the grand battery is broken up as batteries are re-positioned to counter the Prussians.

The gap continues to widen between the allied left flank near Papelotte and those positioned on the reverse slope to the east of the Genappe road.


Ghigny fancies his chances against the lone Cuirassiers regiment in front of him and advances his light cavalry brigade of Dutch/Belgians across the Ohain road.

The attack of Foy and Bachelu's division on the ridge is frustratingly slow. The whole of Bachelu's division fails to activate. Gauthier becomes as equally frustrated as Jamin but is less rash in his actions. He does however decide it is time to begin assaulting the ridge and uses whatever battalions he has in charge reach with the remainder advancing to support them.
The 1st and 2nd battalions of the 92nd Line infantry are the only two close enough to charge and they are ordered to advance. The 2/92nd target (middle right of photo) is the British 33rd Line. This is directly next to the gap created by Jamin's brigade so a great opportunity to build on that. A steady volley from the 33rd put paid to any hopes the French had in that respect. The 2/92nd faltered.
The 1/92nd charged the unformed British 2/30th Line. It shook off casualties from the musketry of the 2/30th and succeeded in charging home (middle of photo). The British line held in the subsequent melee beating back the French battalion who lost 5 to the British 1. The 1/92nd would be forced to retreat in the next turn.

The gap in the allied line which so far the French have struggled to capitalise on. To the right in the photo a firefight as broken out between the 2/1st Foot Guards and the French 2/100th Line, 2/4th and 3/4th Light infantry. Each side inflicted 4 casualties on each other but crucially for the 3/4th Light it had taken them past the 50% casualty dispersal point. They failed their morale test and duly disperse.

Charlet's Brigade of Quiot's Division advance past La Haye Sainte towards the crossroads.

They are supported by 3 battalions of the Middle Guard.

The great mass of allied cavalry on the right flank.

French cavalry on their left reform and reorganise themselves.
 Soye's Brigade also reform ready to commence an assault on the allied right.


The 1st KGL Line experiences the disadvantages of being in square and in effective range of artillery. Two French batteries pour salvos into the square causing 7 casualties. They falter as a result with French cavalry lurking nearby!

In the morale phase the French 2/29th Line disperses from Pegot's brigade.

And the first Prussian unit disperses, the 6th Hussars. Not an impressive start by them!

2nd Lancers of the Guard re-position to face the threat posed by the Prussians.

The Old Guard is brought foward to La Belle Alliance and is now the main reserve.
The situation for the French at 5.00pm is similar to 4.00pm as far as the allied army is concerned. The French are struggling to capitalise on the broken allied left flank mainly due to the lack of infantry. They are however, continuing to increase pressure on the allies to the east of the crossroads. Napoleon hopes to drive a wedge through the crossroads itself using 4 Line and 3 Guard battalions. The axis of attack to the west of the crossroads will also be angled towards the central allied position. Bachelu and Foy's Divisions had been frustratingly slow in launching their assaults bedevilled with command and control activation tests giving a 'hold' result to individual brigades. Reille decided in the next turn to load up the brigade commanders with their maximum number of command dice to hopefully ensure they all advance. The danger by doing this being that there could be fewer command dice available later in the hour which would make brigades harder to control.
The arrival of the Prussians brought into focus the urgency of breaking the allied army. The size of the challenge for 6th Corps to hold them on the right flank was increasingly apparent as units of the Prussian 4th Corps emerged from the Bois de Paris. The Cavalry divisions of Domon and Subervie successfully blunted the Prussian Cavalry screen but it was now down to the infantry and artillery to hold the line with the cavalry in reserve.
For the Allied army, Saxe-Weimar begins to reassemble his brigade and with Best and Vincke's brigades seek to link up with the Prussians. The Anglo/German light cavalry, now supported by Trip's Dutch/Belgian heavy cavalry brigade hope to counter the French cavalry on that wing, or at least hold them until the Prussians arrive in force. For the rest of the allied line it was just a case of holding on and plugging any gaps as they appeared.
Just as exciting as the previous hour, which had seen the French starting to get the upper-hand and as this turn started, it felt to me that the pressure on the Allies was just too much and that they would crack before the Prussians could arrive. Then the 'The 1st Dragoon Guards also failed their rally and routed following the Cumberland Hussars.' result came and confirmed that view. I thought, this is the point at which the game now slips away from the Allies .... but no, they have ended the turn as finely balanced as they started it ... the loss of Hougoumont excepted.
ReplyDeleteMy eyes are now on the Old Guard!
Great job!
Thanks Norm. It is proving highly enjoyable playing this battle as it really is on a knife edge. Just when I thought that one side or the other had it sealed something comes along and turns it the other way. I know from my campaign games with these rules, once the conscript or 2nd Line troops start to collapse it can be quite dramatic!
DeleteThis is absolute gold ! The preparation, planning and actually getting it to the board is outstanding. The spectacle must be the nearest thing to actually being there on the day, amazing and awe inspiring. I came upon your blog by chance, as one does, and have followed it since the start, with bated breath. It is something I have always wanted to do also, like you, but, unlike you, never managed for all the same reasons you detailed. I too believe that your approach, GdB and 15mm bases is perfect, altho until now, I didn't really believe it feasible or possible. I am truly inspired and indeed motivated....Wagram, Dresden, Leipzig, Borodino not to mention Waterloo. I have a "number" of questions regarding how you actually managed this magnificent array of troops in battle order and actually managed to "fight them". However, I do not wish to bury your blog into a question & answer session or detract from your excellent commentary of events.
ReplyDeleteMany thanks for your kind words Karl. Please do feel free to ask any Q's you may have. You may have seen elsewhere on the blog that I shunned large bases and rebased all my figures in this way, including in other periods. Although large scenic bases can make 6mm look great and it is quicker to move them around, they are just too static for me and sit on top of terrain rather than blend in with it (probably not the best way of describing it but hopefully you will understand what I am getting at). I am also old school in that I prefer individual figure casualties with units shrinking in size due to attrition. Doing a game of this size with GdB does require planning and organising to make it go as smoothly as possible. I cleared 3 shelves for somewhere to place casualties, rules, charts, dice etc. The beauty about playing solo is that I can play in short bursts or longer depending on how much time I have spare, sometimes just playing one or two phases. e.g. I keep a record of the phases of a turn and tick them off as I work through them. I may for example, just complete a firing phase returning later to continue with the melee phase etc. Hopefully this will give you some idea of the way I organised and played this battle.
DeleteI have never played GdB but really enjoy your writeup. I totally agree that 6 mm has to be bases like you do - the spectacle is so much better than the "scenic bases". I have several thousand adler 6 mm based like that!
DeleteGreat to hear Sparta. Nice to know there are more out there that prefer the smaller bases.
DeleteYOur photos and narrative remain riveting, Jon! Thanks for sharing it with us.
ReplyDeleteThanks again Peter. Glad that you are still enjoying the continuing AAR.
DeleteMany thanks John for your insights. I understand perfectly what you say about the larger bases. I also appreciate what you say about “old school”, I being of that generation where WRG went into massive detail with individual figure casualties etc. complex but great fun. Although I would dread the thought of trying to undertake your game with them. There was a set of rules way back entitled The Ebb and Flow of Battle which attempted to allow the really large battles (Wagram/Leipzig) in 6mm whilst maintaining some of the spectacle of small bases (2 bases per battalion) with a casualty roster system but no figure removal. I believe your ideas may very well provide the very best of both worlds, old school gaming methods with large armies. It it works, as it doubtless does, for Waterloo here, nothing else should pose a problem.
ReplyDeleteThere is one item which has intrigued me about your set-up and which I would very much like to know how you dealt with it. You based your figures 6 per base on 15mm x 15mm in two ranks of 3. You used Baccus figures, which are without doubt perfect for the job, 5mm per figure but they come on 4 figure strips with a 20mm frontage. What did you do for the 15mm frontage of your bases, clip 1 figure off each strip ?
Once again, an outstanding achievement on your part, a lavish spectacle and riveting battle commentary throughout.
Thanks for that Karl. Yes I snip one figure of a strip of 4. It just means that I have to mount some bases in single figures rather than strips but I find it does not add much to the time taken to basing figures. Originally I planned to base them 8 to a base with 20mm frontages but found that it made them just a little more restrictive with formations, unit sizes etc. I still paint them in strips of 4 and snip them prior to basing. With the rules it really is down to how much time you are happy to devote to playing a game. If time is not an issue the sky is the limit for GdB but in reality, this is probably the maximum I would want to do. I have had some great games that have been much smaller in size and the campaign on the blog covers some of those. Thanks again for your kind comments and pleased that you are enjoying the AAR.
DeleteWell another exceptional report and a finely balanced battle although the loss of Hougemont may prove crucial.
ReplyDeleteYou are really making me reconsider the basing issue as my Peninsular War collection is on 60x30 - not too large to undertake the task - time to think.
Thanks for your compliments Graham. It was not an easy decision to make rebasing my figures. Not only did I have a lot to do they do look good on large bases. I can only speak for myself but I am mightily pleased that I have done it. You still have the option of placing them in a movement tray if you ever want to fight a large battle quickly and is something I may do. But for me it is small bases all the way.
Deleteanother riveting read, Jon. Like other commentators, I had thought that the Allied line might well crack in this set of turns. I was impressed by the way Hougoumont had been brought to the brink of capture without Foy or Bachelu being dragged into the fight and I thought they might just be decisive. The command failures have given the Brits time though. It's fascinatingly poised. I wonder if Jerome has enough men left to draw off enough Allied reserves to weaken the centre?
ReplyDeleteGreat stuff, as always. Thanks Jon!!!
Thanks for your comments Bob. I have to say it really is proving difficult to know how this battle is going to pan out. After the mauling of the French 1st Corps I thought that this was it for the French, and then something happens to turn it around. The same for the allies when one moment all seems lost, and then a flash of excellence by one unit or a brigade brings it all back!
Delete