THE BATTLE OF GREYSANDS
French v Hanoverians
Total French = 214 figures
CinC Lt Gen Marcognet
Total Hanoverian = 132 figures
CinC Col Best
Figure Scale = 6mm
5th March 1808
Marcognet's Division was given the task of capturing the fishing village of Greysands (22B11).
He is then to continue north and capture the only other potential landing point for reinforcements, the fishing village of Brayport. This served a dual purpose. Hanover provided troops to Britain, with whom it had very close connections, whose skills were honed and formed into the Kings German Legion. In return, Britain was committed to defend Hanover in its time of need. Grouchy had learned of a Royal Navy fleet at sea and he was concerned that reinforcements could be landed through either of these access points into Hanover. Similarly, he did not want Hanoverians being evacuated to swell the ranks of the KGL. Therefore, it was impressed on Marcognet that speed was of the essence. Expecting the Hanoverians to defend their capital, Marcognet was then to sweep around east to cover any potential escape of the Hanoverian army. The aim was to totally annihilate the Hanoverian army and thus deny Britain the resources to maintain the KGL.
Colonel Best is in command of a Hanoverian Landwehr Brigade whose orders were to prevent any incursion along the coastline and in particular, preserve the integrity of Greysands. It was hoped that if the French could be delayed long enough, Britain would be able to land reinforcements, and with the help of the Dutch/Belgians, drive them back into France. Best had selected a narrow strip of land between the coast and a river. It provided ample cover with roads on embankments and a beach area slowing movement.
TERRAIN (22B)
Each Square = 3' square on the tabletop
3'9" x 3' table
Hanoverians defending the northern half of the map.
French attacking from the south.
Terrain Description
22B6 Sandy beach, extensive sand dunes (entire sand area on terrain boards including woods are difficult going), farm, road on embankment (cover 6' high. Obstructed view across embankment)
14B10 (right side of map) road on embankment, 6' high. Open grassland, stony river fordable (not modelled. Edge of board represents river)
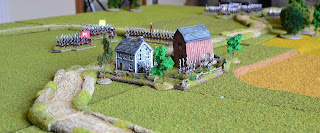
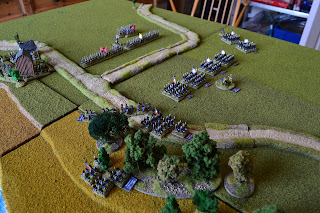
Overviews of the battlefield at the start. Marcognet's columns advancing from the left.
Marcognet's confidence was a little shaken when he saw the nature of the terrain ahead of him. Little could be seen beyond the embankments although, positioned on his horse, he could make out some movement beyond the east road ahead of him. He called up to his artillery commander whose battery was advancing along the coastal road. His artillery commander shouted back that he could also see movement but unable at this stage to determine in what strength. He also saw movement in the farm ahead of them.
Marcognet decided that he would utilise the cover to get as close as possible before unleashing his attack. 2 battalions would make a flanking manoeuvre. If the intelligence was correct, the Hanoverians would be spread too thinly to cover a wide front. In the photo above Noquez' Brigade spanned the road with Grenier's Brigade bringing up the rear.
Col Best tasked the defence of the farm to the Verden Landwehr. Osterode and Munden Landwehr lined the road hidden from the French with the latter in column formation making it easier to reposition if needed. Luneberg Landwehr was kept in reserve. Best was acutely aware that he was expecting a great deal from his troops and was hoping that their enthusiasm for taking the fight to the French and defending their motherland might compensate for their lack of experience and training.
Marcognet ordered Noquez to capture the farm with two of his battalions and the other two to advance on the eastbound road. Grenier, with two of his battalions were to form the flanking manoeuvre, and the remaining two to link in with Noquez' battalions in advancing on the east road. With few targets visible to the artillery battery, it was ordered to deploy and bombard the farm.
Best could see Marcognet's forces from horseback and how they were manoeuvring ready to launch their assault. He deployed Munden into line behind the east road and then considered the most effective way he could counter the threat on the centre.
The two battalions of the 21st Line prepared to assault the farm as the artillery battery slid down the embankment ready to unlimber.
As the French approached and it became clear to Best where their direction of attack would be, he ordered the Osterode and Munden battalions to step back. It was his intention to give the French full volley fire as they crossed the road embankment at close range. He knew that if the French columns contacted his conscripts in line it would be unlikely they would stand. Hopefully, if he could spread enough carnage among the French columns, it might just be enough to hold them off. He deployed the Luneberg Landwehr towards his left flank to counter the flanking threat.
The French artillery formed up and began their bombardment of the farm. All went well until the battery began reloading for a 3rd time. The news was given to the battery commander, "we are low on ammunition and the caisson is nowhere to be seen"! (A double 1 was thrown!!).
As the two battalions of the 46th line with the 1/25th and 1/45th line battalions mounted the east road embankment ready to charge, Best ordered his men to fire. The events that followed went down in the history of the Osterode Landwehr. It gave a shattering volley with numerous men of the 46th line battalions scythed down. Although not as effective, Munden still caused significant damage to the 25th and 45th battalions. The French battalion commanders realised they had to close with the Hanoverians quickly or face more carnage.
All 4 battalions began their charge to be met with a second volley. As more men fell within the ranks of the 46th their confidence evaporated and both battalions faltered in the face of the Osterode. To their right, the 1/25th shamefully abandoned their position and went into a full retreat. Only the 1/45th continued their charge towards the Munden Landwehr. This was too much for the Munden conscripts and they retreated in the face of the French column's charge. The Osterode battalion though saw their opportunity for glory and fixed bayonets.
The Osterode Landwehr charged into both faltering battalions and also the 2/21st Line who had advanced to support them. Despite being outnumbered by more than 2 to 1 the enthusiastic conscripts went to work with their bayonets and pushed all 3 battalions back. Events though were not in their favour to their left.
The Munden Landwehr had continued to retreat leaving Osterode's flank vulnerable. The two flanking French battalions had successfully charged into the Luneberg Landwehr. The melee was all too brief as the Lunebergers routed.
To Osterode's right the 1/21st was steadily forcing its way through the farm. To their left the 1/45th battalion, now clear of the Munden, had pivoted ready to charge the flank of the Osterode. As they began their charge the Osterode decided to call it a day and broke to their rear. Unfortunately for the Osterode the 1/45th managed to make contact and mercilessly cut down several Hanoverians before the battalion put some distance between them.
With battalions streaming towards the rear, it was clear to Col Best that nothing more could be done and he ordered a general retreat.
The Hanoverians left the field without further casualties leaving the ground to the victorious French. The Osterode Landwehr were the standout unit achieving far more than their Conscript status would suggest.
The battle was concluded at 1500 hours (a total of 8 moves). Apart from the minor scare by a lone heroic Landwehr battalion and the stupidity of his artillery commander, Marcognet was satisfied by the rapidity of his victory. On to Greysands!
Result - A decisive French victory.
The Butcher's bill:
This illustrates the difference in casualty recovery a decisive victory can make.
Up next: Map moves.


Once again, the kind of action real life commanders have to fight all the time, but are too "unbalanced" for many to want to play the part of the Landwehr Brigade commander! I wonder where those British warships are?
ReplyDeleteThat was a great read thank you so much for posting this. I apologize if I missed it somewhere in the storyline but what rule system are you using for this?
ReplyDeleteThanks again Gonsalvo. Also thanks to you Steve for your comments. I am using General de Brigade with a few rule amendments. If you click on the 'Rules' link in the labels you will be able to find the amendments I have undertaken for 6mm, and also the campaign. Feel free to ask any further Q's you may have.
Delete