Moving on to part 2 of Matkila Camp, the surviving British troops of Selby Force now have to deal with Italian reinforcements travelling along the coast road from the west.
Table size is the same 6' x 3'9".
The forces involved are as follows:
British - Selby Force
Brigade CO - Brig Selby (CV9)
FAO (CV7)
AT Rifle Platoon - 1 stand
3rd Battalion Coldstream Guards (Veteran - fully motorised)
Bn HQ (CV8)
A - D Companies - 8 rifle stands including 4 company HQ's (CV7).
Support Coy - 1 x 3" Mortar
W Coy, Northumberland Fusiliers (Veteran - motorised)
Coy HQ (CV7)
3 x Vickers MMG stands
A Coy, 1st Bn, South Staffordshire Regt (Veteran - Motorised)
2 x Rifle stands including Coy HQ (CV7)
A Coy, 1st Bn 22nd Cheshire Regt (Veteran - Motorised)
Coy HQ (CV7)
2 x Vickers MMG stands
Detachment Durham Light Infantry (Veteran)
1 x Rifle Stand with truck
7th Hussars
2 x Vickers MkVI Light tanks
Light AA Battery
2 x Bofors 40mm AA guns
1 Section 107th South Notts Hussars RHA
1 x 25pdr Field Gun
Italian - 2nd Libyan Infantry Group
FAO (CV6)
Inf Gun Battery 1 x 65L17 Infantry gun
XI Derna Bn (Green)
Bn HQ (CV7)
3 x Rifle companies each 3 x rifle stands
Weapons company 1 x Breda MMG
XII Barce Bn (Green)
Bn HQ (CV7)
3 x Rifle companies each 3 x rifle stands
Weapons company 1 x Breda MMG
XIII Zemzem Bn (Green)
Bn HQ (CV7)
3 x Rifle companies each 3 x rifle stands
Weapons company 1 x Breda MMG
Continued -
 |
| The British FAO observes the Italian Brigade moving along the coast road. A tempting target! |
 |
| The Coldstream Guards A and B companies along with the Battalion HQ and the force CO move out of Matkila camp. |
 |
| C and D companies with the mortar section travel hidden along the wadi. |
 |
| The FAO along with the Bofors AA Battery position themselves on the high ground. The 25pdr section will remain off table and controlled by the FAO. In the foreground the tanks of the 7th Hussars with the Cheshire company of machine guns and the South Staffordshire company advance across the desert. |
 |
| An overview of the battlefield from the Italian position. |
 |
| The British commander has several successful command rolls enabling him to deploy C and D companies with supporting Vickers machine guns across the coastal road. |
 |
| The Italians move to deploy off the road on sighting the British ahead. |
 |
| Turn 2 is uneventful but turn 3 proves disastrous for the Italians. A command blunder results in the Italian units taking a full move towards the nearest British positions. The XI Derna Battalion advances in the open to within short range of the British (middle of photo). The British units in the foreground duly oblige and mow down half the hapless Italian battalion. |
 |
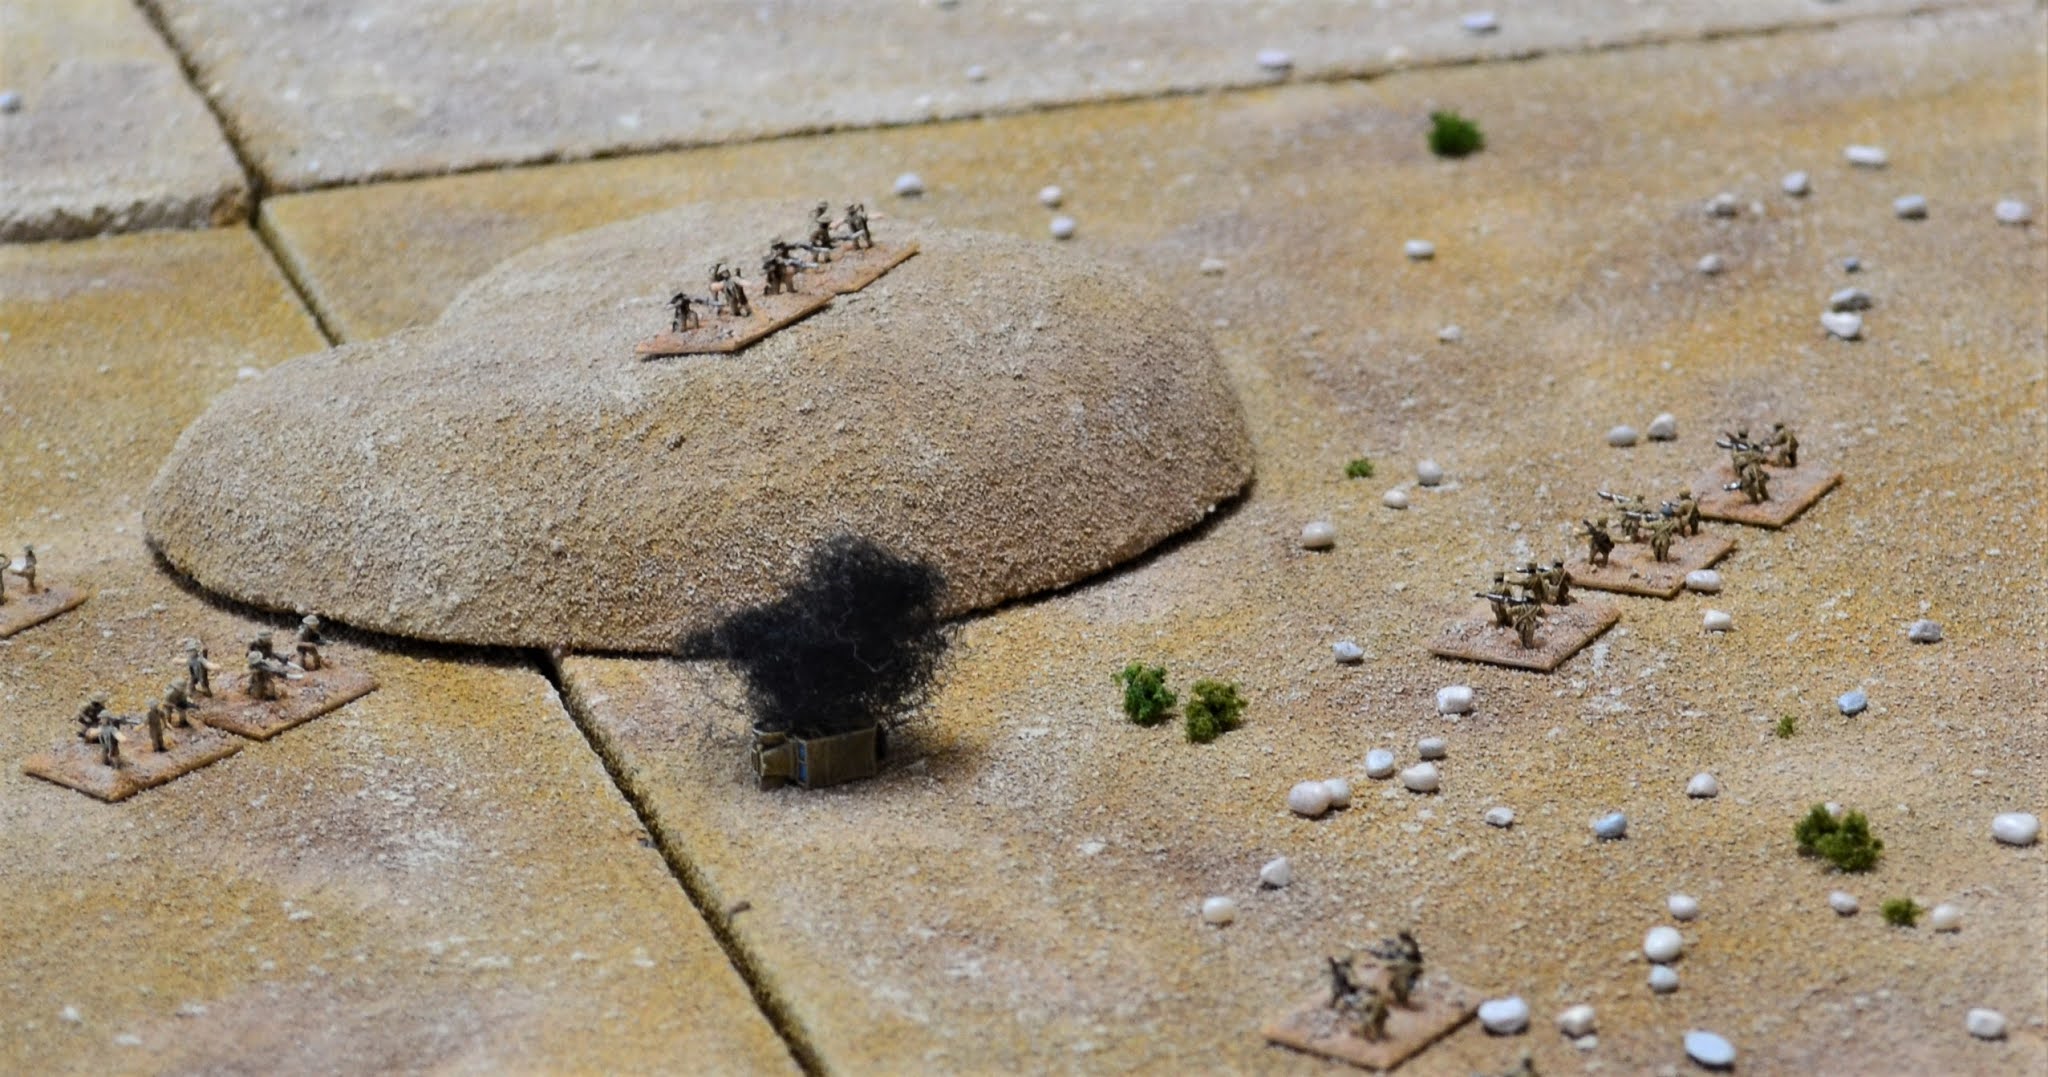
| The Coldstream Guards battalion commander moves A and B companies rapidly towards the high ground overlooking the coast road. A company catches the towed Italian infantry gun as it races across the desert. Fire is poured into the towing vehicle utterly destroying it along with the only Italian artillery piece. |
 |
| B company gains the heights of the sand dune observing the Italians swarming towards them. |
 |
| The two Bofors 40mm AA guns are ordered to move up to within range of the Italians. |
 |
| The bad news for the British is the slowness of the flanking force who make heavy weather of crossing the desert to intercept the rear of the Italian line. The FAO is also repositioning (far right) having repeatedly failed to get through to the 25pdr section. |
 |
| This turn proved to be disastrous for the Italians. Caught in the open the Derna battalion was slaughtered by C and D companies and by the company of machine guns from the Cheshire regiment. |
 |
| The Barce battalion only fared marginally better as they came under sustained fire from A and B companies. |
 |
| The flanking force made better progress but in the end they were not needed: |
 |
| The remnants of the Derna and Barce battalions highlighted the dire straights of the Italian force. Such were their losses that it took them substantially past their break point. A subsequent test signalled the end of the game with the Italians surrendering. |
Blimey, the poor old Italians took one heck of a beating! I thought this might be tough for Selby Force after their previous battle, but it shows you how wrong one can be. As always a lovely looking game and great to see plenty of soft skins on the table to move the troops about. I think 6mm really is the way to go for Western Desert games.
ReplyDeleteMany thanks Steve. I really did not expect this to be such a one-sided game. The Italians never recovered from their command blunder either being suppressed or destroyed before getting an opportunity to engage the British. I totally agree about 6mm.
DeleteA good example of a game that would be fun to play solo, but would have been a strain FTF given the Italian performance!
ReplyDeleteI agree. History repeated itself with Italian command failures! They did suffer bad luck though at a critical moment.
Delete