Troops of the 2nd Infantry battalion loaded their landing craft from the troop transport 'Glenearn' and will form the first wave.
I have given the landing craft BKC stats and will move 10cm each turn. Each invasion wave will begin 20cm out from the beach with 2 turns between them. If a landing craft becomes suppressed it will continue to move as normal but will be unable to fire any armaments (mainly MG's). If a landing craft is destroyed/sunk all troops and vehicles are lost. If within 5cm of beach infantry units land but are suppressed with half their maximum hits, rounded up, recorded against them.
When troops disembark I have referred back to the BKC rules for deployment.
Turn 1

The battle opens with a bombardment from the cruiser HMS Dido. Several positions became suppressed but all survived.

The Germans open fire on the approaching landing craft who survive unscathed.
Continued -
Turn 2

Another bombardment from Dido destroys an Sdkfz 251/1 halftrack and the Sdkfz 10 tow for the 50mm anti-tank gun. The HQ 251/10 is suppressed.

As the landing craft approach the shore, the German's Bison with its 155mm gun pours extremely accurate fire into one of the LCM's utterly destroying it. Two platoons from 'B' company are lost. 3 other landing craft are suppressed. A foretaste of what is to come!
Turn 3

As the 1st wave strikes the beach, units of the 2nd infantry battalion deploy into the face of intense fire from pillboxes at each end of the beach and from positions in and around Faliraki. They did not know it but they were facing he tough troops of the 2nd Panzer Grenadier battalion.


The HQ platoon of 'A' company was also destroyed leaving the initial landing force facing decimation. The battalion commander ordered the 2" mortar to fire on the nearest German position in the hope of stemming some of the incoming fire but to no avail. The HQ platoon of 'B' company moved up to the barbed wire but failed to get any further.

More ominous for the British, the Forward Air Controller arrives from Rhodes town. There are Stukas based at the nearby airfield!

And to add to their woes, the Panzer IV's lead by a PzII HQ tank appear on the coast road out of Rhodes town.
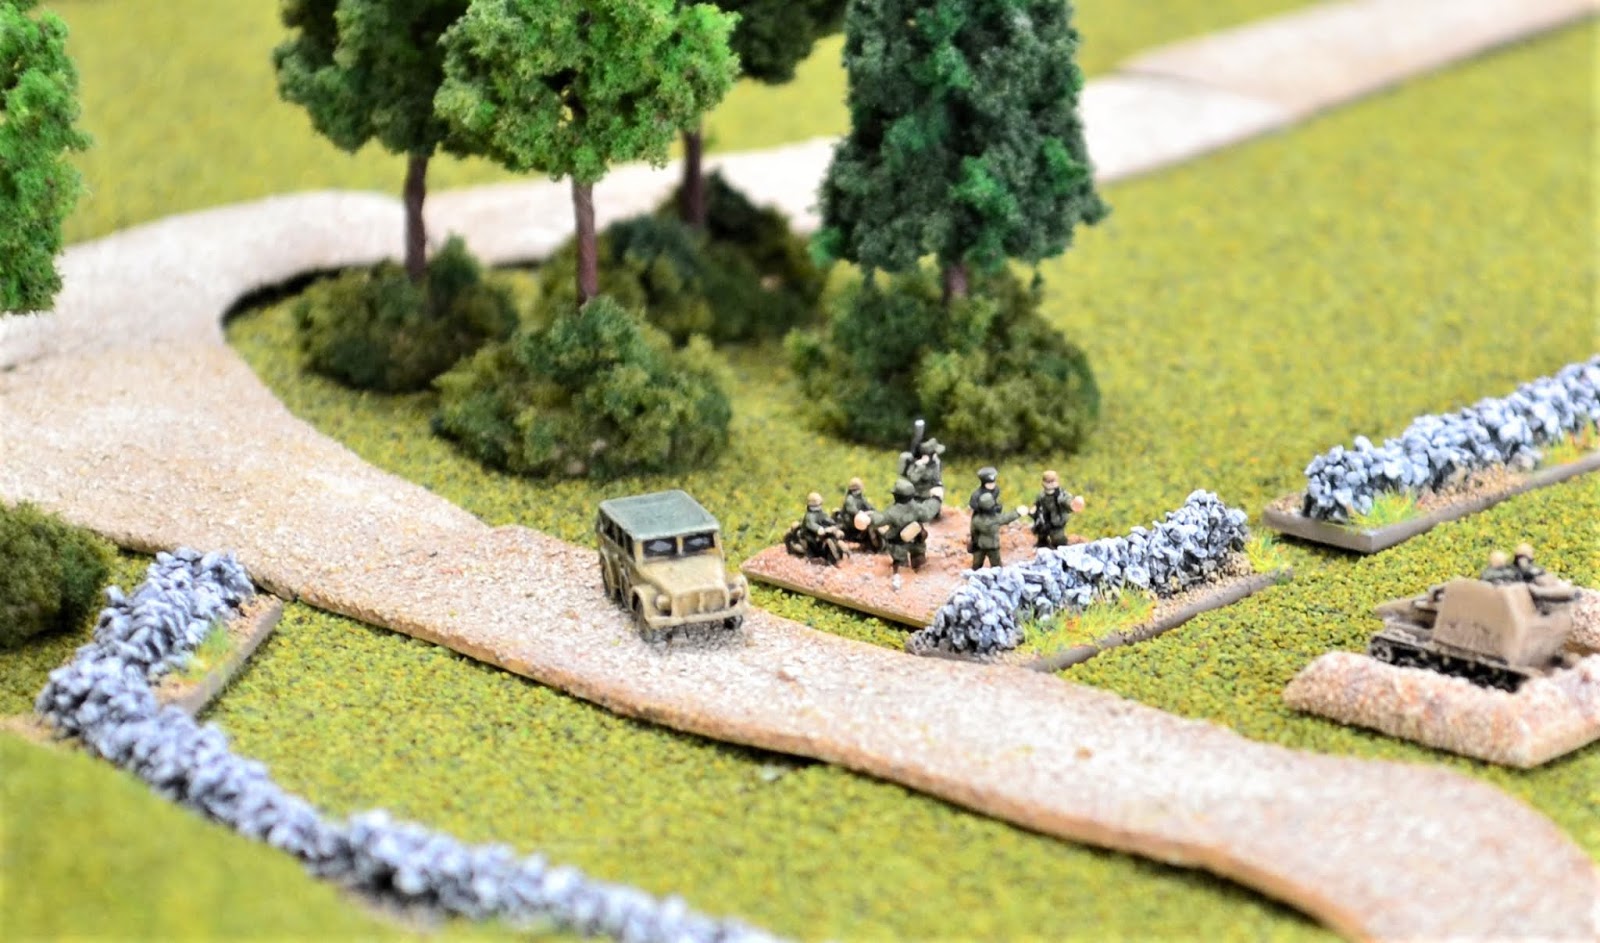
The German island commander arrives on the heights overlooking Faliraki.

Although satisfied from what he sees on the beach so far, he observes the British 2nd wave arriving offshore.
Turn 4

 With just the HQ, a 2" mortar and a rifle platoon left clinging onto the beach, the second wave cannot come soon enough. With real concern mounting among the British High Command that the landings may fail, the para battalion holding Lindos a short distance along the coast were called up to engage the Germans holding Faliraki providing they themselves are not under attack.
Turn 5
 The British second wave benefitted from German attention being focussed on the hapless first wave with all landing craft safely arriving at the beach. The whole of 'C' company along with two Shermans landed. German firepower proved less effective allowing the new arrivals to make quick progress.
 Most notable being the assault on a German platoon dug in on the edge of Faliraki. A Sherman tank lead the charge breaking through the barbed wire. Two rifle platoons along with the 2" mortar section joined in the attack. The defending Germans had been suppressed by machine gun fire from the landing craft and they quickly succumbed to the combined attack.
 The German counter-attack was swift. 3 PzIV's poured shells into the Sherman utterly destroying it before swinging towards the beach.
 British hopes for a decisive breakthough rested on an LCT of the 3rd wave transporting two armoured squadrons.
Turn 6
 A significant breakthrough for the British is delivered by the HQ platoon of 'A' company, 2nd Infantry. In the initiative phase it charges into close combat with a PzIV. The 2" mortar section joins in but is suppressed from defensive fire form the tank. It was not needed however as the infantry platoon defeated the PzIV causing it to retreat suppressed.
In the command phase the platoon entered into close combat with the PzII HQ tank destroying it comprehensively.
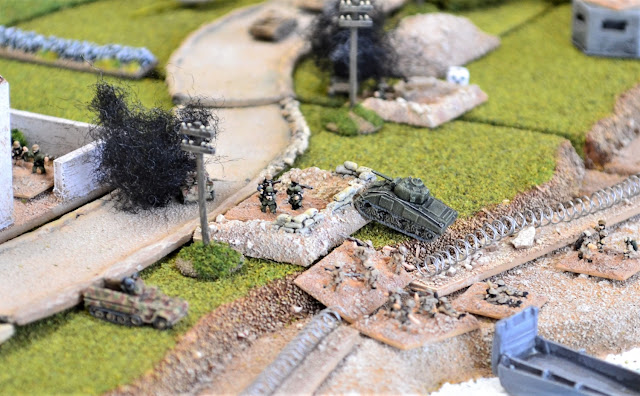
It did not end there. With a double '1' thrown it was awarded two actions. The first was to overrun the Panzer Grenadier battalion HQ and the second to launch itself into the suppressed PzIV that it had beaten earlier. This time it finished the job desroying the PzIV. A consolidation move left the platoon in the position in the photo having single-handedly cleared much of the opposition.
 The Sherman tank fired a superbly accurate shot into another PzIV causing it to brew up.
 Looking down from the heights above Faliraki, the German position was suddenly looking precarious.
Turn 7

 The first units of the 1st Infantry battalion land from the 'Westbury'. Once again the British infantry struggle to get off the beach as they are suppressed by intense fire from the pillbox and German troops in Faliraki.
 With the Shermans still on the beach, the Churchill squadron forge inland brewing up the last of the PzIV's before turning towards the south side of Faliraki.
 Two platoons of the newly arrived 1st Infantry 'A' company join survivors of the 2nd Infantry assaulting the pillbox finally putting the MG34 out of action. In the centre of the photo, the HQ platoon of 'A' company, 2nd Infantry finish off the 50mm anti-tank gun eliminating the last of the German units in the north side of Faliraki.
 The Germans managed to finish off a platoon of the 1st infantry but it was clear their position in the south side of Faliraki was becoming untenable.
 Looking down from the heights it was obvious that Faliraki was lost and therefore the German CO gave the last of the garrison the order to withdraw.
 The last two German platoons mounted up their halftracks, and along with the HQ Sdkfz 251/10 made their withdrawal onto the heights. Here the last of the Faliraki garrison along with the German CO decide their next move.
 On seeing the collection of British troops and vehicles amassing in Faliraki, the FAC excitedly gets through to the airfield to call for an air strike. A single Stuka arrives only to be promptly shot down!

 The German CO decides there is little point in trying to hold Faliraki any longer and orders a withdrawal to Rhodes Town. The British have at last gained their first objective, Faliraki.
Turn 4

The first British wave have now been all but wiped out. To make matters worse, German armour was now fast approaching.

Turn 5


Turn 6

In the command phase the platoon entered into close combat with the PzII HQ tank destroying it comprehensively.
It did not end there. With a double '1' thrown it was awarded two actions. The first was to overrun the Panzer Grenadier battalion HQ and the second to launch itself into the suppressed PzIV that it had beaten earlier. This time it finished the job desroying the PzIV. A consolidation move left the platoon in the position in the photo having single-handedly cleared much of the opposition.


Turn 7

The LCT lands and begins unloading its armoured passengers.


Another view of the British now consolidating their hold on Faliraki.

Wow, that a pretty eventfu game to say the least. Initially I thought the British might get thrown back into the sea as the first wave was having a tough time. But 'twas not to be and the second wave carried the day. I love the variability BKC gives in a game, so it's never over till the fat lady sings as they say.
ReplyDeleteI saw you fielded a 2" mortar, which IIRC is not in BKCIV (but I could be wrong!). What stats did you use to represent it?
As always lovely 'photos and great terrain and miniatures. Really looking forward to what the next game brings.
Many thanks Steve. With regard to the 2" mortar, somebody posted stats on one of the forums some time ago for light mortars. It is a legacy from my Rapid Fire days. I felt that although incorporated in the infantry stats it just added a little more interesting detail to the HQ company.
DeleteI think it might have been Nik Harwood many moons ago and then Pete might have confirmed them. Either way, thanks for posting them in the reply below. Do you allow them to lay smaoke, as per British doctrine?
DeleteI have not used them to lay smoke although not prohibited them from doing so. More a case of relying on the larger mortars and supporting artillery.
DeleteExcellent AAR Jon, touch and go for a while there! As Steve J asks I would be interested in your 2" Mortar stats as I thought the 2" Mortar was incorporated into the Infantry stats. Super photos and a stunning looking game.
ReplyDeleteCheers, Richard P
Many thanks Richard. See my reply to Steve above regarding the 2" mortar.
DeleteThanks Jon, are they on the old SMP forum?
DeleteI cannot recall now but here they are:
DeleteLight mortars (2”, 45mm, 50mm, 60mm) (cost 40) INF Mv 10 AP 2/30 AT 1/30* CA 2
Hits 4
Thanks Jon
DeleteVery well balanced, with nothing in the story being able to be taken for granted by the reader, I thought the landing was doomed!
ReplyDeleteSo did I Norm. Really thought that the British would need the arrival of the paras to give them any chance of getting off the beach.
DeleteYou keep spoiling us Jon! What a gripping game supported by the usual sumptuous terrain. Thanks!
ReplyDeleteMany thanks Mike.
DeleteI am in with all of the fellas' comments above. Great looking table, excellent photography, interesting action, and a well told narrative. What is not to like?
ReplyDelete