This scenario is taken from the Guns at Gettysburg Scenarios Book 4 "Stonewall".
Jackson, reinforced by Ewell's command, sought to force Bank's army from its position at Strasburg by outflanking his position at the northern end of the Massanutten Mountain at the confluence of the North and South Forks of the Shenandoah. Covering this approach was a Federal garrison under Colonel Kenly.
Confederate: Capture 2 bridges intact.
Union: Prevent the Confederates from achieving their victory conditions.
 |
| The Pioneers (represented by a single Zouaves base) attempts to set the rail bridge alight. |
Turn 1
Turn 1 saw an inauspicious start for the Confederates with Taylor's brigade immediately breaking ranks and began looting the Union camp. The Louisiana Tigers were the most exciteable! The single Union cannon took advantage and began lobbing shot into the great mass of troops.
The arrival of the Confederate artillery found themselves in a traffic jam among the swirl of rampaging Confederate infantry.
Flournoy's cavalry brigade begin making their way towards the Union right flank and their own heavily outnumbered cavalry.
Turn 2
Flournoy leads the 6th Virginia Cavalry towards his intended target, the 5th New York Cavalry lining the hill crest. He is confident of sweeping the Union cavalry from their perch before rolling up the Union flank. They come under long range fire from the 1st Maryland (Union) detachment losing a couple of troopers.
Taylor has performed a minor miracle successfully bringing to order all 3 looting Confederate battalions. They reform in the face of firm from the Union ridge line losing several casualties.
At the rail bridge the Union pioneers continue to struggle to set alight the rail bridge.
Turn 3
Flournoy leads the Confederate cavalry in a charge towards the 5th New York cavalry. Despite losing more casualties to the Union infantry they successfully tested to charge home. In response the 5th New York counter-charged.
In the ensuing melee, despite the odds, the 5th New York repelled the Rebel cavalry albeit losing 4 figures in the process. The New Yorkers will retire to regroup in the next turn with the Rebels retreating towards their base edge.
Taylor advances towards the ridge line exchanging fire as they do so. A small number of casualties were inflicted on both sides.
Smoke can be seen in the distance billowing up from the rail bridge. The Pioneers had been successful. If not extinguished in 6 turns the bridge will be destroyed.
Turn 4
The 2nd Virginia cavalry failed to rally and left the battlefield. A serious loss for the Confederates.
Taylor orders the 6th and 8th Louisiana battalions to charge the Union forces lining the hill top. The 6th Louisiana on the right received heavy casualties during the charge and halted to fire its own volley. The 8th were more successful and continued their charge.
Another view of the same charge.
The small Pennsylvania battalion retired faltering in the face of the Confederate charge. The artillery though received the charge as a result of which they were completely annihilated.
A gaping hole had opened up in the Union centre.
The Pioneers make their way along the rail tracks to target the next bridge.
Turn 5
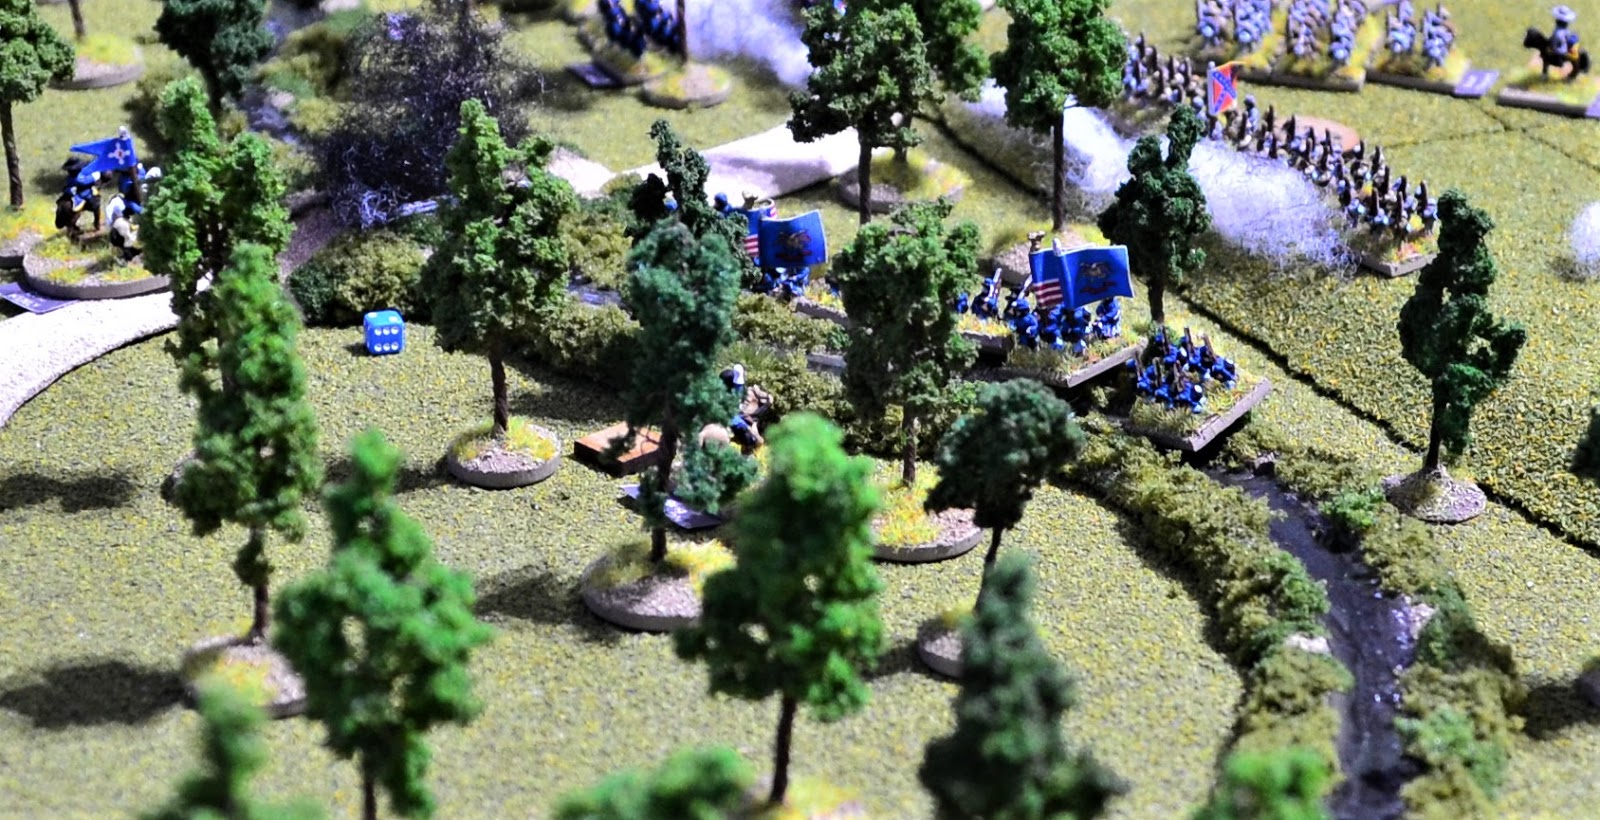
Kenly orders both Union brigades to retire to the cover of the woods. As they fall back the Confederates advance in their wake.
Turn 6
As the Union troops fall back into cover the Confederates open fire along their entire line inflicting casualties on all units. It is their intention to hold off the Confederates long enough for the Pioneers to set fire to the bridge.
Turn 7
Vought is ordered to charge the Confederate cavalry with the aim of clearing them from the flank. The charge goes in with the 6th Virginians lead by Flournoy counter-charging.
The result was an overwhelming Rebel victory inflicting heavy casualties on the 5th New York cavalry taking them to their 50% dispersal point. Being in melee the New York cavalry had no chance of rallying so thus fled the field. The Virginians had a 'Superb Discipline' pursuit test result so they would be fully under control for the next turn.
As the Confederates slowly advanced towards the Union troops both sides exchanged heavy fire with the rebels suffering the heaviest casualties. The 8th Louisiana in the middle of the photo took a morale test having suffered more than 10% casualties in the firefight with a 'Go to Ground' result.
The Pioneers arrive and prepare to set the bridge alight. The infantry will be able to cross the river but as it is classed as severe terrain they will be moving at 1/2 speed and unformed. The river will be impassable to artillery and cavalry.
Turn 8
Flournoy begins his flanking move along Kendrick's Ford Road with the 6th Virginia Cavalry.
The 6th Louisiana with the Louisiana Tigers, spurred on by the sight of smoke coming from the direction of the bridge over South Fork, charge Dushane's 1st Maryland (Union) regiment but both are halted by the intensity of fire emanating from the wood's edge. They return fire downing a good number.
The 8th Louisiana exchange fire with Wilson's brigade now ensconced in the woods with both sides suffering casualties.
Sure enough the smoke had been caused by the Union Pioneers who had successfully set alight the South Fork bridge.
Turn 9
Turn 9 saw the whole of Taylor's Confederate brigade launching desperate charges against the Union troops but again failed to make contact. Both 6th and 8th Louisiana regiments suffered 'go to ground' results in their charge tests.
The Pioneers now move towards the North Fork bridge seeking to destroy it to further hold up the Confederate advance.
The rail bridge finally collapses.
Turn 10
Kenly orders his entire force to retire realising that the Confederate cavalry are on a flanking march and the need to get his troops across the South Fork.
The 1st Maryland (Confederate) are ordered to make for the bridge to attempt to extinguish the fire.
The Pioneers arrive at the North Fork bridge and begin their work.
Turn 11
The 1st Maryland (Union) suffer more casualties as they retire through the woods taking them to their 50% dispersal point morale test. Any negative result would have meant them dispersing, but fortunately they passed, just!
Wilson's brigade is now unformed having crossed the South Fork. With Confederate troops now pouring into the woods on the opposite bank he cannot risk taking time to form them up and hurries the disordered troops towards the Cedarville Road.
The Pioneers are so far unsuccessful in setting fire to the bridge.
Turn 12
Dushane's 1st Maryland (Union) crosses the South Fork leaving them unformed. They attempt to put some distance between them and the pursuing Confederates.
Troops of the 1st Maryland (Confederate) regiment unsuccessfully douses the fire on their first attempt. It will get increasingly harder each turn until it burns down.
As Wilson's brigade burst from the woods they get the unwelcome surprise of Flournoy's 6th Virginia cavalry barrelling down the road towards them.
Turn 13
Flournoy successfully changes his orders from 'move' to 'assault'. He waves the 6th Virginia on as they charge towards the unformed 1st Maryland detachment who have just emerged from the woods. The Union troops fire a ragged volley knocking down 3 of the Confederate troopers. A dreadful dice roll (3!) resulted in a complete morale failure by the rebel cavalry who fail to charge home and will retreat in the next turn.
Wilson's brigade emerge from the wood still unformed and approach the Manassas Gap Railroad track.
Good news for the confederates. Steuart's men successfully save the bridge. With the rail bridge lost they must capture the last bridge intact to secure victory.
Turn 14
Dushane reforms the 1st Maryland (Union) overlooking the railroad and prepares to receive the advancing Confederates.
Flournoy successfully rallies the 6th Virginia cavalry.
The fire extinguished, Steuart leads the 1st Maryland (Confederate) across the South Fork bridge with orders to capture the North Fork bridge.
Steuart though will have another bridge to save as the Pioneers successfully set fire to it.
Turn 15
Having successfully rallied, the 6th Virginia cavalry dismount and are ordered to engage the Union troops lurking in the vicinity of the North Fork bridge.
Steuart hurries towards the now burning North Fork bridge. Elsewhere there was little movement as units took an opportunity in the lull to reform.
Turn 16
As the Confederates appear at the edge of the wood opposite them, the 1st Maryland (Union) opens fire downing 1 of the Louisiana Tigers and 2 of the 6th Louisiana. This brings the latter down to their 50% casualties dispersal point. Any negative result on a morale check will mean they disperse. They were very lucky rolling '9' which only just (by 1) kept them in play.
Steuart arrives at the North Fork bridge and immediately suffers casualties from the 29th Pennsylvania and Pioneers firing from the opposite side. He is hoping that other Confederates will take care of the Union battalion on his flank in the woods to the left.
Turn 17
Dushane's 1st Maryland (Union) engages in a firefight with the Louisiana Tigers and the 6th Louisiana with neither side gaining the upper hand.
The Confederates at the North Fork bridge attempt to fight the fire in the teeth of volleys from the Pennsylvania regiment and Pioneer company opposite. The bridge has been on fire for 3 turns so they will need to roll 4,5, or 6. A '5' is rolled. Success! They must however capture the bridge.
The answer to that came with the decimation of the 1st Maryland (Union) detachment under the command of Wilson. He had manoeuvred the detachment to fire on the 1st Maryland (Confederate) who were attempting to fight the fire. Unfortunately for the Union troops they found themselves at he mercy of the dismounted 6th Virginia cavalry and the 8th Louisiana. Their combined fire brought the Union battalion below its 50% dispersal point. Wilson was attached to the battalion but his attempts at holding up morale failed and they fled the field. The subsequent brigade morale test resulted in a 'brigade breaks' meaning that the Pennsylvania regiment that had been holding the North Fork bridge would retire in the next turn.
With only the company of Pioneers left at the bridge I declared a Confederate victory at this point.
I had been in two minds whether to play this game give its small size which is probably more suited to larger scales. Or so I thought. In reality it proved to be a fun little game with the disparity in numbers on each side counterbalanced with the need of the Confederates to capture two bridges before they were destroyed by the pioneers. It also highlights that any wargamers who are short on space can still have a fun game that is more than just a skirmish. This could easily have been played on a 3' x 2' table.
For the next ACW battle I intend taking a look at the brigade level Fire & Fury scenarios to further try out my brigade level adaption of Guns at Gettysburg rules in preparation for my Gettysburg game.


A great game and scenario, with lovely 'photos of very nice miniatures and terrain:).
ReplyDeleteMany thanks Steve
DeleteJon, I think both the wargame media and game shows, generally place too great an emphasis on big tables, while in reality, many of us need the inspiration of this sized game if we are to match what we see with generally what we own or can physically do.
ReplyDeleteI agree Norm. Either that or its skirmish, something I have moved away from.
DeleteSuper looking game setup and presentation, Jon! One of the advantages of a small battle such as Front Royal is that EVERY unit has an important role to play. Mistakes can be costly, therefore, one must attempt make all actions optimal both sides. The footprint of this game could be shrunk considerably offering an even more focused game.
ReplyDeleteMany thanks Jonathan. Although I enjoy large games, plenty of fun can be had from smaller actions such as this.
DeleteThis is a meticulously well presented game & report - I love it!
ReplyDeleteWe have just begun a very big 10mm Napoleonic project and I am struggling to get the aesthetic to match our 28mm epics, this is just the inspiration I need.
Many thanks for the hard work you've put into this report, best wishes,
Jeremy
Really appreciate your comments Jeremy. Hope your 10mm project goes well. It certainly sounds very promising.
DeleteVery nice AAR and pretty set up. It is a smaller battle but when played with a smaller scale the scope of the scenario widens up. Bigger scales probably wouldn’t include the bridges as much. 😀
ReplyDeleteThamks Stew. You could well be right there.
Delete