11.30am. - 1.00pm.
11.30am:

Napoleon issues his orders having surveyed his troops.

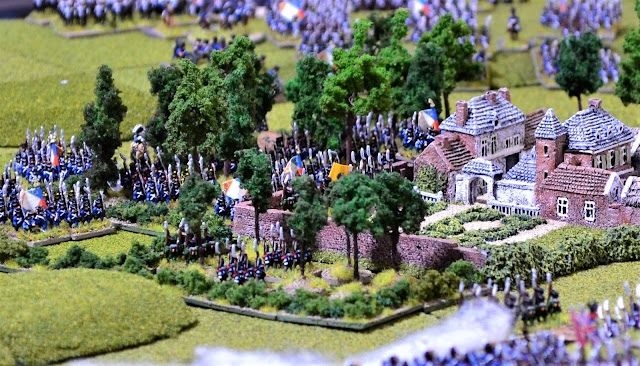
At 11.20a.m. 5 batteries of artillery bombard Hougoumont. Principally the woods and orchard. I represented this by one turn of artillery fire prior to the main attack at 11.30a.m. All 5 batteries were firing on light infantry dispersed in a wooded area affording them some cover.


It would have needed high die rolls to inflict any casualties and on that score they all failed.

Bauduin's Brigade opens the attack advancing in column towards the wood bordering Hougoumont. Light companies from the 1st battalion 2nd Nassau Infantry, the Hanoverian Luneberg Light Infantry and a Nassau Jaeger company opened fire at close range at the massed columns. At this range and against such a dense target they could not miss. 3 casualties were inflicted on the French, one each on the 1/1st Light, 2/1st Light and 3/1st Light infantry.
Those 3 battalions initiated a charge (the 4/2nd Light infantry to their left was forming up after interpenetrating an artillery battery). The allies responded with devastating effect (they rolled '11') causing 3 more casualties. The surprise at losing so many casualties caused the 1st and 3rd battalions to falter. In their disordered state they stumbled into the 2nd battalion causing that to become unformed. The initial French attack had rather embarrassingly been held in check by a few companies of inexperienced Germans!

The 4/2nd Light Infantry (to the left of the attacking group) had reformed and while the other 3 battalions of it's brigade recovered from their shock, it charged the Nassau Jaeger company. The latter did not have time to respond due to the close proximity of the French battalion. The heavily outnumbered Jaegers were no match for the veteran French battalion and they routed following the melee in which they lost 5 of their number for no reply.

Bauduin's 1st, 2nd and 3rd/1st Light infantry charged once again. This time The Luneberg and Nassau companies retreated in the face of the charge leaving the wood open for the French to occupy.
2 companies of British Guards, who had been in the kitchen garden on the west side of Hougoumont (middle left of photo), advanced in the direction of the wood intending to support their German allies.

On seeing the dense French columns in the wooded area, 2 British batteries, Ramsey's and Beane's RHA, opened fire. Beane's battery missed entirely but Ramsey's poured their salvo directly into the mass of French infantry. Fortunately for the French the long range combined with cover afforded by the wood lessened the effect. Just two casualties were suffered by the 1/1st Light Inf.

A French battery fires on Ramsey's battery in response having no effect.
Ramsey politely gave the 'V' sign!

In the morale phase the Jaegers called it a day and dispersed. The Lunebergers successfully rallied and began reforming in the courtyard garden. The Nassauers however failed and continued to retreat through the orchard. (GdB normally handles units at the battalion level. I created house rules for the situation at Hougoumont to make it more interesting. Companies were basically treated as units in their own right.
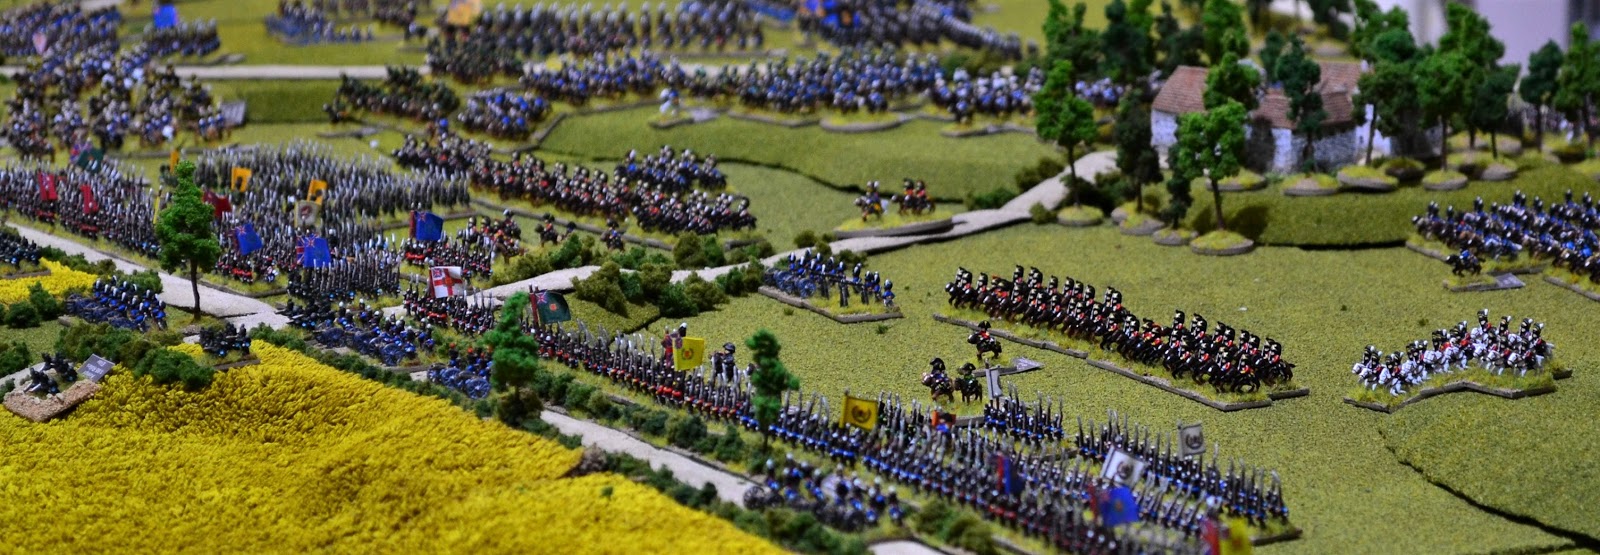
 In the foreground the 3 x 12lb batteries from the 3 Corps move along the Brussels to Genappe road followed by 3 x 6lb batteries of the Imperial Guard. One from each Imperial Guard Division. The 4 x 6lb batteries from 1st Corps move across the shallow valley towards the eastern end of the ridge.


12 Noon:
The Grand Battery begins to assemble:


The 4 x 6lb batteries from 1st Corps.

Imperial Guard batteries pass La Belle Alliance
Meanwhile the assault on Hougoumont intensifies:

All the 4 lead battalions in the woods declare charges.

The 1st and 2nd battalions of the 1st Light Infantry charge the garden walls. Fortunately for the defending Nassauers, the reforming company of Lunebergers arrived at the wall just in time to reinforce them.

To the right, the 1/2nd Light Infantry swing around to assault the orchard followed by the 2/2nd.

The Nassauers and Lunebergers open fire through loopholes and a firing step installed by engineers. This created a narrow killing ground between the wall and the wood. As the two French battalions emerged into this ground the Germans collectively opened fire. The die roll was not great killing only one figure from each battalion. It was enough though to halt the attack of the 2/1st Light Inf. The first battalion however continued into melee. The Germans passed their morale test and fought back at the French who were attempting to clamber over the wall. The subsequent melee was inconclusive and would continue into another move. Due to larger numbers of French though the Germans lost 2 figures to the French 1.
The 3/1st Light infantry assaulted the main building. The 2 x Nassau companies inside opened fire with no effect. The French attempted to break into the building and in the subsequent melee they were resoundingly defeated causing them to retreat. Both sides took equal casualties with 2 off each.

Colonel MacDonnell had taken his two light companies, one each from the 2/1st and 3/1st Guards to the edge of the wood from the kitchen garden (just to the left of the French in the photo). On seeing the sheer numbers of French he decided it would be more sensible to retire to the main buildings to hold the French from there. However, on seeing the guards, the 4/2nd Light Infantry promptly charged them (the French gained the initiative in this turn). MacDonnell decided that there was only one way to deal with this and he ordered his guards to counter-charge. He was very fortunate the dice Gods were with him. They defeated the French causing them to retreat (they were just 1 away from routing them!). Both sides lost 2 figures.
So far so good for the allies but the rate of attrition did not favour them.

Two French battalions are now retreating from the woods.

Wellington had ordered Bull's howitzer battery of the RHA to reinforce the batteries supporting Hougoumont. Bull deployed between Ramsey and Beane's batteries (middle in photo) and joined them in opening fire on the 1/2nd Light infantry that had moved into their sightline and into open ground.

The 1/2nd Light infantry (extreme left) only lost 2 casualties. They were very fortunate! The same French battery opened fire again on Ramsey. This time it was very close. Ramsey kept his hands to himself!

On seeing the Nassauers retreating from the orchard, Col Soltoun ordered the Light companies of the 2nd and 2/3rd Guards into the orchard. They had just before been removed from Hougoumont. Here they advance into the orchard supporting the lone Nassau company manning the perimeter.

The two retreating companies of Nassauers (bottom middle) tested to rally in the morale phase. They succeeded - just! They reformed ready to rejoin their compatriots.


12.30pm:
The grand battery continues to form:


The 1/2nd Light infantry launched their charge at the sole company of Nassauers in the orchard (middle). The Nassauers held their nerve and delivered an effective volley of musketry killing a figure in the attacking column. Incredibly the subsequent morale test to charge home saw the French lose their nerve and promptly retreated.
The 2nd battalion of the 1st Light Infantry now joined the 1st battalion in melee across the garden wall with the 2 companies of Nassauers and a company of Lunebergers.

The 2/2nd Light Infantry battalion advances towards the orchard replacing the 1st battalion.
In the melee at the garden wall, the two French battalions combine their attacks on the Nassauers and Lunebergers. In the rules each of the battalions rolls 2 die with the larger of the two battalions gaining the outnumbering modifier. In this case they outnumber the Germans by more than 100% so they get +2. I have combined the German companies into one force so they get one roll with +3 for defending the high wall. The 2/1st LI are the slightly larger battalion so they get the bonus. Both battalions roll and the 2/1st finishes with '9' after the bonus has been added and is the highest French result so that applies. The Nassauers roll a double 6!! They have roundly beaten the French and both battalions are forced to retreat. Two additional casualties are caused making 4 in total to the German loss of 2. A double 6 is also a risk to a General and the subsequently roll results in Bauduin suffering a light wound. He has to retire 12cm to get his wounds treated and will be out of action in the next move.
Elsewhere the French battery has found the range on Ramsey and kills one of his crew. Not so cocky now!

With Bauduin getting treatment and much of his brigade in retreat it is not a pretty sight for him and an inauspicious start!

Soye is ordered forward with his brigade to support Bauduin.

With Baudin's brigade having been ejected from the wood it is now down to the 2/2nd Light Infantry to salvage some pride. The two guards companies have joined the company of Nassauers in the orchard and ready to repulse the French. The 2/2nd charge is stopped dead in its tracks by the first volley of musketry from the guardsmen. They are still in good order however and manage to fire a volley in return but without effect.

Soye's brigade advances into the wood ready to assault Hougoumont. MacDonnell has pulled his two companies of Guards into the main buildings. They are joined by the company of Lunebergers who have been relieved at the garden wall by two rallied companies of Nassauers.
Ramsey's battery is hit again by the French battery firing at extreme range. He is mortified as another crew member is killed.

Bauduin's brigade is somewhat scattered by the forced retreats. 2 battalions failed their initial rally tests. Having been treated for his wounds he joins one of them and successfully rallies it. The other battalion which has now retreated onto the 2nd board fortunately also rallies.
1.00pm:
The 1.00pm. moves will be covered in the next update. This is the current situation:

The grand battery has formed (40 cannon in 10 batteries) and is ready to open fire. The 1st Corps forms up ready to make its assault.


The latest Allied positions:


NEXT: Grand Battery opens up and 1st Corps makes it's advance.


 |
| British heavy cavalry forms up. |
C'est Magnifique
ReplyDeleteThanks Tales from Shed
DeleteThat Grand Battery looks, well ...... rather grand! I have not seen so many model guns together in one place before - superb, it looks like something to fear.
ReplyDeleteI liked this moment 'The Nassauers roll a double 6!! They have roundly beaten the French and both battalions are forced to retreat.' - we often roll the dice without thinking of the story that they tell. Captain Busgen no doubt will have had a part to play in this stout act of defiance.
You are right there Norm. Double 6 for a reason. The Nassauers excelled themselves defending that wall and the French paid the price.
DeleteThanks for your comments about the guns. Having painted them I wanted to see them in action en-masse. Just have to hope I get the same opportunity in the game for the French cavalry.
superb and inspirational to see a life long aim come to fruition
ReplyDeleteMany thanks for that Graham.
DeleteBut where are the limbers, caissons, etc?
ReplyDeleteFantastic display but missing the essentials.
The deployment should include these elements,
And you can’t just set up a line of wheel to wheel guns and expect to advance through them.
Thanks for your observations Whiskers
DeleteA continuous beautiful spectacle and an excellent narrative.
ReplyDeleteIO for one will not quibble about any deficiency of limbers. At last count I had 180 guns in 28mm, and maybe as many as 10 limbers! If I had one limber for every 2 guns that would be a miracle.
Thanks Peter. I did briefly look at limbers and caissons when I started the project but quickly ruled it out. With around 72 batteries totalling approx 260 guns that would have meant 260 limbers, 72 caissons and around 2,000 horses to paint it was not realistic. It would have meant the board would have been unplayable. I also felt that having token gestures to represent them would be pointless. As for the wheel to wheel artillery, strictly speaking that is not correct. It is base to base leaving spaces between the cannon. The rules allow for this with it's interpenetration rules. That said it would have been nice to leave spaces between batteries but I did not have the space to do so! To cut a long story short, GdB is designed for 1 model = 2 cannon and a figure ratio of 1:20. It recognises space can be limited when using this number of artillery (many other rulesets use 1 gun per battery) and allows you to place batteries in 2 gun depth and calling it massed batteries as a target. I could have done that but felt it would not have the impact of seeing 40 cannon lined up. On the day, those men on top of that ridge looking out at 80 artillery pieces pointing towards them must have been terrifying. I wanted to capture some of that rather than worrying about leaving gaps which in no way affects the rules.
DeleteI am impressed with the number of 28mm guns in your collection by the way. That is a serious collection.
DeleteHi Jon. I'm enjying your blog immensely The AARs read exactly as they should and it's fascinating how, so far, the game is following history, even down to poor old Bauduin getting hit (although, happily, not mortally - so far!) The sight of that Grand Battery is one of the most awesome things I have ever seen on a wargames table: Can't wait to follow your progress and see how things unfold!
ReplyDeleteHi again, Jon. I came up as unknown, but I'm really me!
ReplyDeleteThanks for your kind comments Bob. Although I am following the historical moves this early on in the battle it is interesting that the die rolls and rules seem to be following quite closely what happened on the day. The French are struggling to make headway though in Hougoumont's orchard.
DeleteThat is a superb visual spectacle and a very well written account
ReplyDeleteThank you and well done
Thanks for your comment valleyboyinnz
Delete